
We all know pilots who fall into one of two buckets. Bucket 1 contains pilots who never leave glide range around their home airport. Bucket 2 contains pilots who don’t seem to hesitate at all before they venture out over completely unfamiliar terrain.
Bucket 1 pilots don’t know what they’re missing. Bucket 2 pilots don’t know what they are doing. The former will die of old age but with regrets in their hearts. The latter might not get that far…
These two groups tend not to have too much in common except for one thing: they don’t know their turf. The first group because they don’t need to. The second group because they think they don’t need to.
And then there is a third bucket: it contains those who confidently leave glide range of their home airport, push their boundaries, and do so responsibly. These are pilots who want to live to old age and without regrets.
This article is for those who want to become a Bucket 3 pilot. How can you join? Get to know your turf!
The place I fly from – Boulder, Colorado – is an extreme case in point. The terrain is unforgiving: there are mountains, canyons, woods, and rocks. Boulder was given its name for a reason. Except for airports that are often 40 or 50 miles apart there are few places to land. And even some of the airports have runways too narrow to put a glider down.
What about the prairie? Yes, we do have a flat prairie to the east of the mountains. But it is rarely a good place to soar and the best lift is almost always over the mountains.
A basic rule of thumb for our area: where you can land you can’t soar, and where you can soar you can’t land. (This is a bit exaggerated but you get the point.)
It is no wonder that our club has many Bucket 1 pilots who always stay within easy glide range of our airport. Bucket 2 pilots are rare and a temporary exception: they tend to figure out quickly how get to Bucket 3 or they would not last very long. We also have many pilots who successfully graduated into Bucket 3. It is these Bucket 3 pilots that make the Soaring Society of Boulder one of the most successful cross-country soaring clubs – not just in the US, but in the world.
If you have been a Bucket 1 pilot (wherever you fly) but want to join Bucket 3, what do you have to do and how long does it take?
Are You Ready to Become a “Bucket 3” Pilot?
Let’s acknowledge that you should have some basic competencies as a soaring pilot before you venture further afield. E.g., you should be able to read the soaring weather forecast, tell the difference between a developing and a decaying cloud, center a thermal and don’t lose it. On a good soaring day you should have no difficulty staying aloft, and you should be able to confidently move from thermal to thermal. Some pilots (usually younger ones) learn to get there within one or two seasons and about 50-100 hours of flying. Others may need a bit longer.
Three years ago, at the end of my first season flying from Boulder, I was one of those Bucket 1 pilots, eager and ready to figure out how to get to bucket 3. My logbook at the time showed a total of 200 flights and 100 hours of soaring as pilot in command. 70 flights and 60 hours were in that one season; the rest dated back to my teenage years in the 1980s. All my flights up to that point had been local, i.e. within easy glide range of the takeoff airport.
What It Means To Know Your Turf
Cutting the cord to get back to your home airport is a huge milestone for any soaring pilot, second only to their first solo flight. It can also feel very intimidating. But you can remove a lot of the trepidations if you know what you are doing.
This means: be prepared before you venture off into the unknown! You have to know the terrain that lies ahead and where you might find lift (or sink). Most important of all: you must know exactly where you can land if the expected lift does not materialize.
Knowing where to land, how to ensure that you can always get there, and where you are most likely to find lift is at the very core of what it means to know your turf!
How To Learn Your Turf?
If you are new to cross-country soaring, chances are that you have some homework to do. The same steps apply before you fly in an unfamiliar area. As you gain experience you will become quite efficient in your learning process but that does not mean that should ever skip any of the following steps:
-
- Research viable landing sites
- Understand how high you need to be wherever you fly
- Familiarize yourself with typical energy lines (i.e. where to find lift)
Each of these three steps is discussed below.
My recommendation is that you select the most suitable soaring area beyond your home field’s glide range. Let’s call it your Task Area. Then you complete the three steps before pushing your boundaries further. Keep your initial Task Area reasonably small – otherwise you might become overwhelmed and give up before you even make your first cross-country attempt. Expand your turf one step at a time!
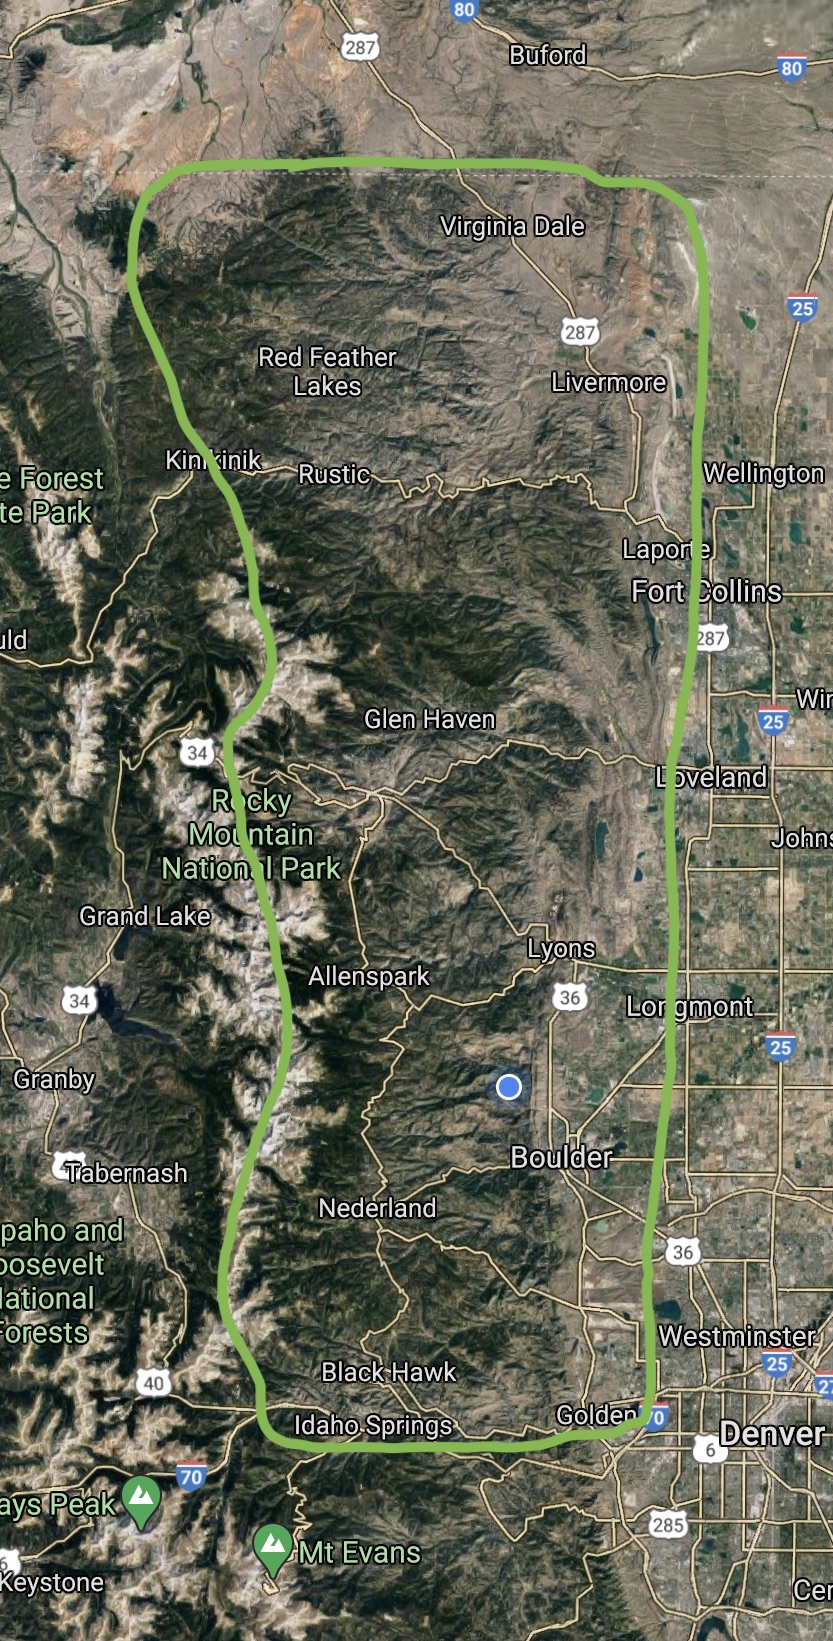
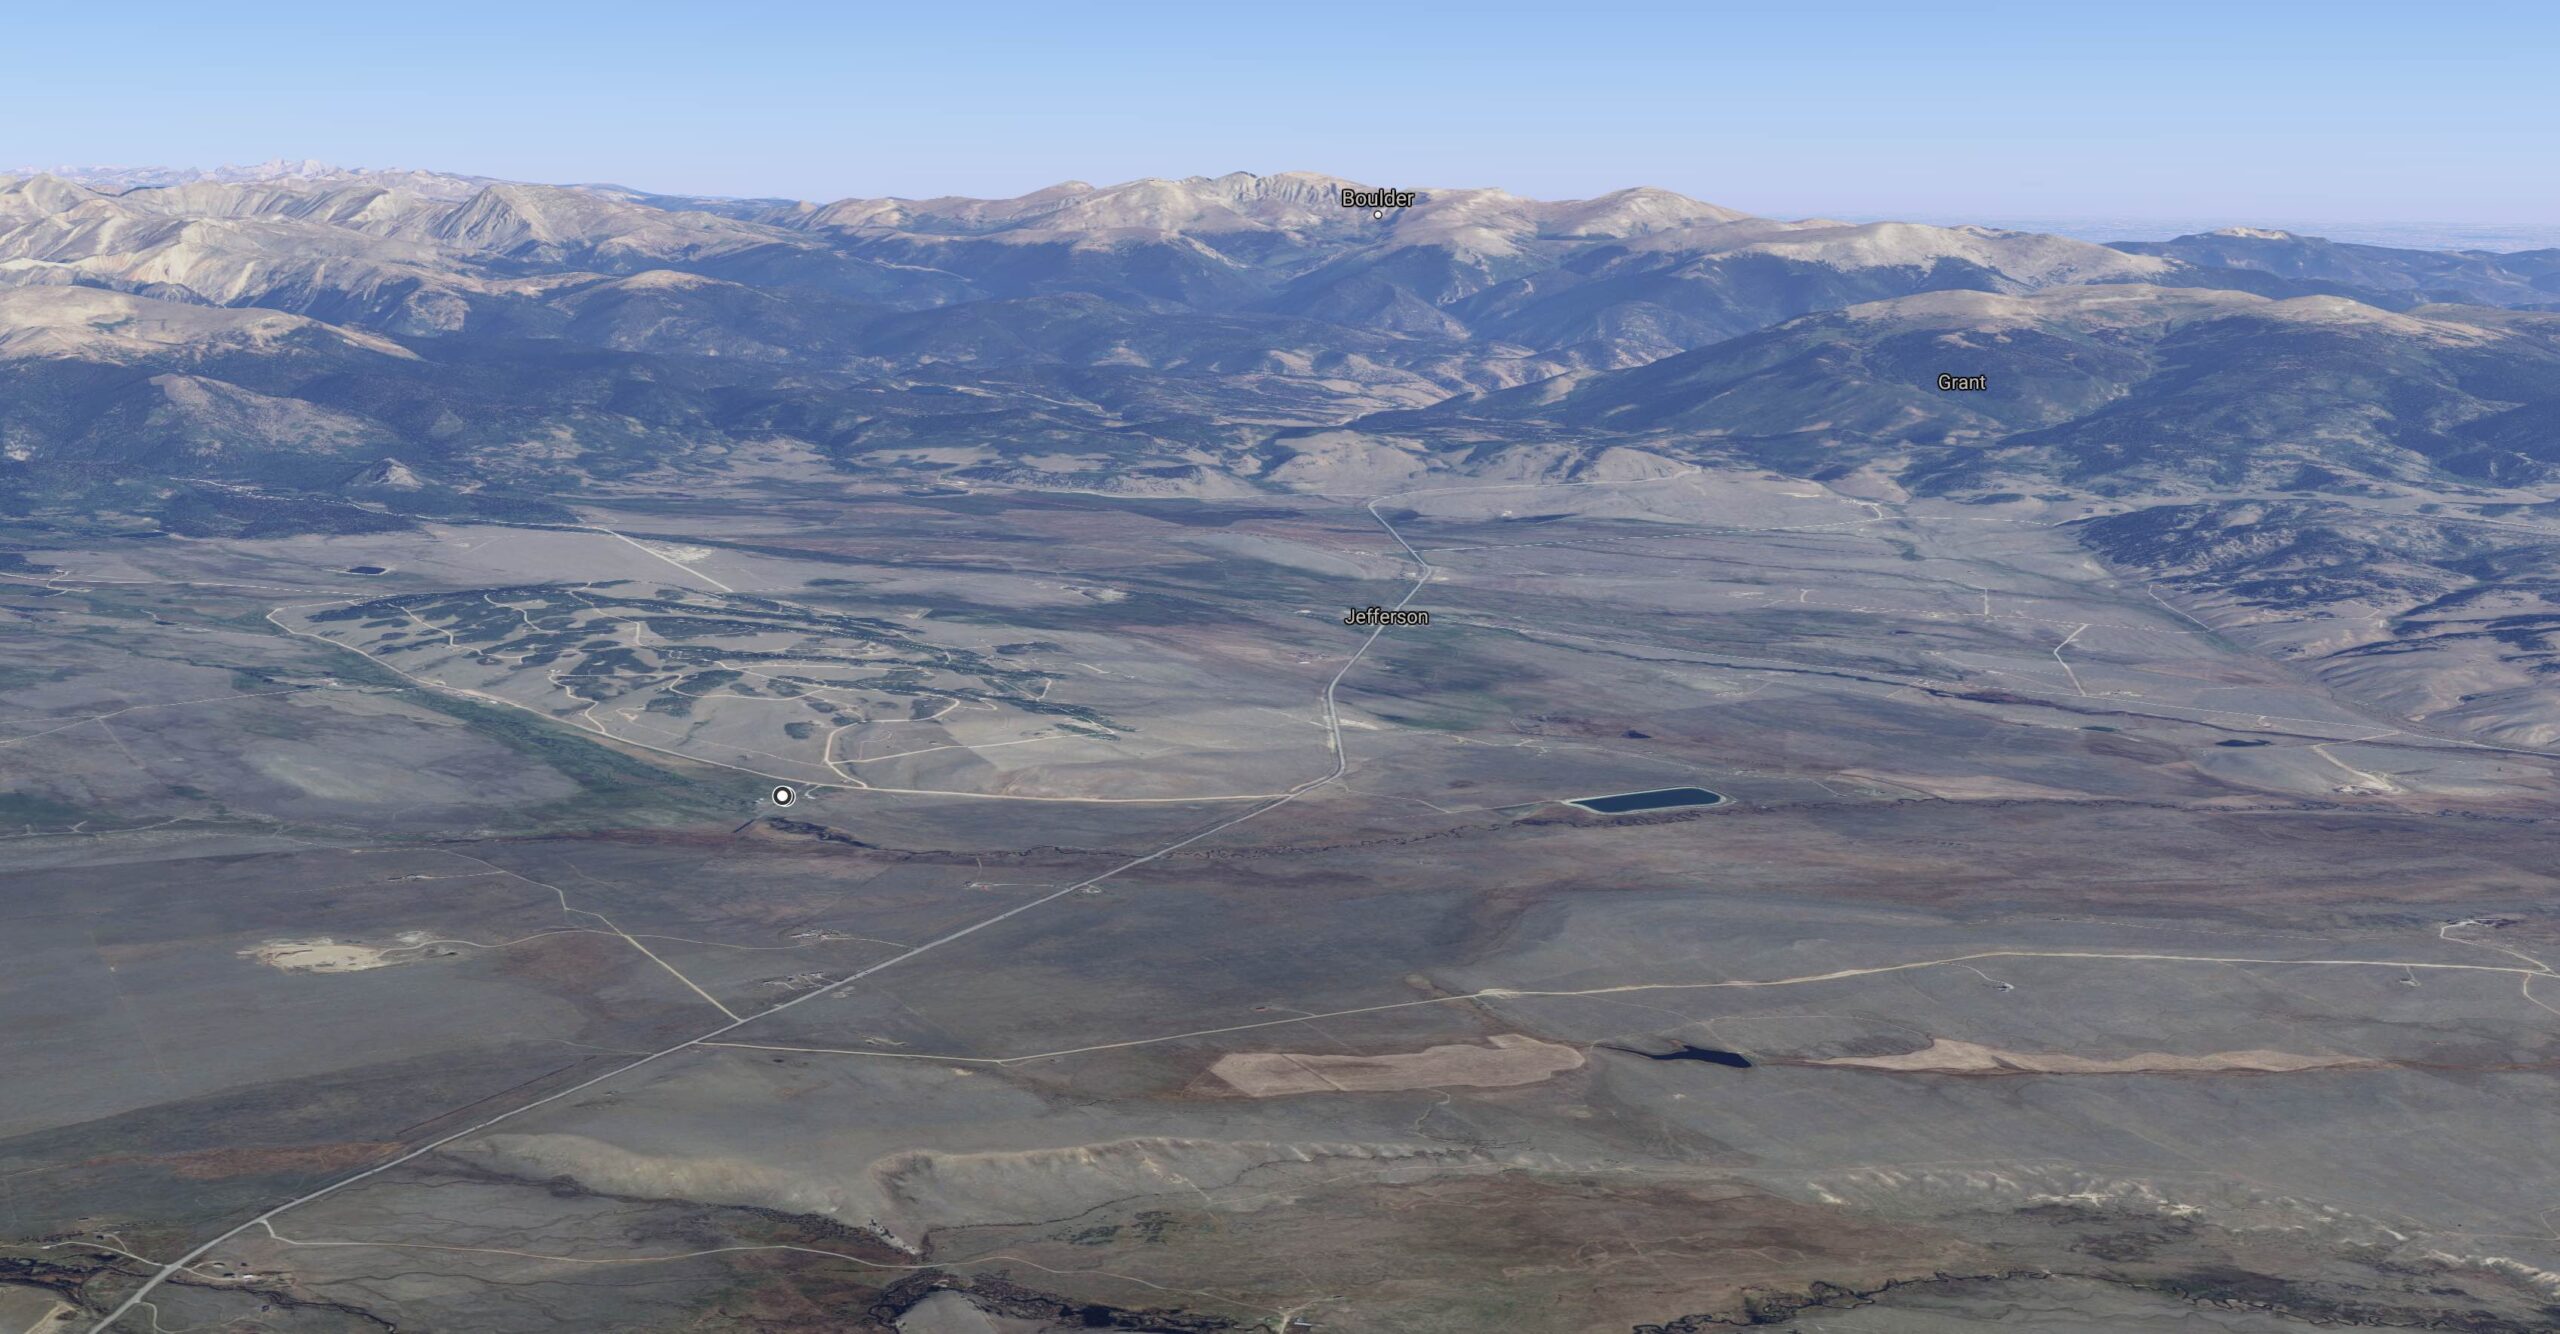
E.g., for pilots flying from Boulder, Colorado, it may be best to initially concentrate on the area east of the Front Range between I-70 and the Wyoming border. This area is easily accessible, offers excellent soaring conditions, and provides access to several landable airports. Only when you are completely familiar with this particular area, i.e., if you know your turf, does it make sense to research additional – and more demanding – areas to the south, west, and north, and north-east.

If you don’t already know what the best area is for your first cross-country missions, I suggest you ask the more experienced pilots at your soaring site. You want to select a task area that best meets the criteria just described.
1. Research Viable Landing Sites
Assuming you have prioritized and selected a task area for your first cross-country flights the first thing to do is to research where you can safely land.
a) Select suitable airports in your task area
Airports in your task area are easy to identify with the help of a sectional map (or an online version thereof – e.g. skyvector.com). Most will also be marked on the local waypoint database that you can find on the Global Turnpoint Exchange.
However, not every airport is suitable for landing a glider, or for your glider in particular.
Towered airports tend to have big and wide runways but they are not glider friendly. I don’t like the stress of approaching a busy airport and explaining to a controller (who may know very little about gliders) why I am unable to stay in a holding pattern and need to land immediately. I will use such an airport if I have to, but it’s not something I would recommend to anyone on their first cross-country flights.
Smaller public airports are usually the best choice but you have to know how wide the runways are and if the width will be sufficient for the wingspan of your ship. A 60 foot-wide runway may or may not be sufficient for an 18 meter (59 ft span) glider: you also need to know if there are runway lights and whether they are immediately at the runway’s edge or located several feet to either side. If you zoom into satellite images on Google Earth you can usually see the lights. You can then use the online measuring tool to check the distance between them.

Private airports can also be acceptable choices but you need to be extra careful during your homework. Often they are built and maintained for bush planes with high wings and narrow spans. The terrain may be too uneven for the long and low-hanging wings of a glider, or the ground may be rising next to the edge of a narrow runway.
Online research is a good way to check them out but be very careful not to overlook anything! You can also never be certain that there aren’t any new obstacles when you turn up on final approach: e.g., there may be tall vegetation next to the runway that wasn’t there when the satellite image was taken. A fence may have been erected. Or a huge bison, a vehicle, playing children, or some other unexpected obstacle may appear in the middle of the runway when you arrive. If you land there, most private owners are likely to be welcoming but you may also find the owner absent and your retrieve crew stuck behind locked gates a long driveway away.
Under no circumstances should you trust that private airfields marked on the sectional map or on the waypoint file are suitable. They might not even exist anymore and were just never removed from the map (or the waypoint file)!

Public airports are generally the best choice for landing out because they tend to present fewer surprises. If the runway is long, smooth, and wide enough for an aero-tow take-off they may also offer the extra conveniences of an aero-retrieve.
b) Where to look for suitable land-out fields
In areas where suitable airports are far apart of poorly located relative to the best soaring conditions, land-out fields can offer a safe alternative.
In some soaring areas fields are large and plentiful. E.g., driving through Texas I noticed that many fields are bigger than most airports and much of the area is as flat as a pancake. At certain times of the year you can land practically anywhere. Land-out Mecca!
However, if your soaring area looks more like Colorado than Texas, it pays to be strategic and ask: are there suitable landout fields where you might need them the most? Here are some prime examples:
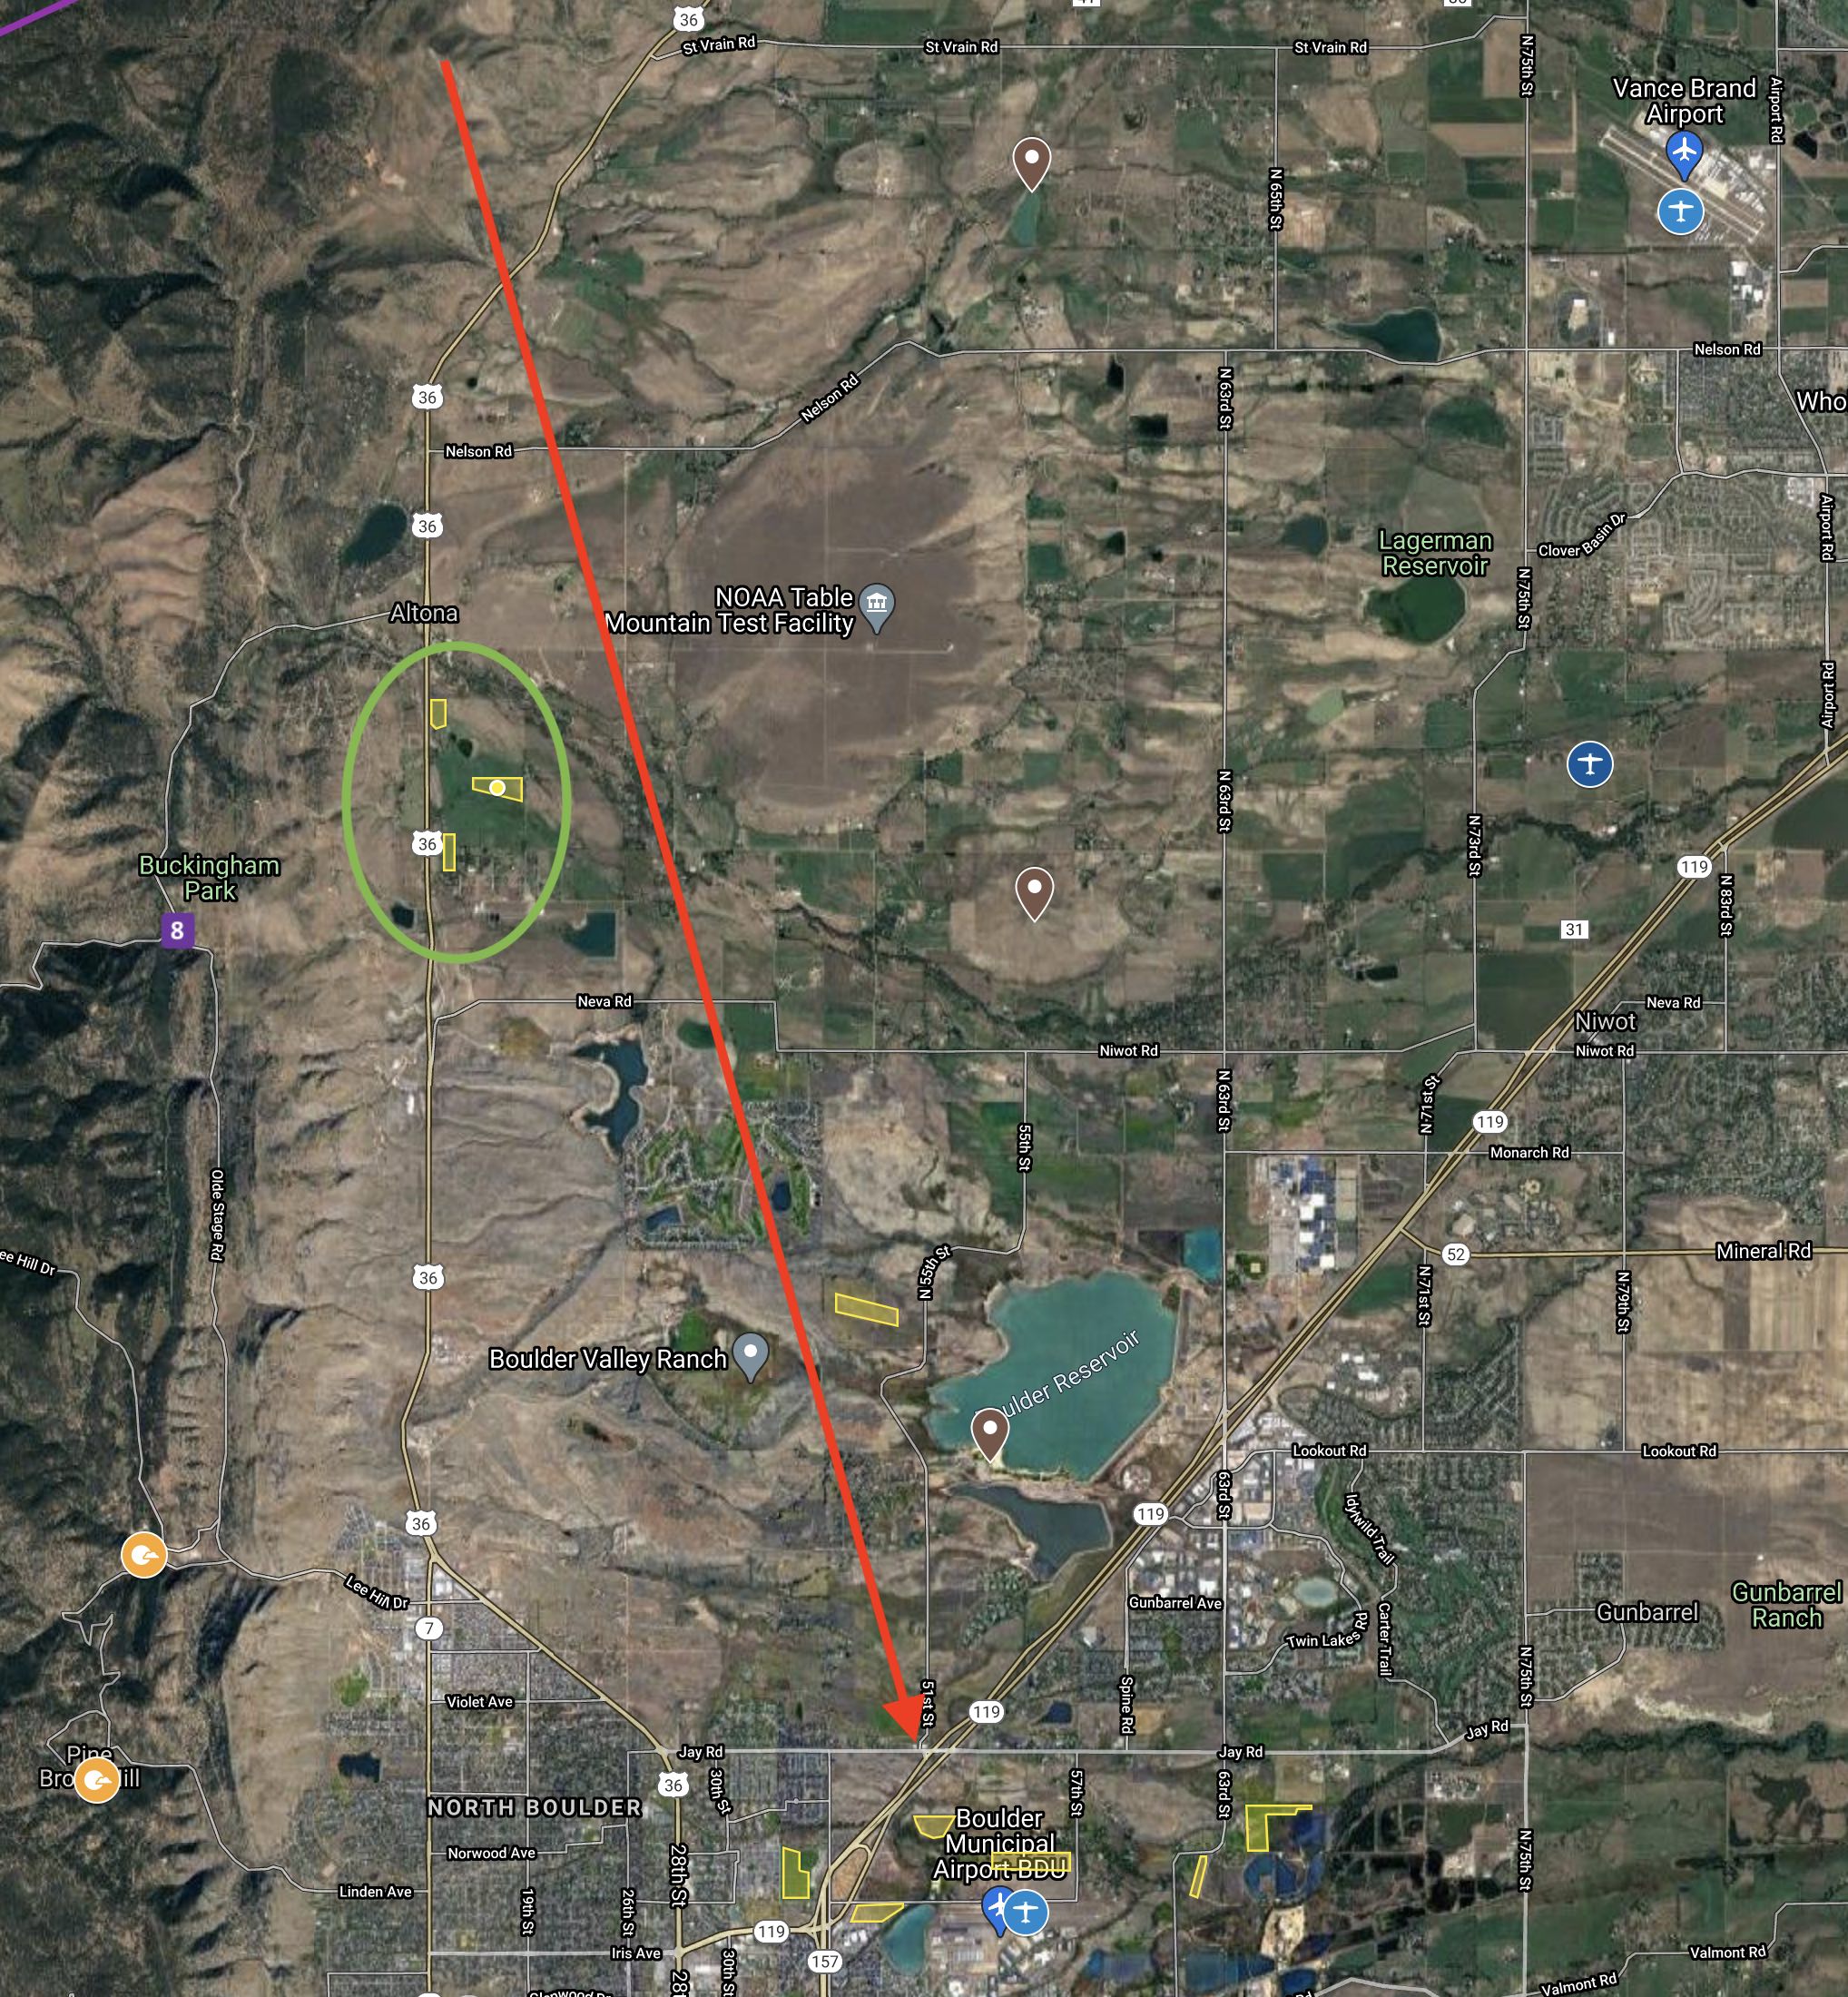
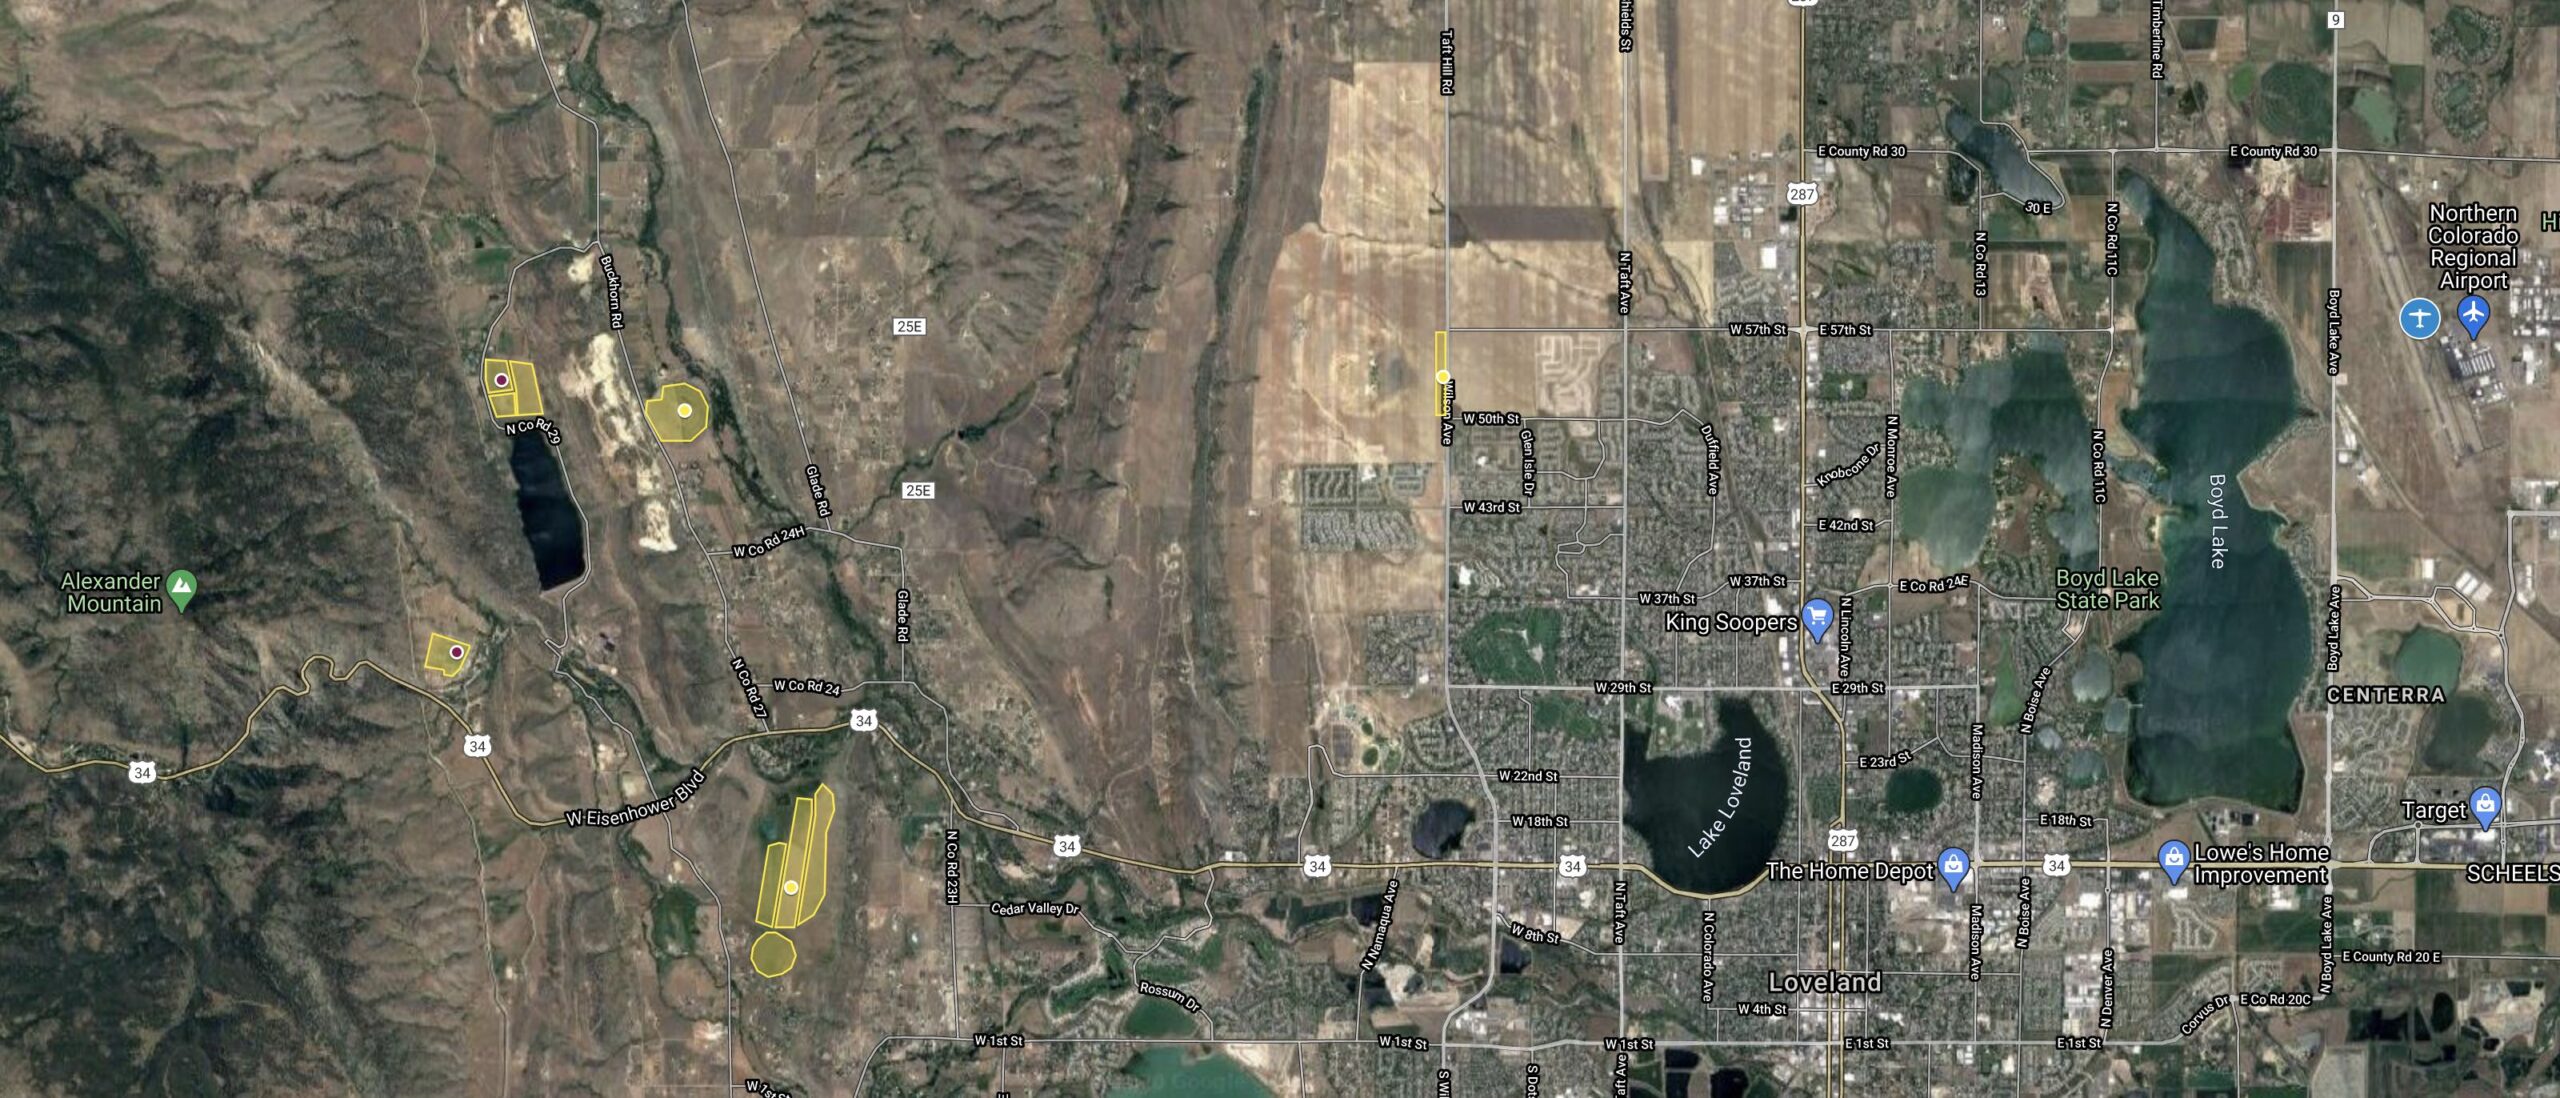
Along your final glide path: a common scenario is that you return from a cross country flight at a time of day when the lift is dying. If you are low and hit unexpected sink after you’ve passed the last airport on route, where would you land? E.g., for those flying north from Boulder it is worth researching specific fields between Lyons and Boulder when Vance Brand airport is no longer an option.
Along the base of the hills and in the valleys: soaring pilots normally fly over the hills and mountains because that’s where the lift tends to be best. If our strategy is to always stay within glide range of a suitable airport, we may be forced to quit searching for lift over the hills and fly out into the plains to an airport while we are still quite high. This means that having to land at that airport becomes very likely because it is usually much harder to find lift over the plains than over the hills. However, if we positively know where we can safely land right at the base of the hills without necessarily having to reach an airport we can continue to search for lift over the hills, thereby greatly increasing the odds of avoiding a landout altogether.
Before major terrain obstacles: if there are terrain obstacles along your flight path be prepared for the possibility of not being able to clear them. A prime example for Boulder pilots is the northeast corner of South Park: Mount Evans is a big terrain obstacles for pilots returning from the southwest and if pilots fail to find lift to get over the mountains they must know the fields where they can safely land.
Across hostile terrain: glider pilots tend to fly along the same flight paths again and again because energy lines tend to set up in the same places (see chapter 4 below). If such flight paths include long stretches over largely unlandable terrain (e.g. undulating hills, big forested areas, etc) it can be vital to know the precise location of the few places where a somewhat safe landing may be possible.
E.g., for Boulder pilots flying towards Wyoming one such stretch is between Estes Park and the Laramie valley: 50+ miles of mountains, woods, rocks, and canyons with the nearest suitable airport often 30+ miles away. The only (private) airstrip at Crystal Lakes is too narrow for gliders but it is worth knowing the exact location of the only two meadows where an emergency landing might be possible.

c) How to Research Specific Landout Fields
After deciding where to look for fields you need to do the work of identifying and verifying them. If you are confident about a specific field in a strategic area you should load it into the waypoint database on your flight computer. This is the best way to quickly locate the field when you’re flying.
Starting Point: a good place to start is the Worldwide Turnpoint Exchange. Locate the waypoint file for your area and view it with your flight planning software or in Google Earth. Waypoint files are likely to include some landout fields. Just know that these were put together by volunteers, often many years ago, and you must never rely on them. They are just a starting point for your own research!
Satellite Maps: the next step in your research is to examine satellite imagery on Google Earth or Google Maps. Familiarize yourself with the 3-D view and the use of the distance measuring tool. If you locate a potential field in a strategic area, try to glean as much information as possible from the satellite image.
-
- View the field from all sides in 3-D view to identify any slope. If a slope is visually noticeable the field will almost certainly be unusable.
- Next, measure the length and the width of the field with the online measuring tool. Then zoom in and carefully examine the surface: is it possible to tell what kind of field it is?
- Can you spot farm animals? Look for any visible rocks, buildings, ditches, irrigation equipment, or other ground obstacles. Demarcation lines across the field (e.g. indicated by different shades of color) could suggest a fence which will not be visible from the satellite image.
- Also check for power lines in the area (these may be impossible to detect but shadows sometimes give them away). If there is a road next to the field, assume that a power line may run along the road.
- If there are prevailing winds in the area consider what impact they are likely to have on the landing direction.
- Imagine how you would fly an approach into the field to identify any terrain or approach obstacles.
- Finally, examine the road access. If a field looks good but seems inaccessible for a glider trailer it may just be of use in an emergency.
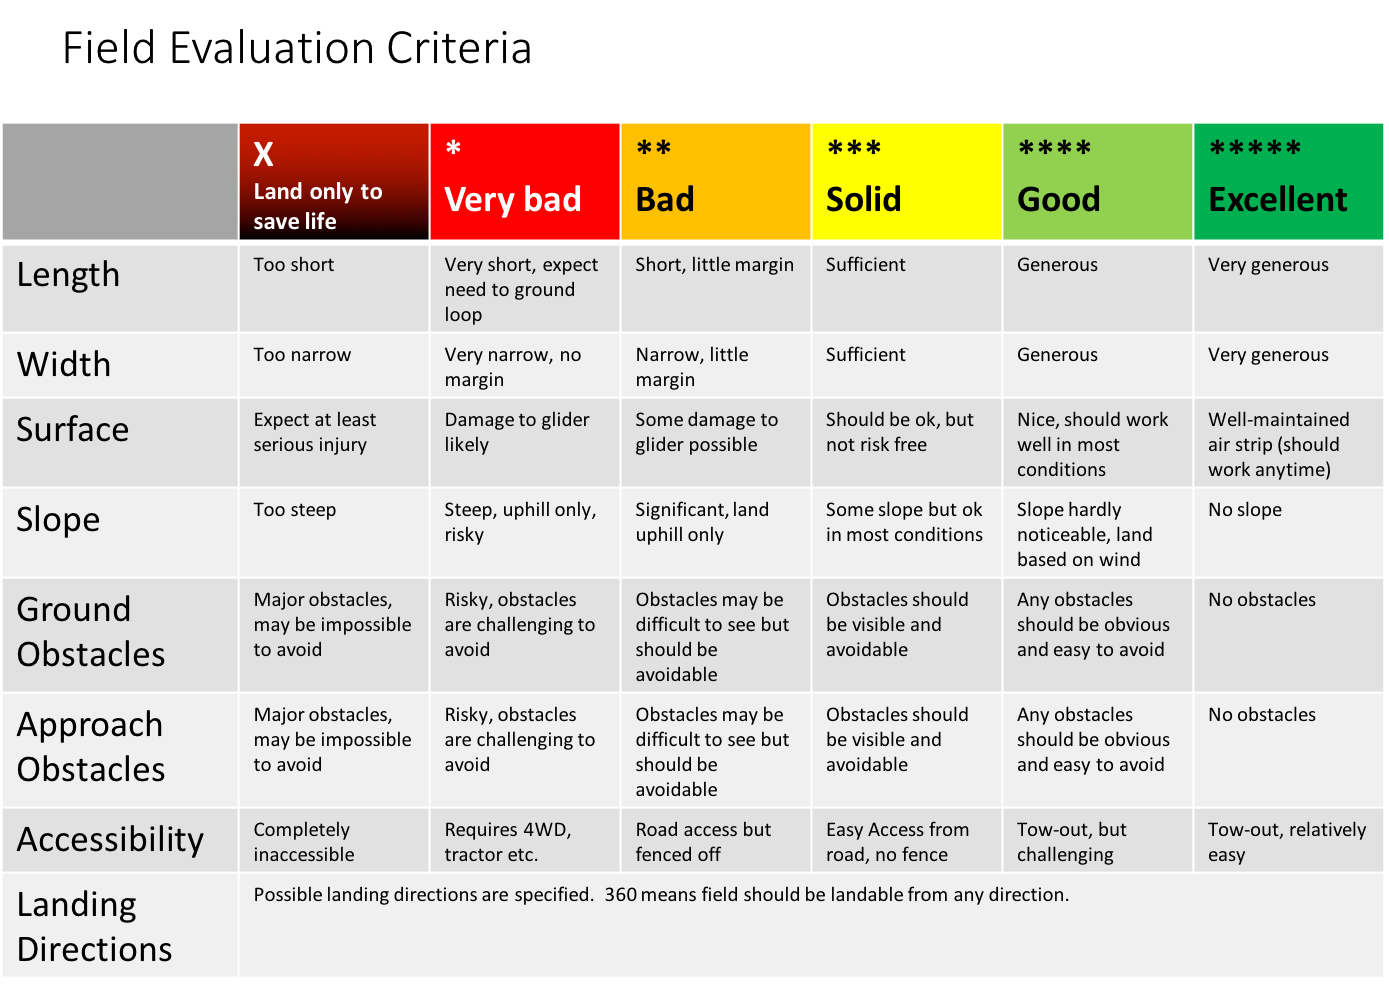
If you like a field and think it is worthy of further examination, try to do a preliminary evaluation and take notes of anything that may be of concern. I note the GPS coordinates for each potentially viable field and make some initial evaluative guesstimates on a 5-point scale for each of the following characteristics: length, width, slope, surface, potential ground obstacles, approach obstacles, and road access.
I also note potential landing directions. If a field has some clear deficiency I may classify it as “emergency only”. When I later visit a field on the ground I revise my initial evaluation – this process can be eye opening because the reality always looks different than the satellite image.
Examining the first few fields using this method will take a while but you’ll quickly get better at it. Note, however, that you can never positively identify a field as suitable just from an online review!
Visit and Verify: the only way to get reasonably confident about the suitability of a field is by visiting it.
There are two good ways to do so. The most thorough one is to visit the field on the ground. Ideally you would want to walk around in the field but doing so may involve trespassing and attract unwanted attention. But even just stopping next to the field and looking at it from the road will tell you a lot of things you might have missed.
Small to medium-sized rocks, uneven terrain, fences, ditches, or power lines are typical examples. You might find out that the farmer is now growing tall crops in what previously looked like a hay field. You may find the field full of cattle. You may even find that there is no longer a field at all but a new housing development or a gravel pit..
Visiting fields makes you appreciate the static nature of a satellite image and is a powerful reminder for why you must not blindly trust your online research!

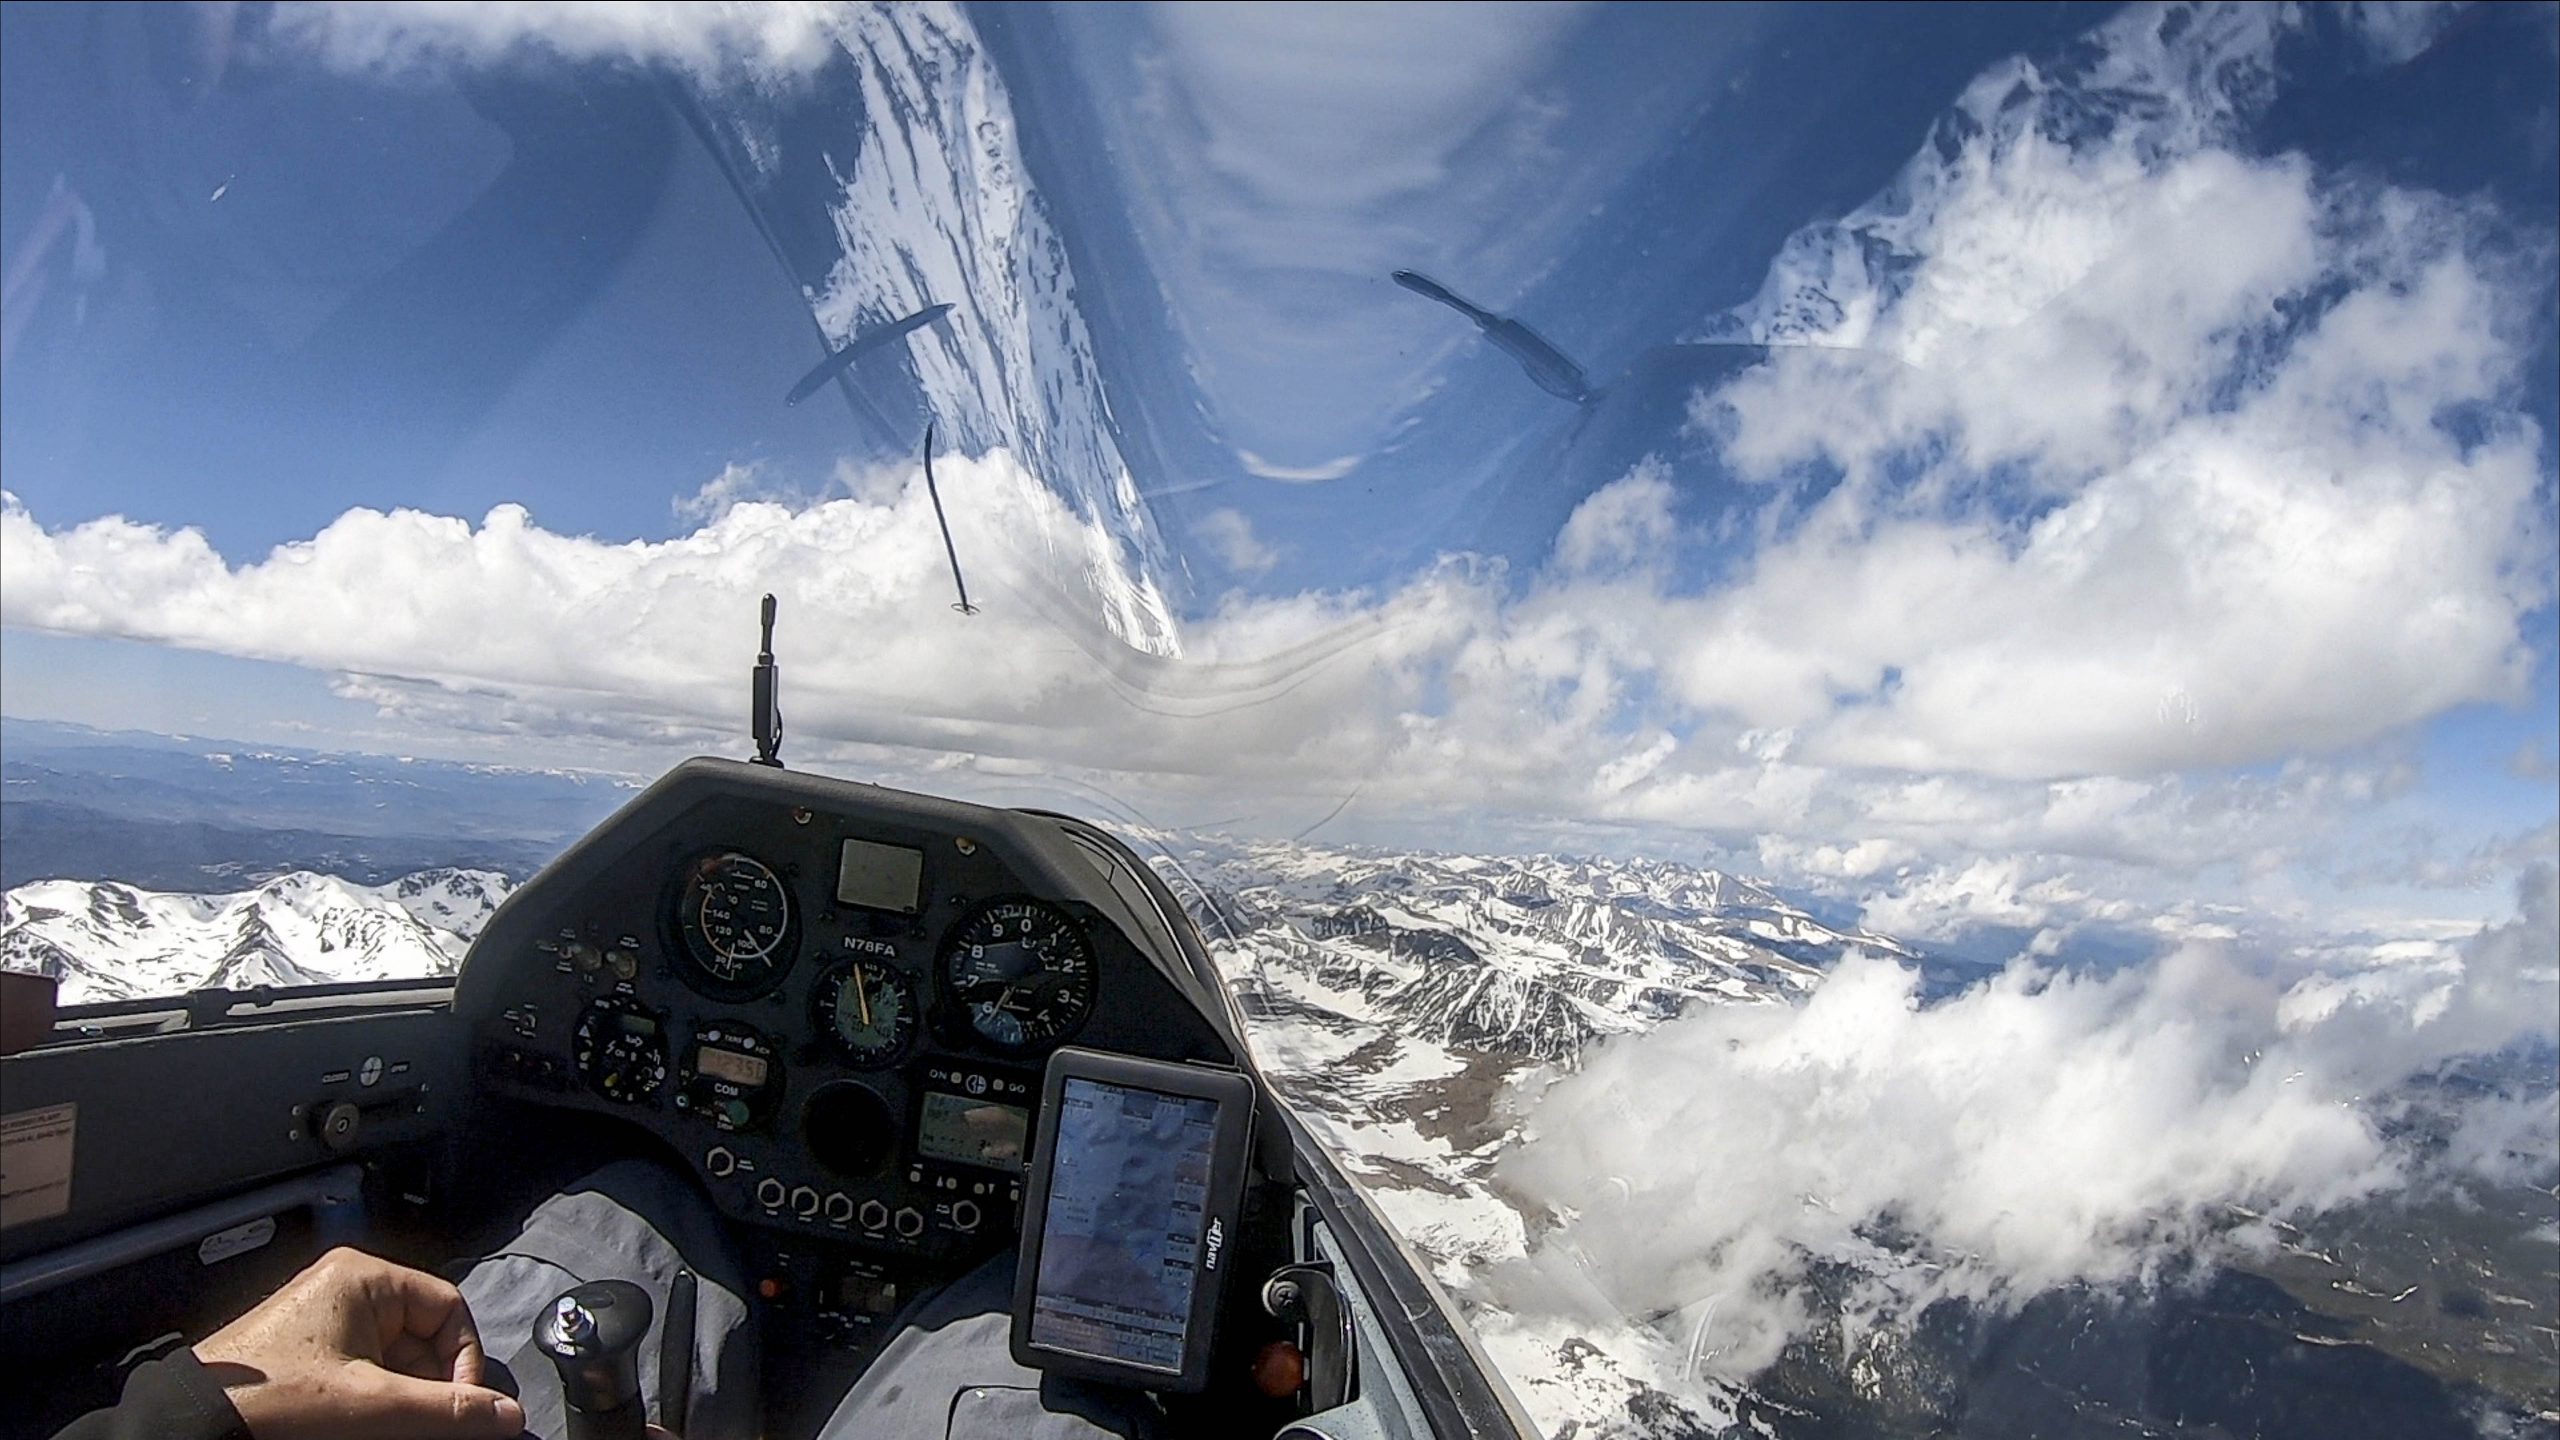
A good alternative (or complement) is to visit fields by air with a touring motor glider or a small power plane. You might not be able to see everything as well as during a ground visit but you will gain another invaluable perspective: you can fly low approaches into the selected field with the engine idling and then go around. It is easy to imagine what the approach would feel like in a glider. Touring Motor Gliders are particularly well-suited for this endeavor. Another advantage of this methodology is that you can see many fields within just one or two hours whereas a road trip to visit the same fields on the ground might take one or two entire days.
Can you not also examine fields from your regular glider the next time you fly over the same area? Well, you can identify where they are (and you should do that) but you will normally not be able to get close enough to learn much more than what you can learn from viewing satellite images. In Colorado, where we typically fly many thousand feet above the ground, almost every mountain meadow looks easily landable until you get low and close and it becomes obvious that you’d be lucky to survive if you had to put your glider in the middle of it.
Whether you do ground visits, air visits, or both, you should also familiarize yourself with the typical crops and their growing season in your area: what is being grown? how tall does it get? when is it harvested? is the ground soft or firm? In other words: which of the fields will be (most) suitable to land in at the time of your flight and how do you recognize suitable fields from the air? This is even more important if you do your ground visits in the off-season. Fields look vastly different in winter than during the peak soaring season. You should also research the types of irrigation systems being used (if any) and how you can avoid them. Most irrigation systems will not stop when a glider shows up in the field and the machinery might just roll over it.
d) Practice With Condor
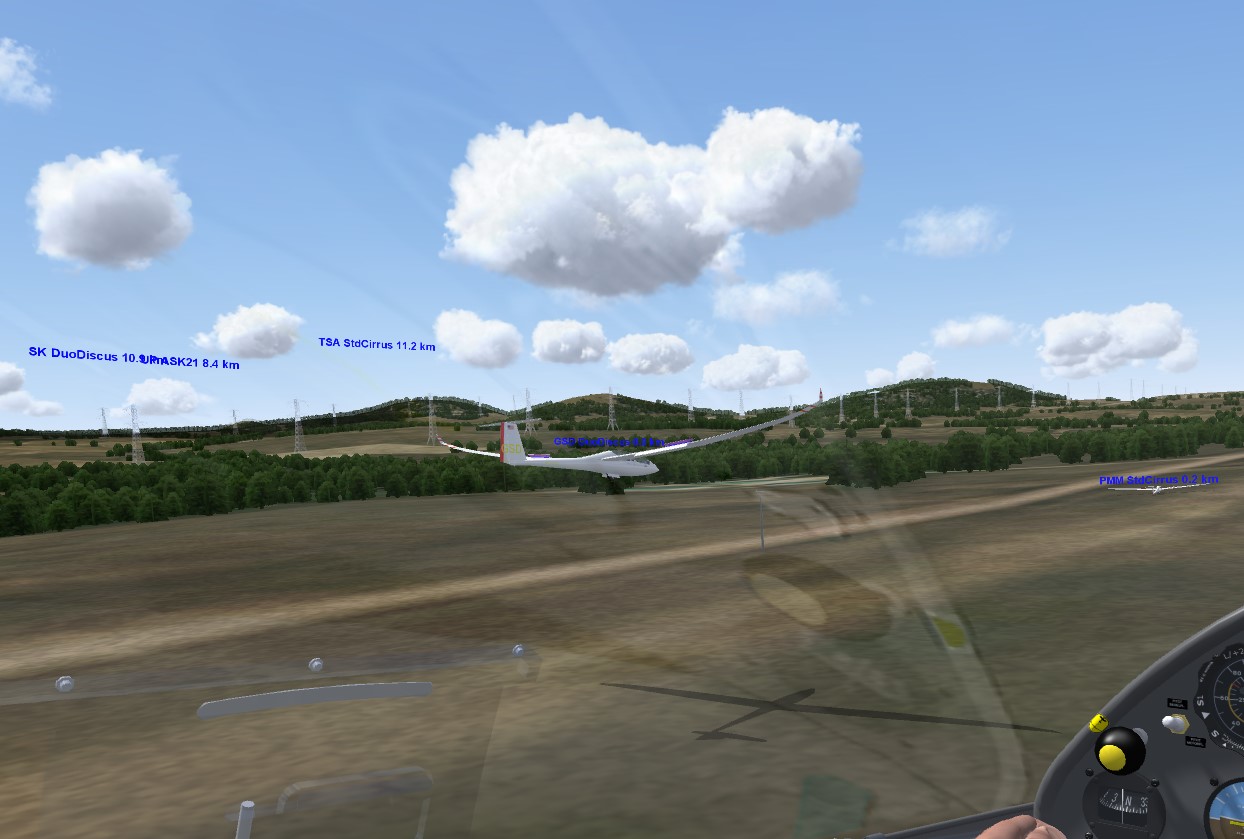
This isn’t a necessary step but it is super useful and fun. If you have access to the Condor Soaring Simulator and there is a scenery for your soaring area, you can practice landing in your chosen fields. This has multiple key benefits:
(1) You become familiar with the visual view of the most hostile terrain from “down low” – a perspective that you hope to never see in real life.
(2) You experience what it would be like to land in the fields you have selected, and you test the approaches with different gliders and under different wind conditions. If you ever have to use one of them, you’ll be better prepared and know what to do.
(3) You can repeat this exercise over and over again at no risk to you or your glider until you feel confident that you would not screw it up.
(4) You gain valuable practice for how to land in small fields – how to judge your altitude above ground, how to control your airspeed and glide path, how to clear obstacles, how to deal with cross winds and turbulence, and how to touch down with minimal energy.
These skills come in handy for all your future real-life landings and are invaluable if you have to put your glider into any small field.
If you do practice with Condor, remember to never use it for the purpose of field selection! Condor will allow you to land in lots of places that are not at all landable in real life! You must select your fields in real life and use Condor only for landing practice!
Here is a video recording of a Condor flight to a number of emergency-only fields in the foothills of the Rocky Mountains. This shows you how to use this tool. It is a lot of fun!
2. Understand How High You Need to be Wherever You Fly
One of the most fundamental safety rules in soaring is to always keep an airport or some other suitable landing site within safe glide distance.
However, applying this simple rule isn’t always easy.
a) Benefits and Challenges of Relying on Your Flight Computer
When you’re flying, the easiest method is to use the final glide calculator of your flight computer.
E.g., if set up to do so, my Oudie flight computer will display the expected arrival altitude above a specific airport or landout field if flying at the selected McCready setting (MC).
This works pretty well assuming that you selected the correct polar for your glider, that you accurately entered the weight of the pilot and water ballast, that you used reasonable bug settings, that you set an appropriate safe arrival altitude, and that you fly in accordance with MC. It also assumes that there is no vertical air movement along your flight path, especially no unexpected and prolonged sink.
It took me about an entire soaring season to learn to trust my flight computer. This has a lot to do with the fact that I did not trust myself to program it correctly. Remember the standard rule for any analysis or machine output: if you put garbage in, garbage comes out!
I also learned to appreciate the impact of different MC settings (a higher setting gives you some extra safety margin because you can conserve energy by slowing down), and the significance of lift or sink along the way. One of my more memorable learning experiences in this regard was on this long and somewhat exciting final glide.
Anyway, there are a lot of reasons for why I do not recommend that you simply trust the flight computer on your first cross-country flights!
b) Create Your Own Glide Map with Glide Rings
I recommend you use the off-season to study maps and determine for each part of your chosen task area how high you need to be to safely reach the next safe landing area.
How do you do that? You probably learned a simple and reliable method as part of your initial flight training: you take a map of your task area, mark the chosen airports and any personally verified landing fields, and then use a pair of compasses to draw concentric circles around each chosen landing site. Each ring should indicate the minimum altitude that you need to be at in order to glide to the landing site and arrive there at a safe pattern altitude.
First, you pick a safe pattern altitude. I recommend at least 1500 ft, especially for airports or fields where you have not landed recently. For busy airports you may want to add some additional margin.
Then you pick a conservative glide ratio that is appropriate for “sinky” conditions. Since you’re doing this exercise in the off season, you don’t know what the weather will be like on the day you’ll be flying, so err on the safe side. I have encountered 10+kt sink for stretches of five miles or even more. What’s conservative also depends on your soaring area. This excellent booklet on mountain flying recommends to use half of your glider’s best glide ratio. In benign conditions this will feel overly conservative. In extreme conditions it may not be conservative enough! You may also want to discuss this with your flight instructor.
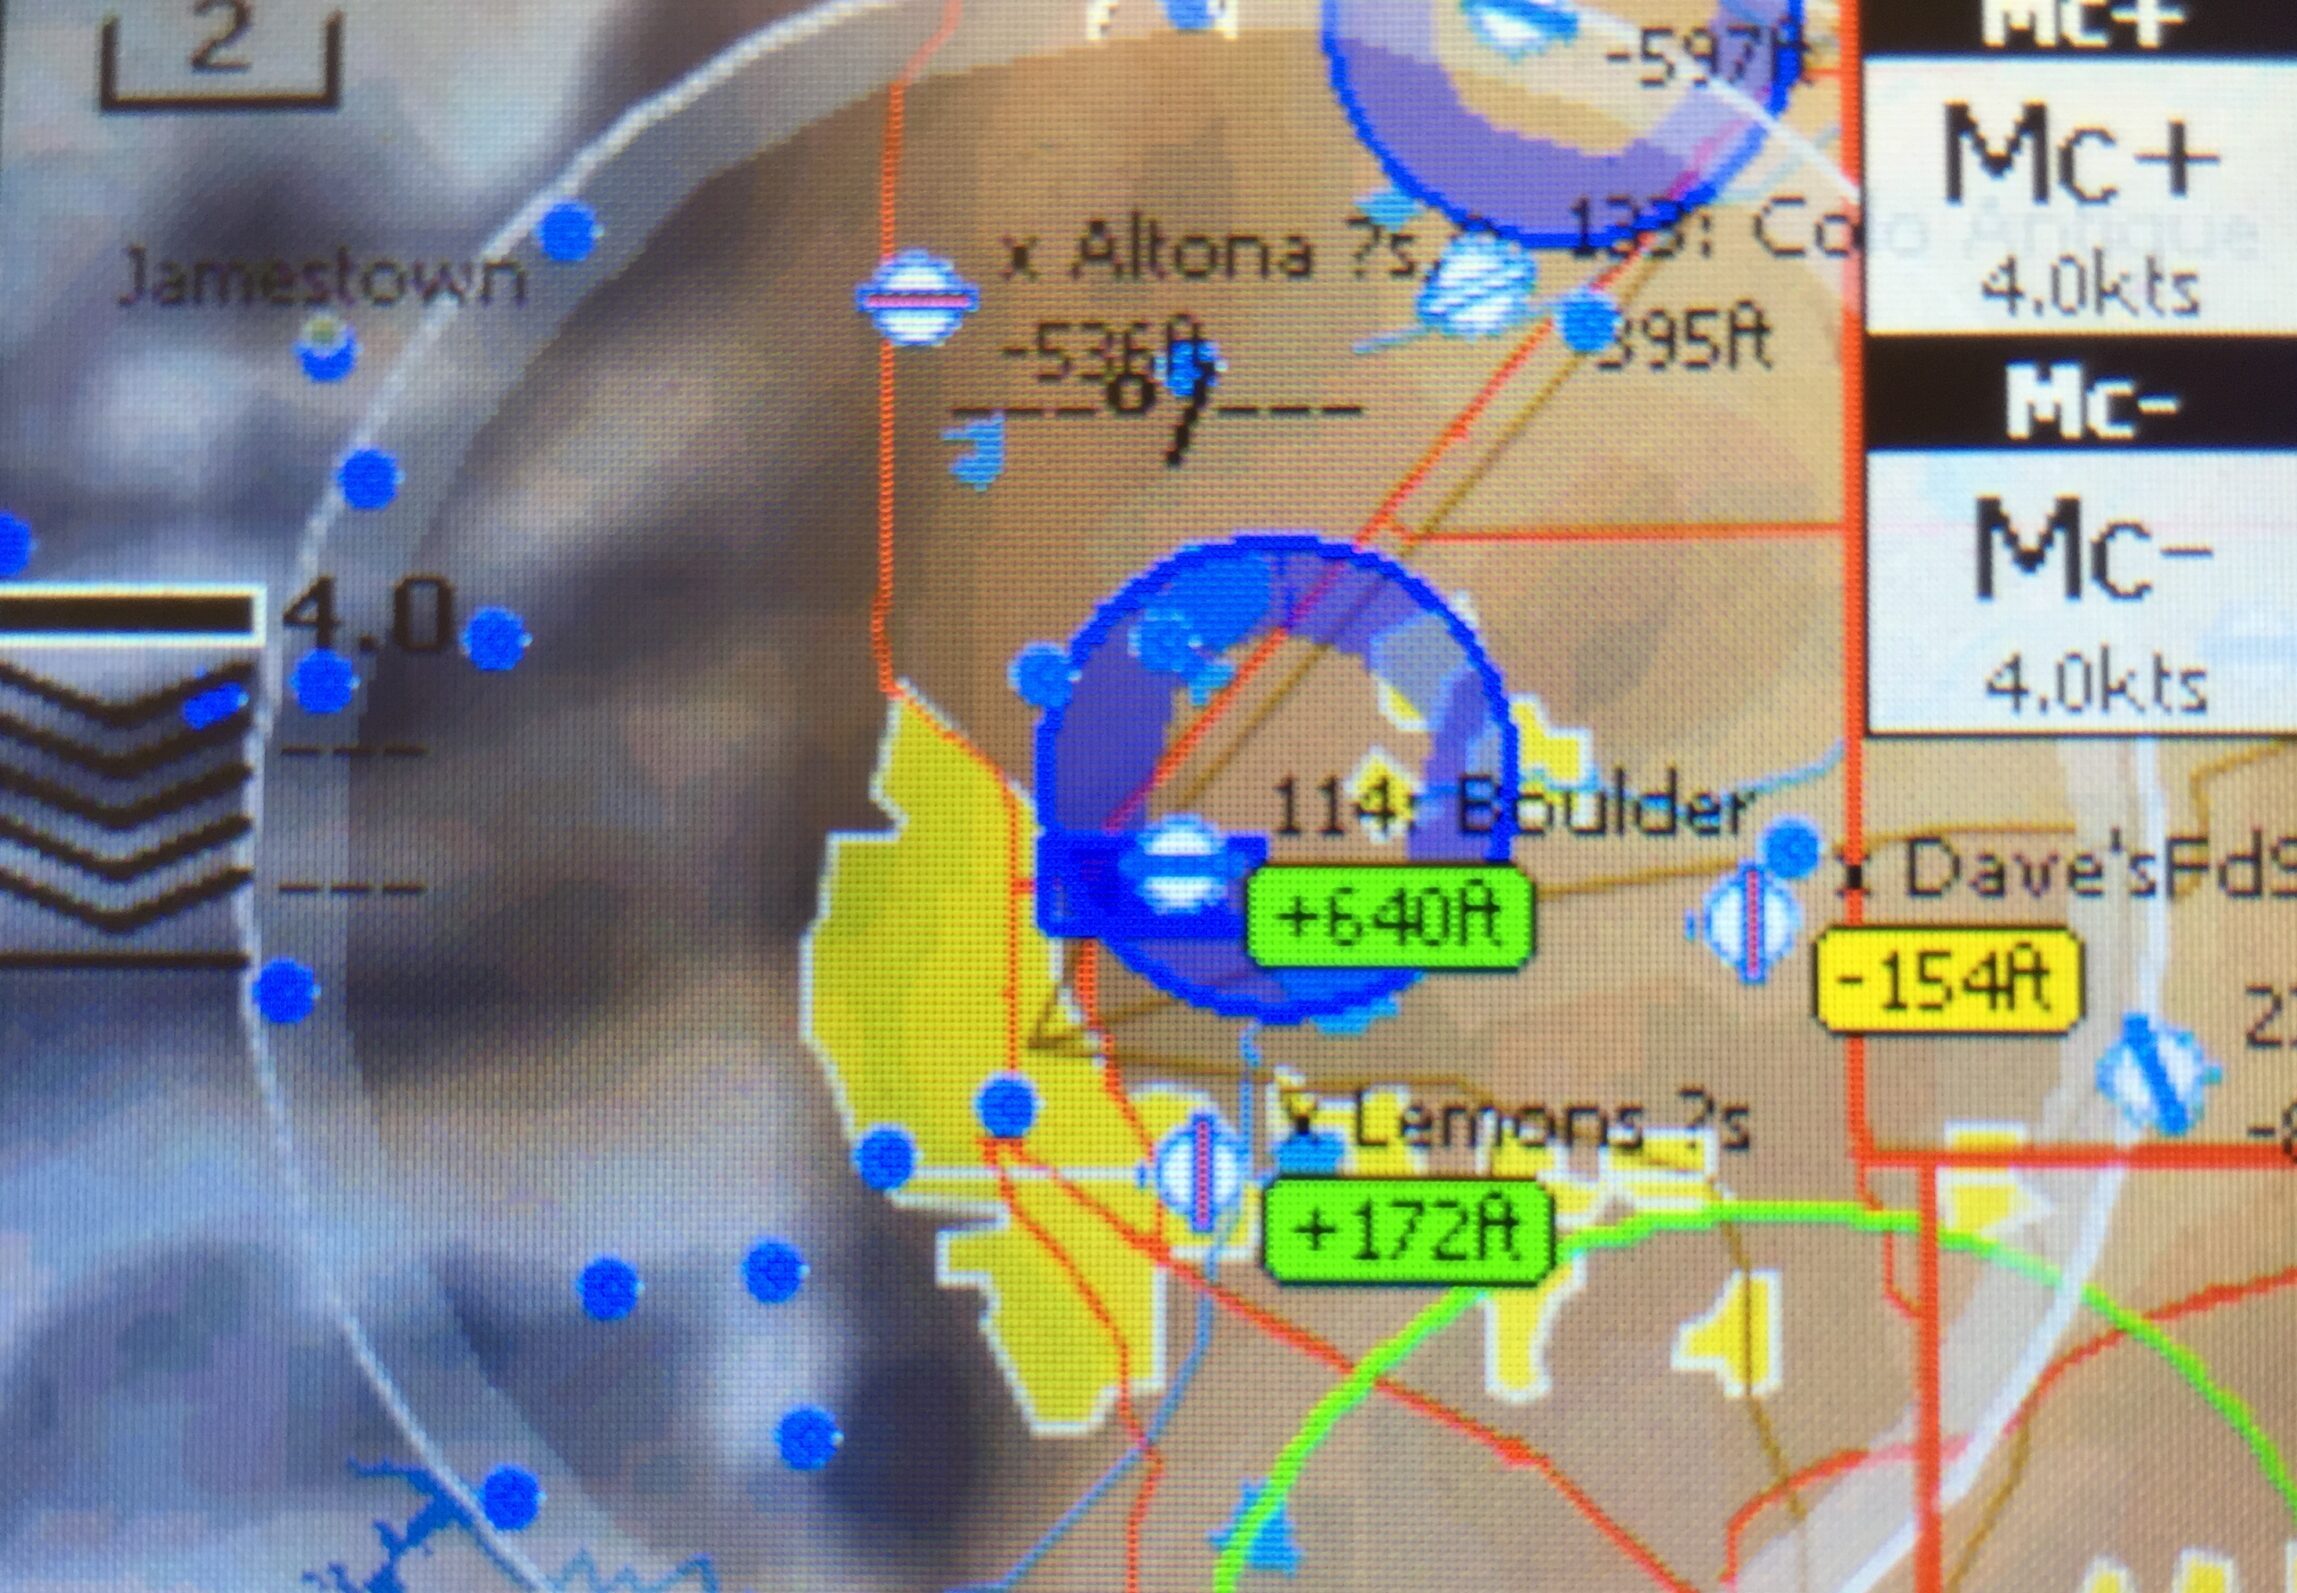
For Boulder I have created such a map with the help of Glideplan, a special piece of software that I bought for this purpose. Note that this map is designed for high performance gliders and assumes a glide ratio of 1:27. It may thus not be as conservative as you want it to be!
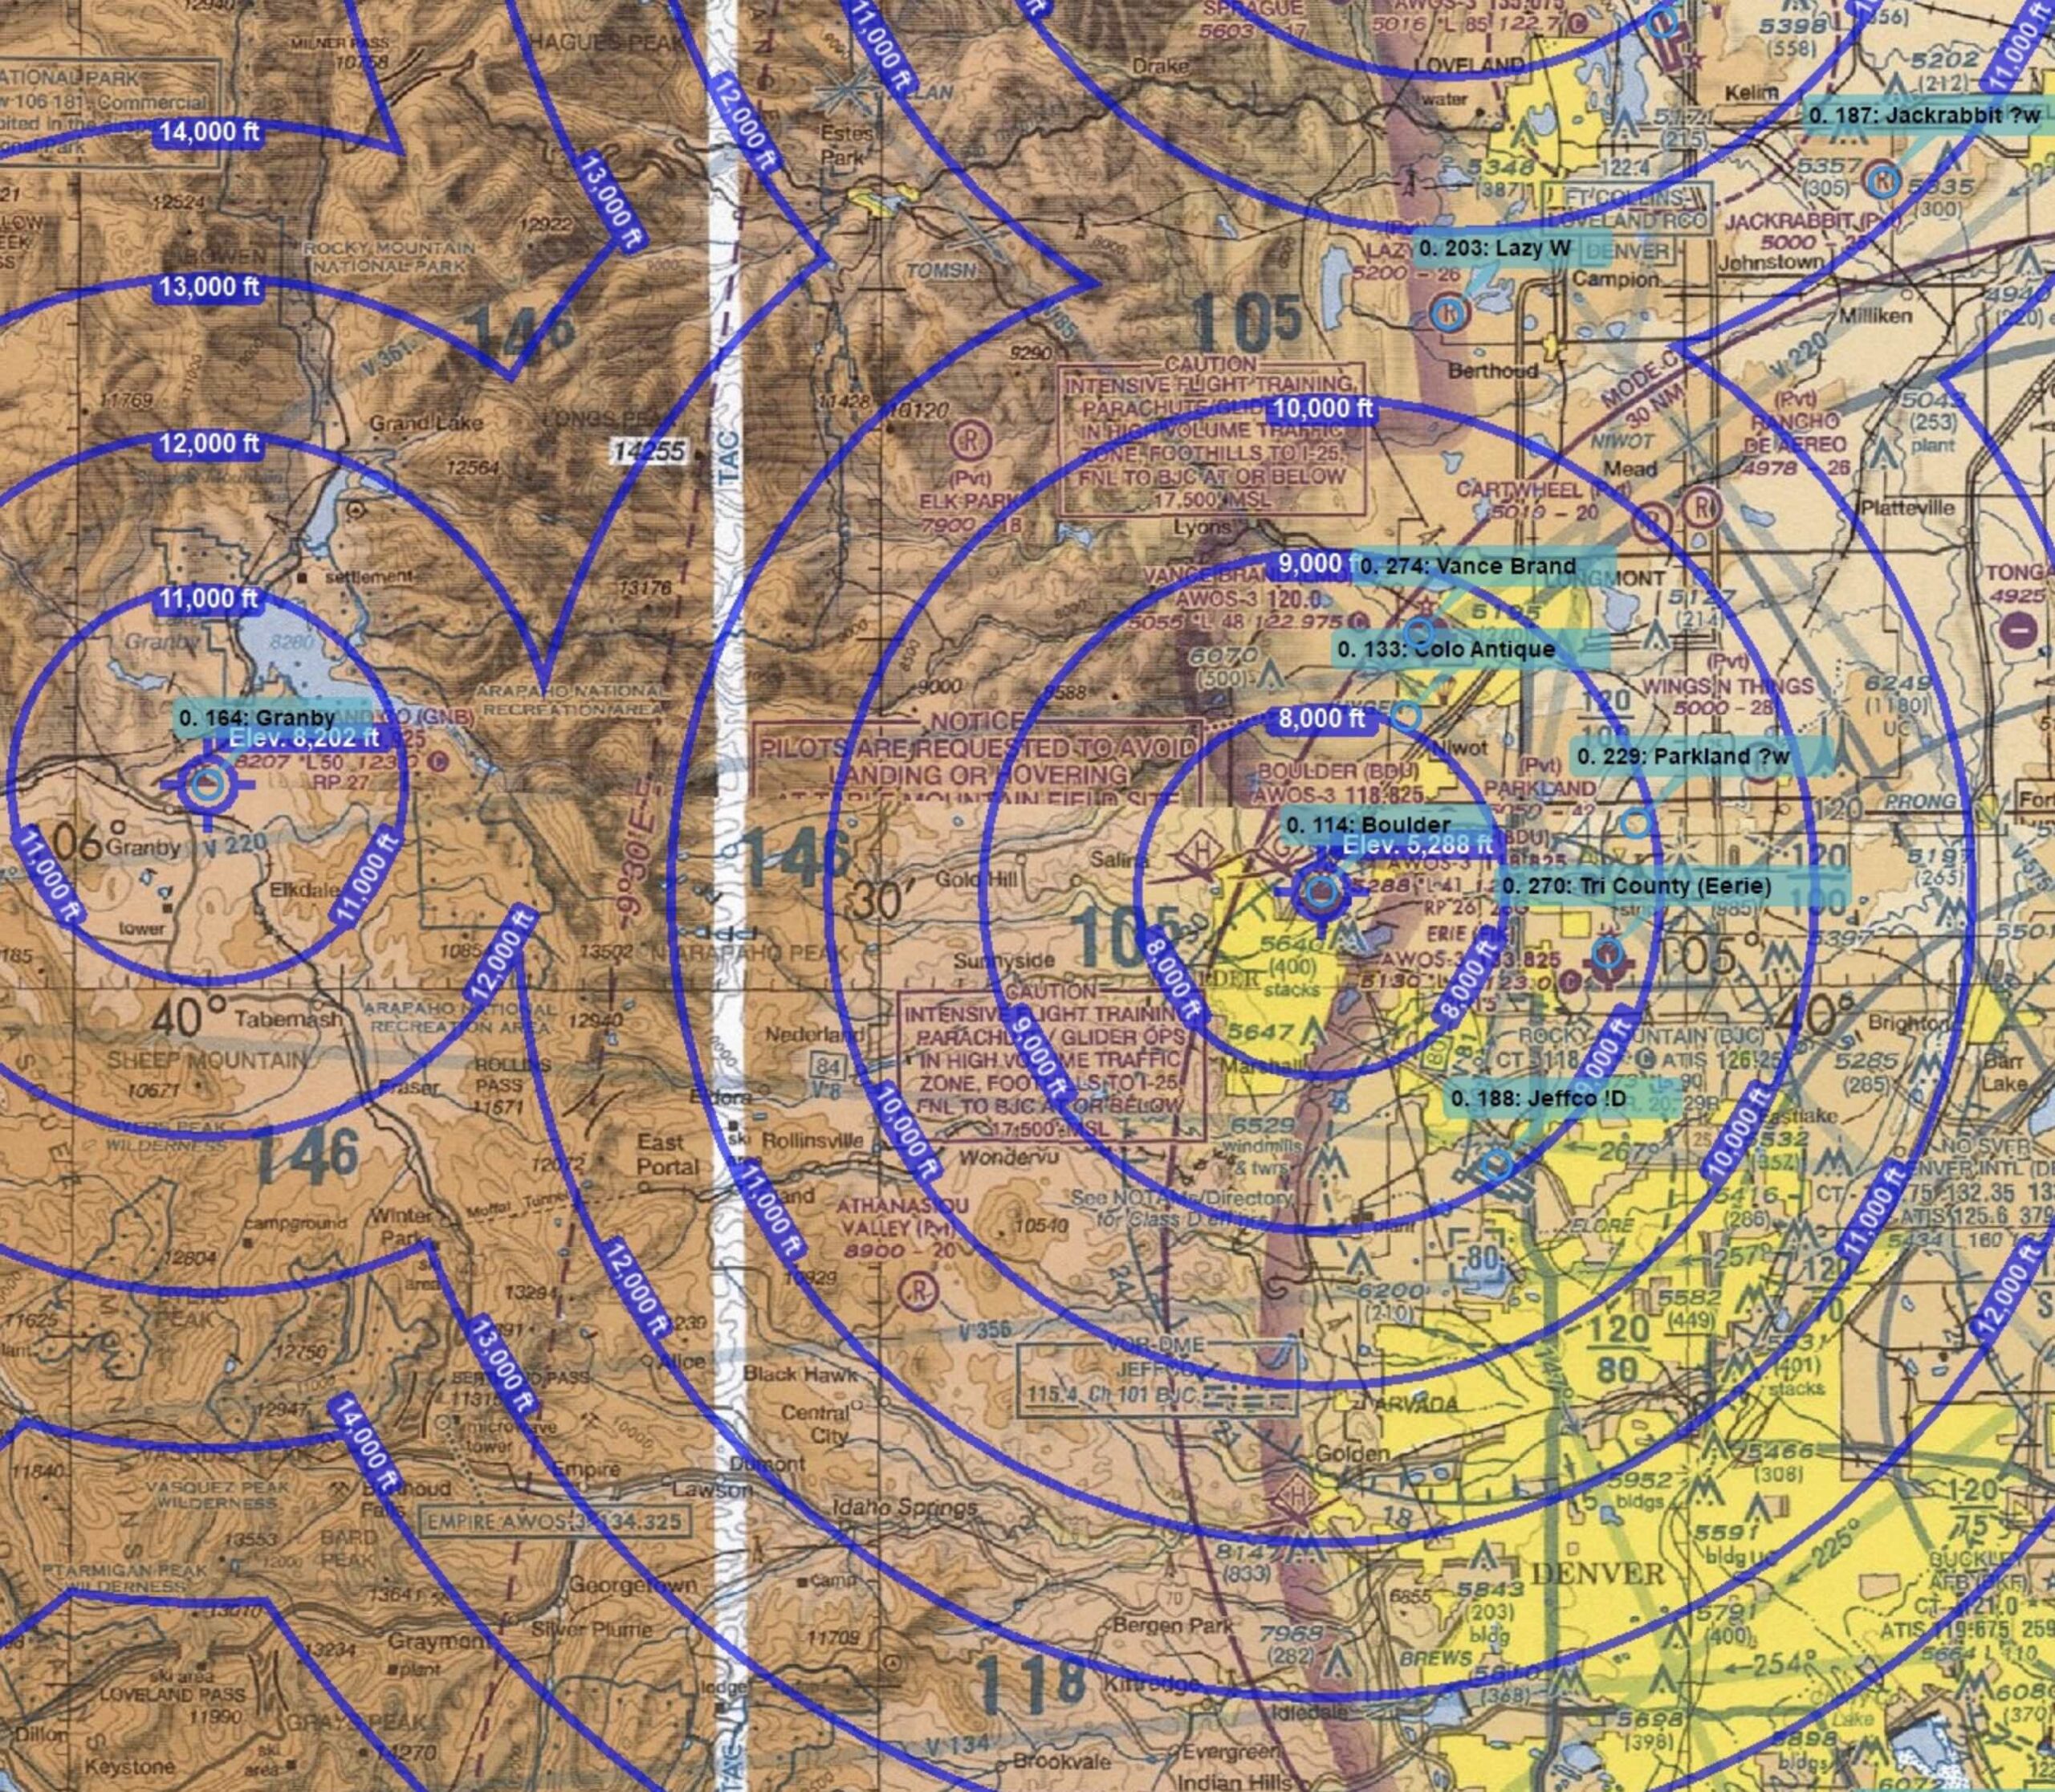
Glideplan is just a tool that facilitates the drawing of such circles on top of a current Sectional Chart but you can easily accomplish the same thing manually, using the process described above. One advantage of doing this by hand is that you will better remember the information when you’re flying. You can of course put a physical map with glide rings into your cockpit but I personally found it quite challenging to use during flight, especially when you are already relatively low and your workload is pretty high.
c) Account for Terrain Obstacles
Whether you create your glide map with glide rings, use a software to do so, or rely primarily on your glide computer: make sure you account for terrain obstacles that may lie between you and your nearest landing site(s).
Some glide computers such as the LX 9000, ClearNav, or even open source software such as TopHat and XC Soar will help you with this by displaying a “glide amoeba” on your screen. This will show if your glide path is blocked by a mountain, hill, or ridge line. Other computers such as the Oudie do not offer such a feature.
Whether you have such a computer or not, you should study the potential terrain obstacles that may exist in your task area and account for this by adjusting your personal glide map so that you positively know how high you need to be at any given point to clear any obstacles that may exist. To do so, just use a safe minimum clearance altitude for your obstacles (e.g. 500-1000 ft) and then apply the same conservative glide ratio from there.
For pilots flying from Boulder, here is a brief list of some of the terrain obstacles nearby:
-
- Flatirons – do not get low on the west side of the Flatirons. Your only escape route may be through Eldorado Canyon and chances are that you will not make it back to Boulder.
- Thorodin Mountain and Black Hawk – do not get trapped on the west side of Thorodin Mountain. Your glide computer may show Boulder airport in glide but chances are that you’re not. There are no safe landing options in that area. You may not even be able to glide out to one of the (poor) fields near Golden.
- High terrain east of Estes Park – if you get low in the Estes Valley, you will get trapped by the hills to the east. The landing options in Estes Park are marginal at best. This flight got me to contemplate my options.
- The Rampart Range. This is a ridge line along the southern foothills roughly between Twin Ceders (south of Conifer) and Woodland Park (northwest of Colorado Springs). Good lift can often be found along the convergence several miles west of the Rampart Range (e.g. near Cheesman Lake). However, be careful not to get trapped over completely hostile terrain between the Rampart Range and the Terryall Mountains (the ridge line along the eastern edge of South Park) to the west. Your computer may show the private airfield of Perry Park in glide but there is no way to get there. Before you know it, ditching your glider in the lake could become the safest of all the unpleasant options. On my first flight over Pikes Peak I dropped to 12,700 ft, uncomfortably low for in this area.
3. Familiarize Yourself With Typical Energy Lines
Following the advice in sections 1. and 2. above should help you stay safe during your first cross-country flights. This last section will help you find the most common lift lines within your task area.
It’s easy to see why that’s important: following lift lines makes it much easier to go places and you’re also more likely able to stay high and avoid having to put your land-out knowledge to an early test. After all, wouldn’t it be great if your first XC flights were successful and free of land-out-stress?
Most soaring areas have typical recurring weather patterns. For each weather situation, lift lines tend to set up in roughly the same places again and again. This is especially true for mountain sites where ridge lift, convergence lift, and wave lift are a function of topography and wind. Many mountain sites also benefit from valley breeze, mainly a function of topography and sun angle. Thermals almost always set up first over the high ground where they are also stronger (albeit often narrower).
You will be able to obtain a wealth of information by talking to experienced cross country pilots at your site who are often eager to share their exploits. Quiz them about what lines they fly most often in the most common weather and wind patterns, and what causes the more typical energy lines to set up.
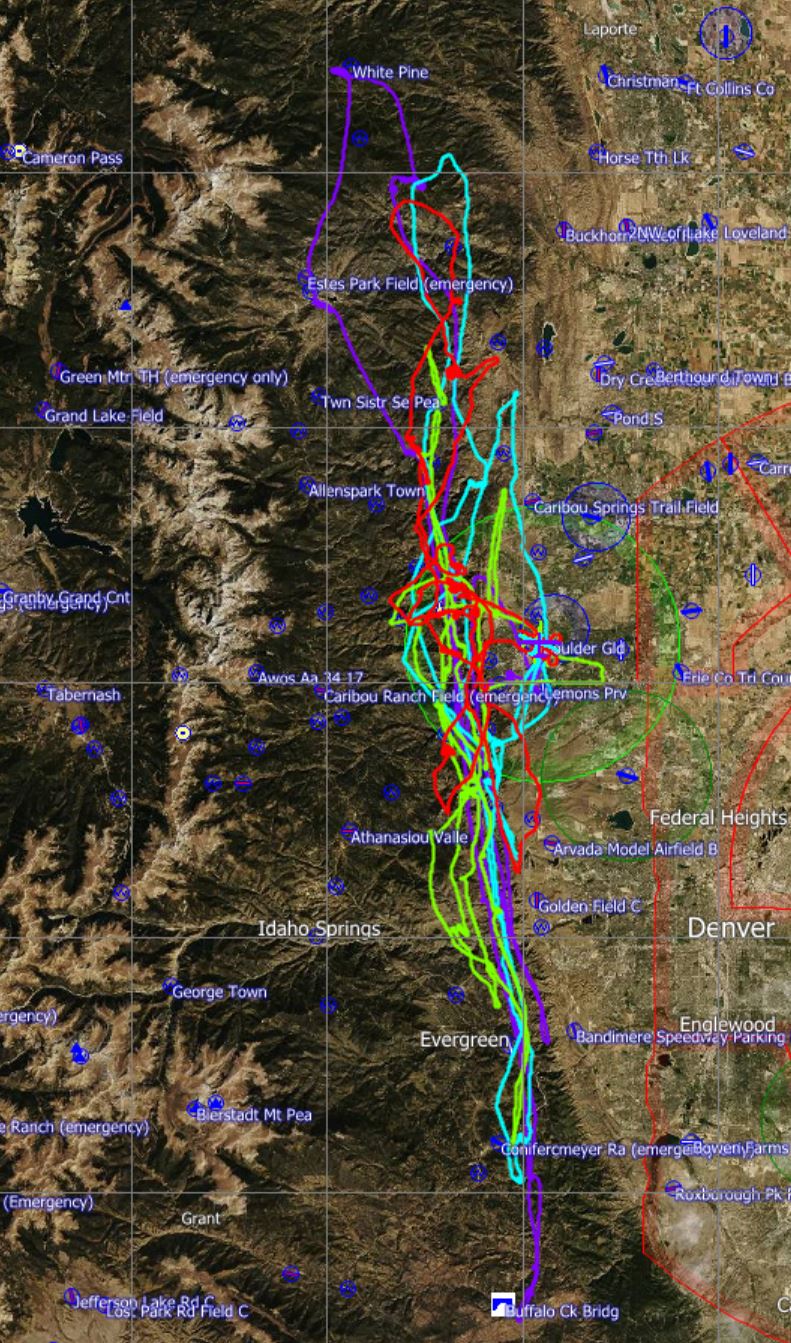
Another way to find out is to download flight traces from flight sharing sites such as OLC (Online Contest). Pick the better traces of pilots who are know to fly the longest and fastest tasks at your specific site. Also, if competitions were held in your area, it is useful to download the flight traces from contest tasks.
Once you have found and downloaded such traces (20-50 traces is a good number to start), load them all into a flight analysis software such as SeeYou and overlay them on a single screen. (OLC limits your download to 20 flights per day, so just stick with it over a number of days.) Chances are that the patterns will jump right out at you.
If you can see where pilots fly most frequently you still want to understand why they tend to find lift along the same lines. The answers are likely very specific to your site and once again it is best to quiz these pilots directly.
In Boulder, by far the largest number of XC flights follows the convergence line that normally sets up over the foothills east of the Continental Divide and runs parallel to the mountains. I have written multiple times about it. Getting to the line is not always easy, but once you have learned to recognize and follow it, the rewards are amazing. Understanding the convergence is really critical for local XC pilots. On strong convergence days it can be close to impossible to complete a successful XC flight if you’re to the east of the convergence. It can be very frustrating for those who did not make it into the convergence to look at the amazing flights of those who did. On the other hand, convergence days offer fantastic opportunities for badge flight such as my first diamond goal flight.
As an example of what you can learn from contest flights, take a look at this analysis that I completed in preparation for a contest in Montague, California. The typical flight patterns are easy to see. Conversations with pilots who previously competed there helped me understand the energy lines.
Bringing It All Together
“Bucket 3 pilots” don’t stay stuck in glide range around their home airport but neither do they head out blindly over unfamiliar and potentially hostile terrain. Instead, they have done their homework. They selected an appropriate task area. They know where they can land safely. For each part of their task area they understand how high they have to be to clear terrain obstacles and reach safe landing sites. They also understand the typical energy lines that tend to set up in their task area. In other words: they know their turf.
By becoming a bucket 3 pilot you drastically increase your chances that your first cross-country flights will be successful, safe, and less stressful.
Boulder pilots can take a look at my personal Boulder Soaring Area Map where I have documented the results of my own research. Instructions for interpreting and using this map can be found here. This is and will always remain a “work in progress”. I have visited many fields on the ground, especially along the Front Range and across South Park. An evaluation of fields along the Northern Front Range dating back to 2017 can be found here.
However, remember that such visits are just a snapshot in time based on what I could observe on the specific day of my visit. Our environment obviously continues to evolve.
Given the size of the covered task area, it would also be impractical to visit all the potential landing sites in person. If I am not certain about a field, I will only treat it as an “emergency site:” good enough to minimize physical harm to myself but not to my glider. As a rule, I keep at least one good airport or a positively known landable site in glide at all times. I will only fly over “emergency-only terrain” when I am certain that I there is a line of good lift along the way.
If this seems like too much work remember to limit your initial task area! Your first XC flights won’t lead you all across your state or even into neighboring states. By selecting an appropriate and realistic task area for your first cross-country flights you can drastically reduce the scope of the required homework. One or two weekends of online research, a few phone calls with experienced XC pilots at your soaring site, plus a day or two of visiting fields on the ground (or a flight in a touring motor glider) should give you plenty of information.
If that still feels like too much work there’s nothing wrong if you keep floating around your home airport! After all, it’s your hobby and our choice what you make of it. Just don’t succumb to the temptation of heading out into the hostile unknown!
However, if you have read all the way to the end, you must have what it takes to become a Bucket 3 pilot. Have fun getting to know your turf! I wish you great success on your upcoming cross-country missions.
Excellent article –
I do not fly in the large skies of the US but in the UK.
The advice is good wherever you fly, “Know your turf”
Thank you so much for this article!
After my first soaring season I’m in bucket 1. You gave me a structured guide of how to get to bucket 3.
You rock! :))