For how to get into wave lift, look here instead. The following describes how to use wave lift once you’ve found it.
- I just got into wave – now what?
When you first connect with the wave (especially when you soar into it), chances are that you are relatively close to the bottom of usable lift. The rate of climb may not be very high and the area of usable lift may still be relatively small. It is all the more important to stay within the area of lift until you have gained some altitude.
Upon encountering wave lift the first things to do are:
– Take note where you are and try to stay there: using a GPS is best because using ground references can be tricky when you’re high up. Take a look at the rotor clouds and lenticulars if there are any. The best lift will be upwind of the best developed rotor clouds.
– Figure out the direction and strength of the wind: try to fly directly against the wind and determine how fast you are moving forward against the ground. If the lift begins to weaken fly a steep circle (like in a thermal) and watch what happens to the strength of the lift as you begin to drift downwind. Look at the moving map on the GPS: the direction of the wind will be obvious as you see yourself drifting downwind on the map. GPS will also help you determine the strength of the wind if you watch the groundspeed during the turn provided you keep a constant airspeed throughout. Your maximum groundspeed will be reached when you fly directly in the direction of the wind; your minimum groundspeed will be when you fly directly against the wind. Remember the maximum groundspeed, subtract the minimum groundspeed and divide the result by 2: this will be the strength of the wind.
– Do not circle if the wind is very strong as you will quickly drift into sink. Try to fly directly into the wind. If you drift sideways in either direction, correct the course until you know exactly where the wind is coming from. When you fly directly into the wind, take note of the compass heading and the ground features. If you look straight ahead you should also see the trigger slope of the streamline that you are on.
– Try to go back and forth on the streamline that you are on to determine where the lift is strongest. If you move into the wind and the lift weakens, drift back a little until it strengthens again. Circling works best to drift back unless the wind is very strong, in which case you have to fly figure eights, always turning into the wind, similar to climbing along the side of a ridge. (If the wind is extremely strong you may be able to just slow down to drift backwards. Note that GPS can be very confusing because it will show the glider icon heading backwards even if you are flying forwards but are drifting backwards…) Try to orient yourself based ground features and remember the compass heading of the wind direction. Try to figure out where the best lift is relative to the trigger point – which you can see directly in front if you fly straight into the wind: take note of your distance from the trigger point when you have found the best lift along the streamline. (The clouds change rapidly and are therefore not a good reference point.)
– Once you have found the optimum distance to the trigger point for the local streamline, begin to fly sideways along the wave bar, trying to maintain the same distance to the wave trigger. Find out what crab angle allows you to fly along the wave bar perpendicular to the wind. You need more crab angle if you fly slower, and less crab angle when you fly faster. Orient yourself based on GPS, ground features, and the distance to the trigger slope. Don’t navigate relative to individual rotor clouds as they will appear to drift downwind while new ones form further upwind. (It is useful to configure the variometer as a netto-vario that indicates only the movement of the airmass and not the performance of the glider. This way you will know where the best lift is even when you fly at different speeds and therefore different sink rates of the glider).
- Where should I search for the best lift relative to the clouds (if they exist)?
The best lift will always be upwind of the best rotor clouds and/or upwind of any lenticular clouds. If clouds begin to form where you are, quickly move directly upwind!
- Where should I search for the best lift relative to terrain (e.g. if there are no clouds)?
– Wave lift usually extends over a large area, gradually increasing or decreasing in strength as you shift your position relative to the ground. If you follow along a wave bar (i.e. your ground track is perpendicular to the direction of the wind and parallel to the trigger) and the lift reduces you are likely either too far downwind or too far upwind of the best lift. In most cases you will have drifted downwind. If you are not absolutely sure that you are too far upwind, always turn into the wind first because it is very quick to shift downwind if you happen to be wrong; however, if you first explore downwind and find yourself in heavy sink, it will take much longer and cost a lot more altitude to move upwind again. (By the time you get to the position over ground where the lift was, you could be below the wave and have lost the lift altogether.)
- How does the position of the best lift change as I climb?
– It is possible that the ground position of the best area of lift does not change with altitude. However, this is rather the exception than the rule. It requires a consistent wind direction and a gradual and substantial increase of the wind with altitude.
– More often than not, the wave will tilt into the wind. I.e., the area of best lift relative to the ground will gradually shift upwind the higher you climb. At higher altitudes, it is not unusual for the best lift of the primary wave to be directly above the ridge that triggered the lift. Note that in this case, the position of clouds at different altitudes may be misleading. (E.g., at lower levels you might fly directly below a lenticular cloud of the same wave; at higher levels you might find yourself far upwind of rotor clouds of the same wave.)
– The amount of tilt depends primarily on the wind profile at different altitudes.
- How do I fly along the trigger ridge without losing the wave?
– When you fly along a wave bar, keep in mind that changes in the terrain that trigger the wave will also impact the position and strength of the lift. It is critical to always know the direction of the wind, which will allow you to keep track of your relative position to the trigger.
– A gap in the ridge upwind will also cause a gap in the wave.
– A curve in the trigger ridge or a change of the shape of the lee slope can weaken or strengthen the lift (based on the direction of the wind) – just like a change in the form of a ridge will change the strength of the slope lift. Depending on the wave length (and hence your distance from the trigger slope), gradual changes in the shape of the trigger may be difficult to spot from the distance. If there are clouds (rotor and/or lenticular clouds) such changes may be more obvious and following the lift along the shape of the clouds will be easier than in blue conditions.
- What should I do if I “fall out of the wave”?
If you find yourself in heavy sink between two wave bars you should do one of two things: fly either directly into the wind to the upwind wave bar or directly with the wind to the next wave bar downwind. (Remember you must always know the exact direction of the wind!) Do not fly in sink diagonally (or perpendicular) to the wind as this will cause the loss of a lot of altitude.
Flying upwind makes sense only if (i) you have reasons to believe that the upwind wave bar provides stronger lift (it often does); and (ii) you have sufficient altitude to push through the sink to get there; and (iii) you have a viable plan B (e.g. a safe landing site within glide range) should you arrive too low.
In all other cases it may be better to fly straight downwind to get to the next wave bar and try to climb there. Because you fly with the wind, you will get there much faster and loose a lot less altitude until you reach it. It may (or may not) be possible to gain enough altitude in the next wave bar to make another attempt at pushing upwind again.
- How do I stay clear of lenticular clouds?
In good wave conditions, the winds aloft are usually very strong. That means that a strong crab angle is usually needed to stay upwind of any lenticular clouds. The cloud may be difficult to see from the cockpit because it is behind the glider. E.g., imagine a wind of 70 kts. If you are flying at a ground speed of 70 kts you must fly directly into the wind to stay in front of the cloud. If you are not flying directly into the wind, the cloud will encroach on you from the back and may suddenly catch and engulf you from behind. The same thing can happen if there is a slight increase in humidity. If the air is suddenly starting to look somewhat misty, sharply increase your airspeed (but stay below Vne for your altitude!) and fly directly into the wind immediately! It is critical to always keep good track of your distance from any clouds, even and especially if they are behind you! Getting caught by the cloud could quickly lead to icing and total loss of control and is obviously extremely dangerous!
- Which oscillation(s) provide the best lift? The primary? The secondary? The tertiary?
The first wave crest behind a mountain is called the primary, the next one is called the secondary, followed by the tertiary and so on. How many usable wave bars there are depends primarily on the wind profile.
A wave train with multiple wave bars extending downwind will only develop if the wind increases with altitude. In this case the stronger winds aloft will “trap” the wave energy, forcing the air to move down behind the first wave bar, thus establishing a resonant wave length and multiple oscillations. On the other hand, if there is no increase in wind with altitude, the wave will likely dampen out quickly and only the primary wave may provide usable lift. (If the wind speed decreases with altitude, a wave system is unlikely to develop at all; and in the more complicated case where the wind speed first increases and then decreases with altitude, the wave may break at higher altitudes, sometimes leading to severe clear air turbulence aloft.)
In most cases the primary wave will allow for the highest climb. However, if there is a good wave train, the secondary or tertiary wave bar may begin at a lower altitude than the primary, allowing for an easier entry into the wave system. The rotor turbulence under the secondary or tertiary wave is likely also less severe than the turbulence underneath the primary.
- How do I transition from one wave bar to another?
In many cases it will be easier to enter the wave system via the secondary or tertiary wave. The local terrain may even make it impossible to get directly into the primary. (E.g., such a situation appears to be fairly common in Boulder, CO, where the wave trigger is the steep slope of the Continental Divide, and the primary wave is typically located over the complex and forbidding terrain of the foothills, which provides barely any opportunities for a safe out-landing should anything go wrong in contacting the wave.)
So, let’s say you’ve maxed out the climb in the secondary and you want to transition upwind into the primary (which will likely allow you to climb higher). You will have to penetrate into the wind, and you will have to cross the area of sink downwind of the primary. To minimize the loss of altitude during the transition, always fly directly into the wind. If the winds are light and if there are no clouds, the transition may be relatively easy. If the winds are strong, be prepared to loose a lot of altitude (many thousands of feet) as you push into the wind and through the area of massive sink. Rotor clouds make the transition even more challenging.
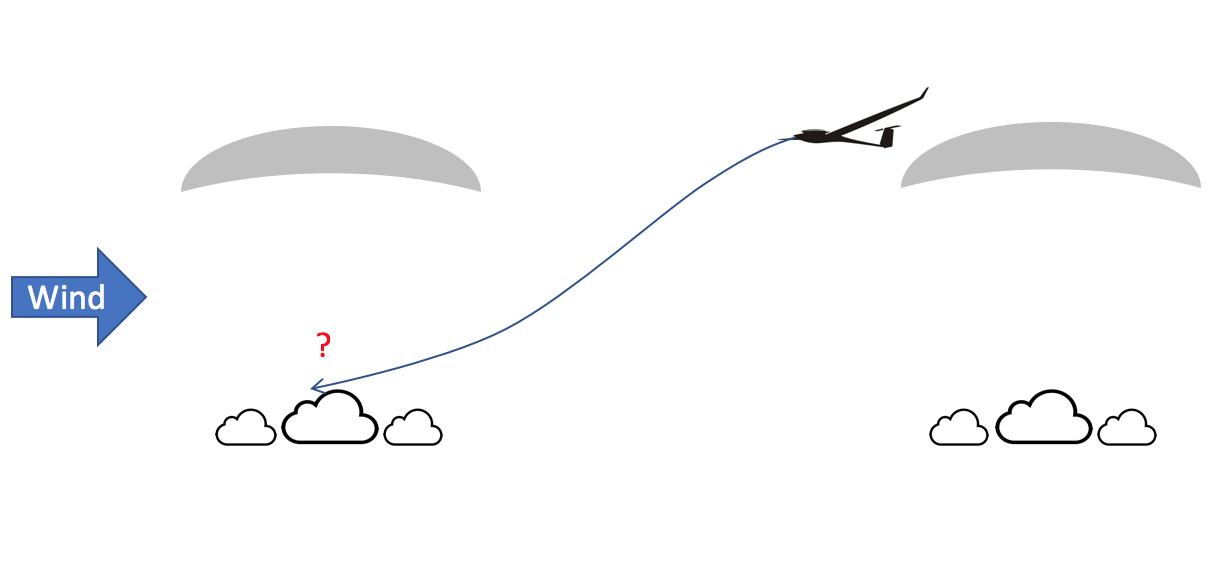
– Jumping over the rotor of the primary.
This is a challenging and risky maneuver. It can only work if (i) there is a wide enough gap between the rotor cloud(s) and any lenticular clouds of the primary; and (ii) the altitude is sufficient to reach the primary before sinking into any clouds (see graph). This will depend on the strength of the head-wind, the sink between the wave bars, and the performance of the glider at the high speeds that will be required to penetrate forward. One advantage of this transition is that it can be flown in smooth air without encountering rotor turbulence.
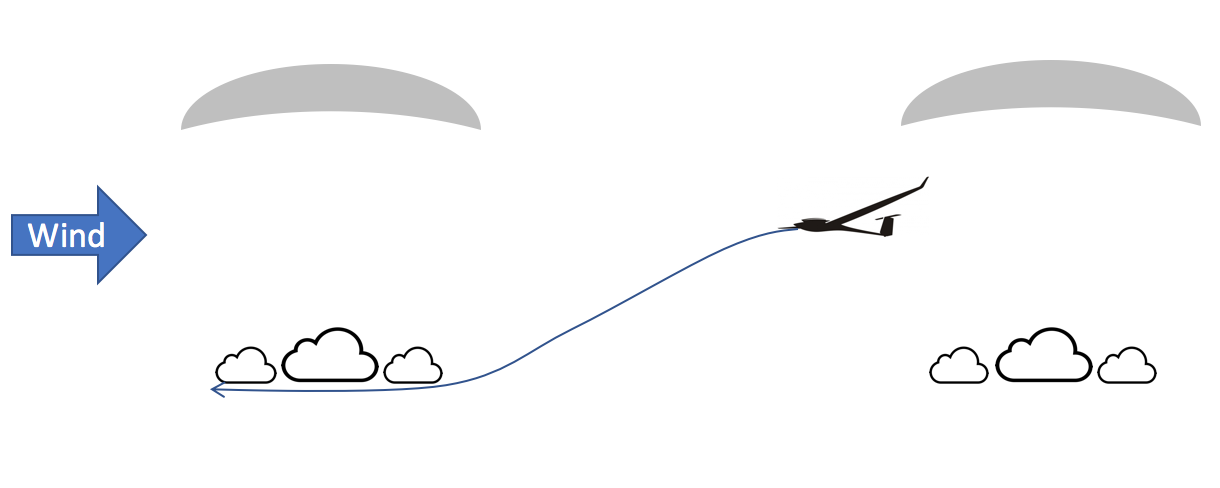
– Diving underneath the rotor of the primary
Depending on the terrain it may be a safer option to fly below the rotor clouds of the primary. However, this only works on days where you can expect to find sufficient lift below the rotor. (If you already climbed into wave below the rotor of the secondary, you may be able to do it again under the primary.) This option may also be faster than option one because you won’t need to climb nearly as high in the secondary. You will obviously fly lower than in option one so it is equally imperative to always keep save landing areas within reach.
– Transition at the end of a wave bar
If at all possible seek to avoid the wave sink between the secondary and the primary by going around it. Gaps in the clouds may indicate areas where the wave system is weakest – those are the best spots to make the transition. Otherwise look at the upwind terrain along the trigger to find a gap in the ridge or another feature that might suggest a reduced wave strength. If you fly along a wave bar perpendicular to the wind, you may also come across areas with with little lift: where there is little lift, there is likely also little sink. Pick those streamlines to make the push forward into the primary. You will still lose a lot of altitude because you have to penetrate fast into a strong headwind but you will avoid flying through heavy sink.
– Transition in blue conditions
The good thing in blue conditions is that there is no need to worry about getting caught in cloud. The downside is that you won’t see the location of the primary and the associated rotor. Pick a streamline where the wave system is relatively weak to make the transition. Watch your speed as you push into the wind and plan to slow down to rough air speed well before you expect to encounter the rotor. Only a second or so before reaching the rotor the air may give a mild kick – slow down immediately should you notice this before you expected it.
When you arrive in the primary, expect the lift to be different than in the secondary. Often the lift is stronger and reaches higher, but the area of lift is typically much narrower than in the secondary or tertiary.
- How do I best transition downwind?
Since you’re flying with a strong tailwind, downwind transitions are obviously a lot easier. Flying over the rotor should not be a problem as long as you can clearly see a gap in the clouds beyond. You should fly fast through the sink but not so fast that you fly right through the lift when you get to it. As soon as you encounter rising air it is important to turn hard into the wind in order to avoid drifting into the next area of sink. Whereas an upwind transition always must be exactly into the wind, a diagonal transition downwind is fine as long as you are confident about where you will encounter the lift of the downwind wave bar. (If you’re not sure, it’ll be better to stay on the same streamline by flying directly with the wind.)
- How do I best leave the wave?
Descending in wave can be relatively quick and easy if you fly in the sinking air mass. But there are several things to watch out for and consider:
– Never get caught above the clouds! If there is any risk that the gaps in the clouds might close, descend early!
– Don’t get caught in the dark! You may be flying in bright sunshine at altitude while the valley below is already dark. Know the time of sunset on the ground and plan accordingly. At a sink rate of 2,000 ft per minute it will still take five minutes to loose 10,000 feet.
– Remember that the air will once again become turbulent. Tighten the straps and secure any loose items (camera, food, extra clothes, etc) before you get into the rotor zone. Test all controls for free maneuverability and quick movements before leaving the wave.
– Test the spoilers. If there was any water in the spoiler boxes they might have frozen shut.
– Descend gradually – especially with a glass ship. The gel coat is prone to cracking if the temperature increases too rapidly.
– Know where you are and always keep save landing areas within reach.
– Expect turbulence and heavy sink in the landing pattern. Arrive at the airport higher than normal and fly a higher pattern.