We know from a prior chapter that good ridge lift depends primarily on the shape of the terrain as well as the direction and strength of the wind. Of course we look at the weather and wind forecast for various altitudes but sometimes (well, actually many times) the reality does not quite match the forecast. Especially in mountainous terrain it is normal for the direction and strength of the wind to differ widely across the task area. So how can we figure it out? That’s what this chapter is about.
What should I look at before each flight?
Start with the overall weather forecast: fronts and pressure systems; get a sense for the overall flow of the wind and the weather. Then think about how local factors might impact the overall flow. E.g. mountain ridges may divert the direction of the overall flow, especially below the peaks. Or the relative position of air masses may shift throughout the day. E.g., in Colorado, there is often a convergence line in the summer where the moist air from the plains in the east meets the dryer air over the mountains in the west. The position of this line, and hence the direction and strength of the wind, often changes throughout the day. In the winter months, the strong westerly flow aloft often triggers mountain lee waves with turbulent rotors such that the strength and direction of the wind near the ground becomes highly variable and completely unpredictable. (At the Boulder airport the wind on one end of the runway may be completely different from the wind at the other end of the runway!)
I find wind maps such as this one to be extremely helpful in visualizing the overall flow but I’ve also learned that their predictive power is often limited, especially near the ground. As you use this chart or any other one like it, make sure to move the slider to view the wind at different altitudes. The first time you do this you will likely be surprised just how dramatically different the flows at various altitudes can be. When using any kind of forecasting tool it’s important to stay focused on the bigger picture, i.e. the underlying drivers of the wind and weather patterns instead of trying to memorize all the specific information represented in each area chart.
A good preparation will help you develop a mental model for what’s going on in the atmosphere and this in turn will allow you to adjust the model during the flight if the actual conditions are somewhat different from what you had anticipated.
Here’s my flight planning check list to ensure that I consider all the relevant aspects before my flights.
Below are some tips and techniques to get a better sense of the wind at various altitudes and locations.
How can I figure out the wind on the ground below?
We know that the wind on the ground is often quite different than the wind even just a few hundred feet above. So to figure out the wind on the surface we have to look for signs on the surface itself.
In the absence of nearby windsocks, the water surface of lakes and ponds often provides the best information:
- Look for a stretch of shoreline where the water on the surface is calm: that’s where the wind is coming from because this part of the shoreline will be in the wind shadow of the shore and ripples and waves will only begin to form once the wind has hit the surface.
- You can observe the same effect around little islands in a lake. Look around the island for spots in the water where the surface is calm.
- Larger waves on bigger lakes are always perpendicular to the wind direction. The surf (where the waves are breaking) is on the downwind side of the link while the upwind side will be much calmer. If you see waves braking away from any shoreline the wind is blowing with at least 15 kt.
- If you look at a lake in a deep valley you will almost always see the wind blow either up or down along the valley. If you see the regular flow pattern on the lake disturbed somewhere in the middle of the lake, this is likely due to a downdraft hitting the surface of the water. The downdraft could be due to a thermal outflow or, perhaps more likely, due to wave or rotor wind touching the ground. If you suspect wave or rotor you should also suspect a wave system further aloft.
- If you observe different wind directions on a larger lake (or on two nearby lakes) this could be a sign of converging or diverging winds (depending on the direction). In the Colorado foothills one can sometimes spot this phenomenon when winds on two lakes further up and down in the foothills indicate the location of a convergence line.
If there are neither windsocks nor lakes (or the lakes are frozen) we have to look for other surface wind indicators such as:
- Blowing dust, e.g. from dirt roads.
- Movement of trees and vegetation. (E.g. foliage of aspen trees will indicate even very light winds)
- Movement of crops. In a field of tall crops a circular swirl may give away the location where a thermal is leaving the ground. Calm fields could indicate where the next thermal might come from.
- Spray from irrigation. Look for signs where the normal direction of spray is deflected as the wind carries the spray downwind.
- If you can’t make out any signs of wind on the ground there is always the automatic weather radio report of a nearby airport – make sure to know which frequencies to tune into.
Having been in situations where I wanted to know the wind on the ground without a telltale sign in sight, I’m trying to make it a habit to always look out for every indicator of wind on the ground and to remember my observations.
How can I figure out the wind at my current altitude (e.g. at ridge top level)?
Sometimes there is dust or snow blowing over a ridge nearby you can see trees or grasses move at ridge-top level. However, many times the ridges are nothing but bare rock or short and hardy vegetation and provide no clue about the wind. Here’s what you can do then:
- Identify the cross-wind by flying straight and observing the glider drift to either side. The easiest way to do this is to visually align two easily recognizable terrain features in front of you – one closer, one a bit further apart – and point the nose of the glider straight at one of them (while keeping the yaw string straight). Then observe any relative sideways movement between the two chosen spots. By watching the gap between the two points widen or narrowing you can quickly and easily perceive the sideways component of the wind.
When you fly directly above the ridge you will also intuitively notice the sideways component of the wind as you correct for it with the crab angle necessary to prevent you from drifting into the lee.
- Identify the headwind or tailwind component by comparing your ground speed as you fly back and forth along a ridge. You will intuitively notice that the wind is not blowing directly at the ridge if you observe that going one way takes longer than flying along the same track in reverse. You can measure the actual difference by comparing your GPS ground speed on each of these legs. Make sure you’re flying at a consistent airspeed when you take a quick glance at the ground speed indicator. Remember the outbound ground speed, then turn around and observe the groundspeed on the return. The headwind/tailwind component on the ridge will be 1/2 of the difference between the two ground speed readings.
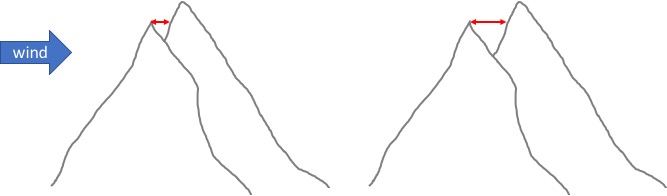
Knowing that the wind is blowing at the ridge at an angle that is different from perpendicular will help you identify the bowls and spurs along the ridge where that angle is almost 90 degrees since that’s where you are likely to find the best lift. Conversely, it will help you avoid areas in the lee of spurs where you may find nothing but sink and turbulence.
How can I figure out the wind at the base of the clouds?
We have all learned in basic training that we should look for the shadows of the clouds on the ground to work out the wind at the level of the clouds. This is largely true and relatively easy to do.
However, there are some potential traps here too: keep in mind that in the case of tall clouds the shadow may be cast by a part of the cloud far above its base where the direction of the wind may be somewhat different than at the bottom. (Think of a cumulonimbus, for example: even the growth of its anvil and the associated shadow on the ground may give you a wrong sense of the wind!) Also, when ridge soaring remember that the wind at cloud level is often not the same as the wind on the ridges!
How can I figure out the wind in a thermal?
Make a mental note of the location on the ground where you start circling and then observe the wind drift as you climb. If you have a GPS with a moving map that records the flight track this is also easy to see on the screen.