Now that we’ve looked at what ridge lift is, the best conditions for it to occur, the origins of the wind, and how we can know its strength and direction, it’s time to figure out how to best fly in ridge lift.
On what parts of a ridge will I find the lift best?
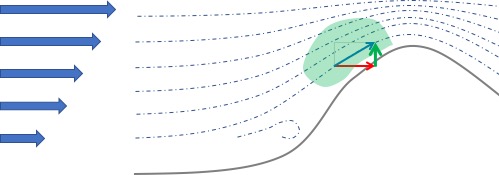
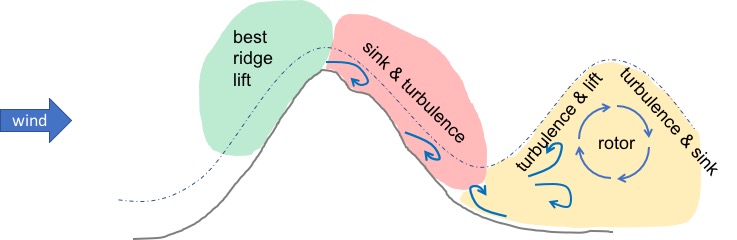
From what we’ve seen earlier it is easy to surmise that the best lift would be along the part of the slope where the slope is steepest, which is very often (but not always) just below the top of the ridge. It is there that the vertical velocity of the airflow, i.e. the lift, will be strongest.
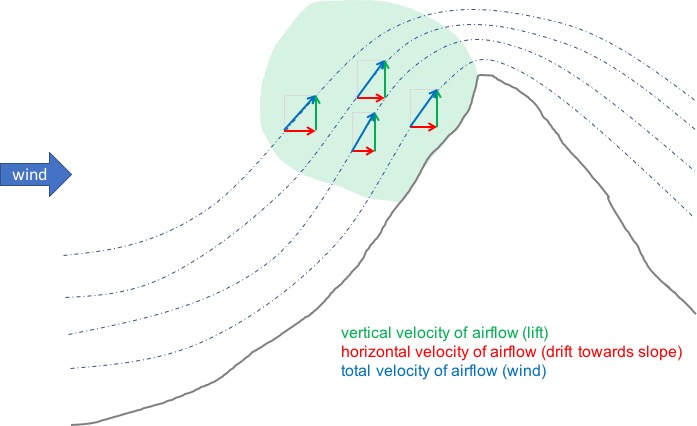
However, this is only true if the wind blows with equal velocity at all altitudes. This is often not the case.
Consider the same ridge with the following wind gradient – a relatively frequent scenario in the European Alps during the summer when there is a stable high pressure system and the main wind is the Valley Breeze.
Note that on sunny days during late spring and summer the best lift is often above the ridges where thermals break off. It’s also much safer to fly there since you’re further away from terrain and at an altitude where its easier to escape if necessary. However, this means that you’d be soaring in thermals and not in ridge lift. I’ll cover this in the section on thermal lift.
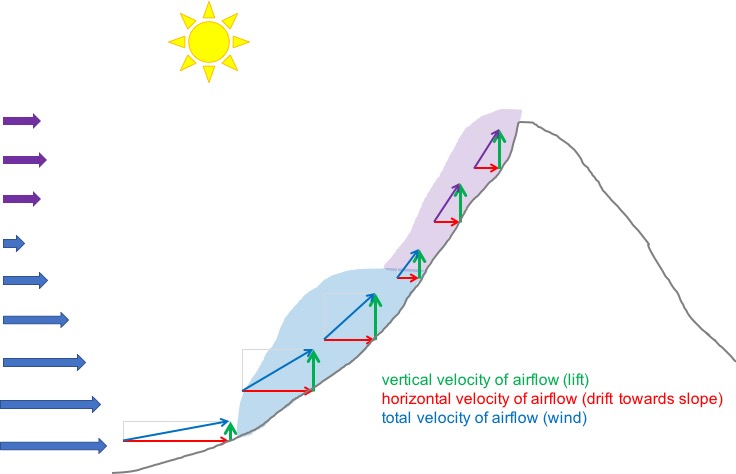
Let’s look at another example using a differently shaped ridge and a different wind gradient. I believe this one may be more representative of pure ridge soaring along the Appalachian Mountains although I haven’t flown there yet.
Note that the area where the hill is steepest (closer to the bottom of the hill) is not the area where you’ll find the best climb rates. One reason is that the wind speed is slower near the bottom, which affects also the vertical component of the airflow, i.e. the lift. Secondly, this area could be quite turbulent and dangerous. Because the wind increases with altitude, the streamlines get compressed and the slower flowing air near the bottom gets squeezed: it curls over and doesn’t make it up along the slope. The steeper the bottom of the ridge (e.g., a near vertical sea cliff), the more likely you are to encounter such turbulent eddies.
The examples above illustrate once again the importance of knowing the nature, strength, and direction of the wind at all altitudes. Ridge lift is always a function of the shape of the slope, the speed of the wind, and the direction at which the wind blows at the slope.
What happens behind the ridge (i.e., on the lee side)?
If the wind blows up along a ridge on the upwind side, it will also descend back down on the downwind side. The faster the wind and the more stable the airmass that gets pushed up, the more vigorously it will flow back down. These are ideal conditions for lee waves to form, especially if the drop on the lee side is relatively steep.
When ridge soaring it is important to stay on the upwind side and avoid drifting back with the wind into the lee. That’s one reason why you should always turn into the wind when changing directions in ridge lift, even when flying above the ridge. (The one exception is when you are climbing in a thermal that is breaking off from the top of the ridge. In that case it can make more sense to circle once you are well above the terrain, and even then only if there is a viable escape route on the lee side in case the thermal isn’t working as expected.)
How do I approach a ridge?
With caution. Well before you get to the ridge make sure you have thought about the wind and looked for all the clues that help you understand how strong it is and where it comes from (see above). Think about the shape of the terrain and where you are likely to find good lift and where you must be careful (see below). Consider your altitude relative to the terrain. Will you be high enough to connect with good lift? Think about the vegetation: are there trees that will slow down the wind or cause turbulence near the ground? Reflect upon your escape plan if the ridge shouldn’t work and you were to loose altitude. Where would you turn to? Where can you land? How high do you have to be to get there?
As you approach the ridge, look out for traffic: a good ridge will attract others too. Remember the basic safety rules for ridge flying and commit to following them. (This can be hard.) Don’t expect others to do the same. Watch for obstacles along the slope: rock outcroppings, power lines, cables. (Especially for those flying in the Alps – watch out, such obstacles can be anywhere and they may not even show up in your map that you have studied so diligently!) Look for irregularities in the terrain below – areas where thermals could break off and disturb the flow of the wind along the slope.
Then, as you get close, remember to never fly straight at the ridge; instead, always approach it from an acute angle so you get a feel for the conditions as you come closer and can readily turn away if necessary.
How do I fly along a ridge?
If the ridge is straight and the wind is blowing at it from a 90 degree angle, things are easy. You can experiment until you find the area of best lift, often just below the crest, adopt the correct crab angle to maintain a safe distance from the terrain and on you climb.
However, usually you won’t find yourself on such a miracle ridge. Your real life ridge won’t be straight and the wind won’t blow from a 90 degree angle. This means there will be areas along the ridge that will work much better than others. Some areas may not work at all or may even provide nothing but turbulence and sink. You won’t be caught by surprise as long as you know where the wind is coming from, as long as you know where you are and where you’re going, and as long as you keep a mental picture in your mind about how the wind and the terrain are likely to interact with one another. This, of course, is easier said than done.
Imagine the glider approach the ridge in the simple sketch below. For simplicity, assume that the pilot will reach the ridge at point A one third below the top, and that she wants to fly to a point that is at the bottom right corner of the sketch (not marked). To reach that point she will need to climb as high as possible over the top of the ridge as far to the bottom of the sketch as possible. Where will the pilot most likely want to stop to gain altitude? What areas of the ridge should she fly along? What areas of the ridge should she avoid and how should she do that?

Obviously, my primitive drawing is very imprecise and different eyes will interpret it differently. The point here is not to provide a right or wrong answer, but to train the mind to form a mental model of the ridge and the wind: where is the wind hitting the ridge from a right angle? are there bowls that the wind must enter and that it can’t escape but at the top? are there spurs that will create turbulence and sink on the lee side that the pilot should fly around? Are there parts of the ridge that will likely divert the wind? Once you’ve worked it out for yourself, reverse the task: imagine the glider icon represents the wind arrow and the wind arrow represents the glider and fly along the ridge in the other direction. Where will the best climb zones be now? Which areas must be avoided?
Now imagine you’re approaching the following real ridge. (The picture is from high above the ridge so you’d have to imagine being lower.)
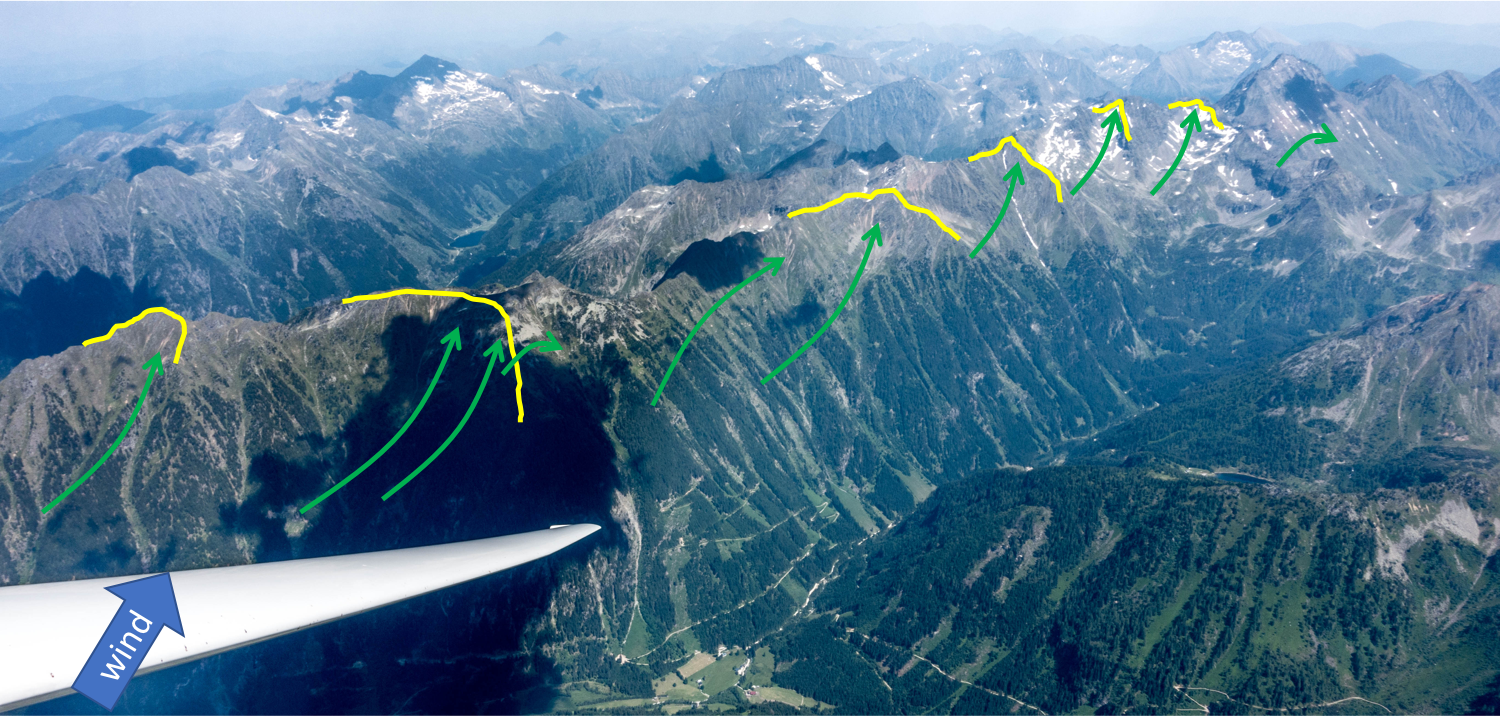
I’ve marked the wind coming from WNW, a frequent wind direction above ridge top level in this area. At the bottom of the valley I would anticipate a light valley breeze flowing upstream. (It’s light because I’m in a small secondary valley close to the top of the central Alps.) For better visibility I have marked the small bowls along the ridge where the wind is most likely funneled upwards. That’s where the best lift is likely to be. The ridge is also exposed to mid-afternoon sunlight (except for the cloud shadows of some passing cumuli) so I would also expect some thermodynamic lift flowing up the the slope above the tree line. It’s a summer thermal day with a high cloud base so I would anticipate frequent and strong thermals breaking off the top of the ridge. I would want to keep a safe speed. Below ridge top level I would also be mindful of the threat of potential thermals breaking off below me (e.g. from gullies, rock outcroppings, or from the edge of the tree line) as they could push my glider towards the slope.
My flight path along this ridge could look something like this:
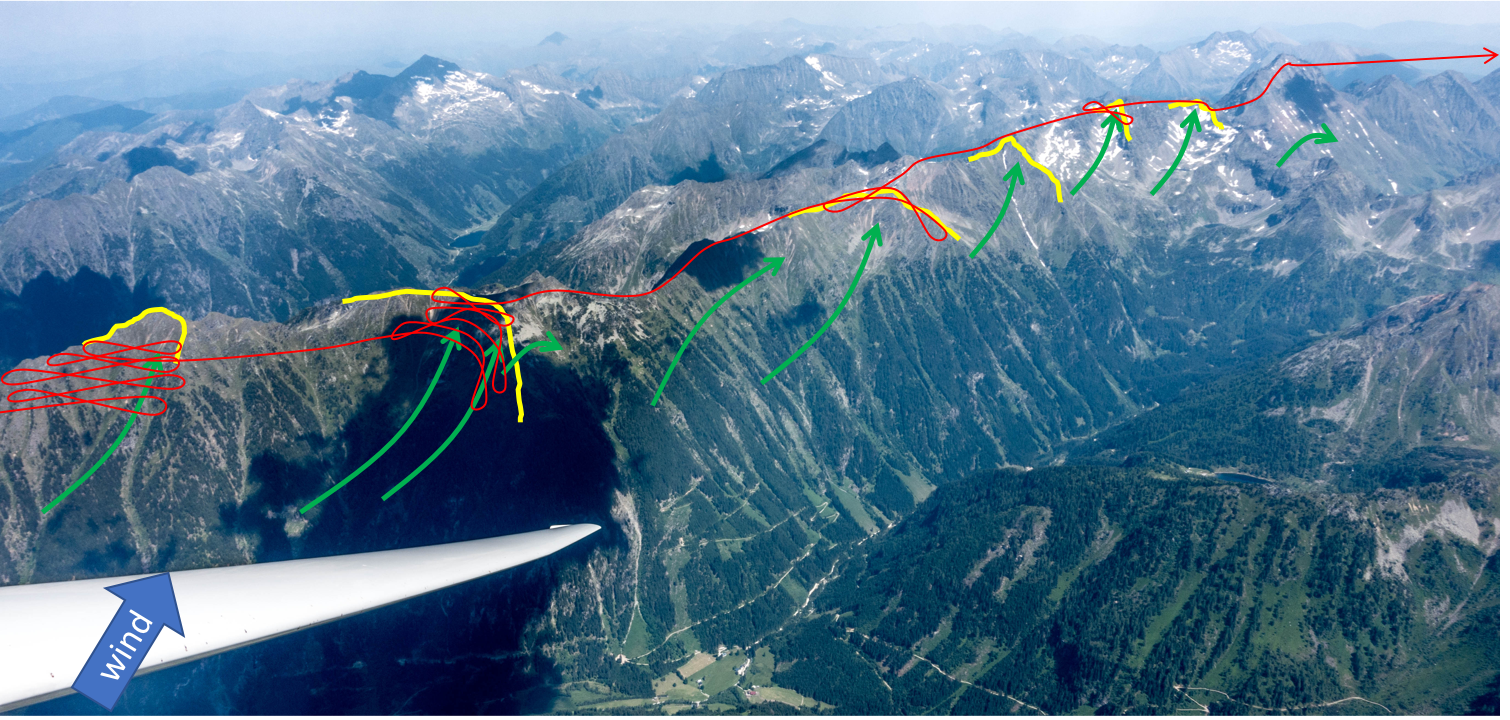
At the beginning of the valley I would use the first opportunity to climb up to a more comfortable altitude. From there I would continue to head along the ridge, always seeking to climb in the area where the wind is funneled up by a bowl. Some pilots will circle in bowls because this enables them to stay in the area of the best lift. However, when circling near a ridge there is always the danger of misjudging the distance to the ridge that is necessary to complete the circle, especially if the wind has a strong horizontal component that is blowing you towards the ridge. Personally I think the time gained is not worth it and I rather spend a bit more time flying figure eights, which gives me a greater safety cushion. In order to cross the pass at the far end of the valley (on the right side) I would want to be well above the level of the ridge because I would anticipate turbulence and sink in the lee of the pass (where the green arrow curves downward). By crossing the pass high enough I would likely continue to find lift on the face of the taller mountain (it is called “Hochgolling”) just beyond the pass and not lose any altitude during the crossing.
Also note that the valley is quite narrow so I definitely would not want to enter it any lower than tree line. There’s one potential land out field in the main valley just to the left of the picture that I would immediately head to if I unexpectedly dropped below tree line at any point in the valley.
By the way, I’ve found that a great way to practice ridge flying in a somewhat more realistic but still risk-free environment is on my PC using the Condor Soaring Simulator. While no simulation is perfect, Condor does a great job simulating not only thermals but also the wind on the ridges and you get a real sense how powerful and how close together updrafts and downdrafts along a ridge can be. You’ll get a feel for the wind drift as you fly close to terrain, and you experience the consequences of getting disoriented when you take a route that suddenly and unexpectedly leads you to a slope in the lee. I’ve also seen how quickly a seemingly save and innocuous flight in the mountains can turn into into an emergency situation. Not everything you learn on Condor translates 1:1 into the real world but I have found that it sharpened my spatial thinking and it certainly taught me a healthy respect for flying in the mountains.
How do I transition from one ridge to another?
Flying from one ridge to another is in principle like flying from one thermal to the next: you want to make sure you get there with enough altitude to safely connect with the lift. To do that you have to account for the direction and speed of the wind, the distance you need to bridge, and then fly with the best speed to optimize the transition. But that’s where the similarities end. Ridge transitions are a lot more complex (and can also be dangerous). We must distinguish between upwind and downwind transitions.
Downwind Transitions
For obvious reasons, downwind transitions are faster, safer, and easier than upwind transitions. Let’s start with the easiest one:
You fly figure eights on the upwind ridge until you have sufficient altitude to dash to the downwind ridge. If you are lucky (as shown in the sketch above) and can transition from the end of the ridge – rather than over the top – this is the better solution because you can avoid much of the sink and turbulence in the lee of the first ridge.
Let’s consider a transition over the top of a ridge:
We’re now dealing with long unbroken ridges – so we have to over the top to transition. In addition I have drawn ridges with rounded tops. We’ve seen before that the best climb zones tend to be further in front of such hills and often don’t extend far over the top. That means we have to be extra careful that we have sufficient altitude before we fly over the top. Many a pilot has already got caught by this and landed (or crashed) right on top of the hill. Since we have to transition over the top we must also expect significant sink on the downwind side. We have to account for this when we estimate our arrival altitude at the downwind ridge. Note how I chose to draw the transition at a spot where the distance between the too ridges is fairly small.
Notice also another difference: the downwind ridge is not exactly parallel to the upwind ridge. Perhaps unbeknownst to us, the unequal distance between the ridges may have a profound effect on the strength of the lift on the downwind ridge: if the air mass is stable and the wind is strong enough, the first ridge may trigger a wave system between the two ridges (although this may be invisible to us). See the following sketch:
The dotted lines show two streamlines of a wave system triggered by the downslope of the upwind ridge. Look at the one in the center of the sketch: you can see that in this location the distance between the two ridges is in synch with the wave length. That means that in this section of the downwind ridge the lift along the ridge will be enhanced by the wave motion. We would find particularly strong climb rates in the green shaded area. (Notice also how this streamline moves up much higher behind the second ridge: because the ridge is in synch with the wave motion, it amplifies the wave further downwind.)
Now look at the the lower of the two wave streamlines: in this location the distance between the two ridges is completely out of synch with the wave length. Unfortunately I had chosen this particular spot to arrive at the second ridge. And where I expected lift I only found turbulence and sink and may now be looking for a field to land in. If, however, I carried enough altitude and realized what was going on, I might instead continue to the green spot and find a wonderful climb!
Obviously, wave can form behind any ridge and irrespective of the the terrain further downwind. E.g., had the second ridge been exactly parallel to the upwind ridge, it might have either been completely in synch with the wave system (and we got lucky), or completely out of synch with the wave system (and we got unlucky). If we got to the second ridge and found it not to be working, we should not linger there. Instead, we should fly away from it; in this case, back to the valley and try to connect with rotor lift on the upwind side of the wave motion. From there we might even be able to climb into laminar flow above and leave the ridges for good on this particular day. More about that is in the section on wave lift.
Upwind Transitions
As before, let’s start with the easiest one. In pure ridge lift it may be the only one that works.
The best case scenario for an upwind transition is one where we can fly around the end of the upwind ridge and avoid the lee sink and turbulence (the area shaded in red). If the terrain and wind are such that this is possible, this kind of flying can usually be accomplished in ridge lift alone.
The pilot on this flight uses multiple parallel ridges to climb, and always transitions around the end of the ridges to avoid the lee sink and turbulence. She also stays within easy gliding distance to potential land out fields in the main valley below.
In this type of terrain it is always best to stay near the top of the ridges: our pilot arrives at her first ridge close to the top where it starts to fall off towards the main valley. There she climbs along the ridge into a side valley: in most cases the height of the ridge will increase the further she moves into a side valley. She leaves the ridge when she has reached an altitude that is sufficient for her to push forward to the next ridge and arrive there not far below the top. There she repeats the same thing: as she climbs she looks ahead at the next ridge she wants to use and begins the next transition once she has sufficient altitude to arrive near the top of the subsequent ridge and so forth.
The wind tends to be stronger near the top of the ridges than deeper in the valleys below. Also, in the lower parts of the valleys the wind is usually diverted, flowing along the valleys and not up the slopes. Furthermore, the ridges tend to be steeper near the top: as rocks fall off due to erosion, the bottom of the ridges usually flattens out while the top of the ridge line remains steep. It goes without saying that staying high is also a lot safer and gives us more options to reach land out fields etc. Finally, the further down you get in the valleys, the greater the risk of getting impacted by turbulence from the lee slope on the other side, the potential or rotors turbulence, etc. My basic rule is to leave a narrow valleys as soon as possible if I find myself well below the top of the ridge line.
Things get much more difficult if you cannot fly around the end of a ridge but have to come over the top from the lee side. If the upwind ridge is of similar height as the downwind ridge, then pure ridge lift will normally not allow you to gain enough altitude to get over the top: your transition will be directly into the wind and you will hit strong sink and turbulence before you reach the ridge line in front. Underestimating the amount of altitude loss when crossing over a ridge from the lee is one of the main killers in mountain soaring.
This doesn’t mean that you should never fly over a ridge from the lee side. (Often you can climb in thermal lift far above the tops of the ridges and fly over the ridge in front at an altitude where there the effects of the lee are minimal.) Just always do it with a substantial reserve of altitude and always have an escape path in mind as you approach the ridge. If you have the slightest bit of doubt, turn away while it is still safe to do so!
How do I cross a spur?
Spurs can be traps. Be careful. Even when the entire ridge seems to be working, the area around a spur may not. Consider the following:
Given the direction of the wind, the spur in the middle of the ridge may well be in the wind shadow. If you fly too close at the spur you may suddenly find yourself in unexpected sink when it is too late to turn away from the ridge. The flatter the spur, the more insidious this trap can be. The safe way to fly is to give the spur a wide berth and reconnect with the ridge once you’re passed the spur.
How do I cross a pass?
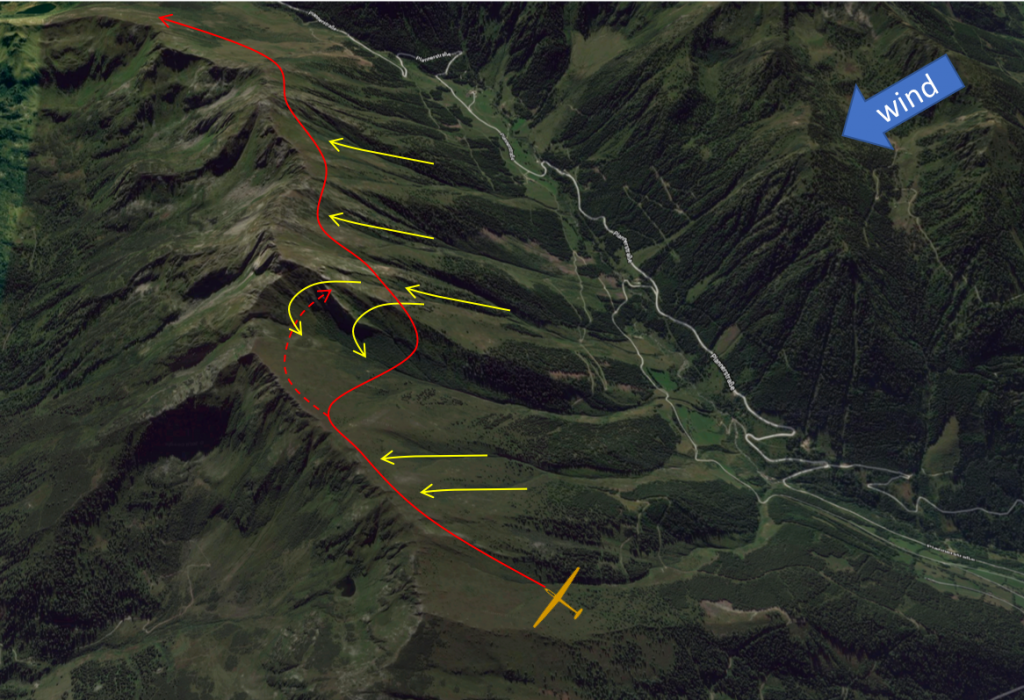
Let’s look at the following scenario. Btw, the valley is the same one as in one of my pictures above but I’ve used a Google Maps image, and changed the perspective and wind direction to make the point better to see.

Pilot 1 (red line) flies a route close to the ridge, carefully avoiding potential sink in the lee of each of the spurs (see above re: spur crossings). Shortly before the pass (just above the little lake) she can see that she’s clearly high enough, continues to hug the ridge that still provides lift and crosses the pass. In case she has any doubts about her altitude, she is able to turn around, fly back to the ridge, climb even higher and cross the pass on the second attempt (see the dotted red line).
Pilot 2 (white dotted line) believes earlier on that he has the pass made and heads straight towards it. He neglects to approach the pass from an acute angle and leaves no room for an escape. Then he hits turbulence and sink just as he approaches the pass and looses a lot of energy. If he can’t scrape over the pass with sheer luck, his flight will end in disaster. The lesson is simple: don’t be pilot 2. Make sure you fly with an adequate safety margin and always keep an escape route until you are absolutely certain (i.e. not the slightest bit of doubt) that you can cross the pass safely.
How do I fly in more complex terrain?
When I think of complex terrain, I think of the Colorado foothills, which is where I now fly most of the time.
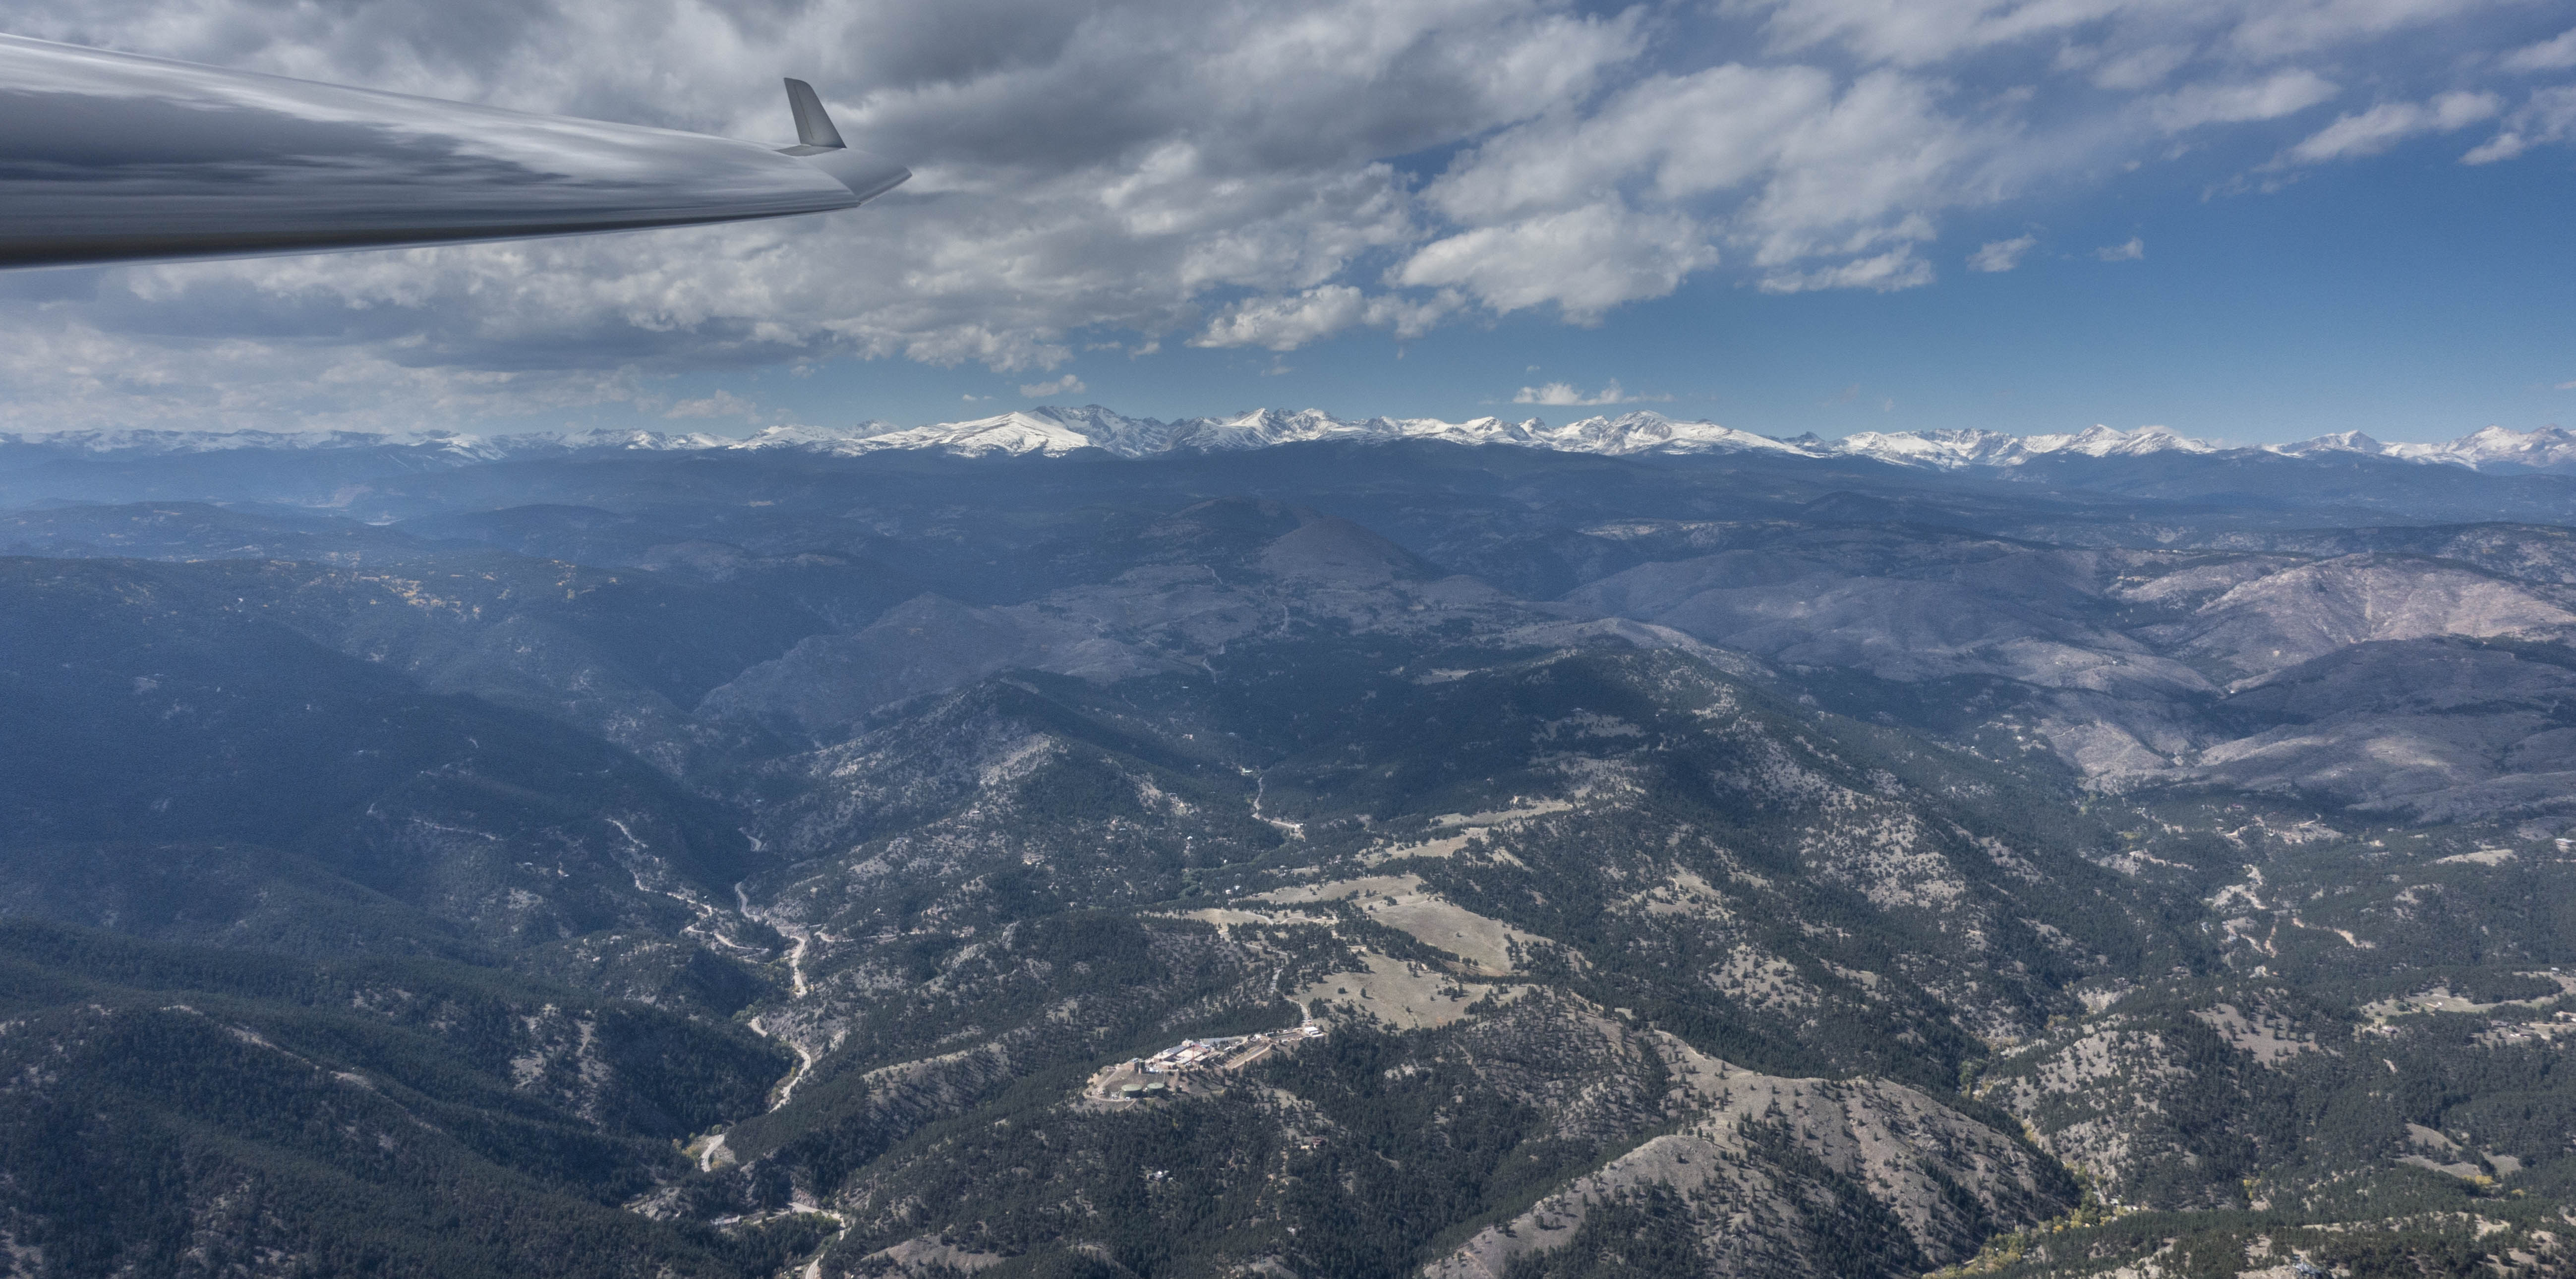
This is a great terrain for flying in thermals. The sun is hitting the surface at various different angles, causing uneven heating. There are open meadows that heat up faster than the surrounding forests. Many small ridge lines create ample opportunities for thermals to break off. These hills can produce lift of 10 kt or even more, sometimes reaching well beyond the legal flying limit of 18,000 feet. In the winter months this is also a great place to fly in wave triggered by the downslope of the Rocky Mountains that you can see in the background. But thus type of terrain not conducive to ridge soaring at all. The slopes tend to be steep deep down in the canyons and the tops of the hills are more rounded. The ridge lines are short and their directions are all over the place. And once you’re down at the level of these ridges there is no place to go and land if something doesn’t work out. For those who fly here the basic rule is simple: get high and stay high.
Personally I will only approach a ridge line if it meets the following criteria: 1) I can work out with a high degree of confidence where the lift is going to be (this requires knowing the direction and strength of the wind and how it interacts with the terrain); and 2) There is a clear escape route to a land-able field if the lift isn’t where I had expected it to be. The terrain in the picture above fails both of these tests.