As most of our gliders are grounded due to the Coronavirus pandemic, lots of pilots are flocking to Condor to spread their virtual wings and get their fix of soaring. You can have a good time flying by yourself but the real fun starts when you fly with others. And the pinnacle of fun is multiplayer online racing. The racing environment is very welcoming and friendly but the learning curve can be steep – especially at the beginning.
Helping you to shorten the learning curve is the purpose of this article. It assumes that you are already a proficient glider pilot (whether in Condor, in the real world, or both), that you are acquainted with the concepts of cross-country flying, but that you have no or only limited racing experience. You should also be familiar with the controls in Condor and make sure you have a suitable computer setup. (Read this article to learn more about Condor – at the end you will find my recommendations for hard- and software.) Hopefully the following tips will help and encourage you join the fun of multi-player online contests.
The Basics
The purpose of racing is obviously to go fast. In Condor, most races are “racing tasks”, i.e. the pilot who can get around a set course the fastest, wins. Most of the scoring is based on the familiar 1000 pt model used in real world FAI gliding contests. (There are exceptions such as “Grand Prix” style races and Assigned Area Tasks but both are rare. This article focuses primarily on FAI racing tasks and what you can do to try to minimize the time you need to fly around the course.)
First, remember what you learned in your real life training about finding lift because Condor tries to simulate the real world (and does so quite well).
Ridge lift obviously forms on the wind-ward side of ridges and the strength of the lift depends on the strength of the wind (stronger is better), the angle between the wind direction and the ridge (perpendicular is best), the shape of the ridge (steeper is generally better), and your position relative to the ridge (all else being equal, the best lift will be near the top of the ridge). (Here is more information about ridge soaring in general).
Thermal lift is stronger in the mountains than over the flats. The best lift will be near the top of sun-exposed slopes, especially if the wind direction is the same as the direction of the sun. If you look for lift under clouds, the best lift will be on the windward side of the cloud, especially if that is also the sunny side. Conversely, be careful looking for lift under clouds in the lee of mountains, especially if you’re also in the shade. Such clouds rarely work and if they do, the lift may only be close to cloud base. Always, always pay very close attention to the wind and the sun. Also bear in mind that clouds with a higher cloud base tend to indicate stronger lift than clouds with lower cloud bases. And newly forming clouds tend to provide better lift than aging clouds. (Did I say it was just like real life? It is.)
Wave lift forms in the lee of mountains under certain conditions. A detailed explanation would go beyond the scope of this tutorial but again, remember what you learned. (Here is more information about wave flying in general.) Most of the Condor races tend to be primarily a mix of ridge and thermal flying. It is not very often that wave is a big factor.
Condor does not (yet) model convergence lift so this is one complexity less than in real life.
To race effectively, you have to first internalize these basics because only then will you have sufficient mental band-width to concentrate on all the other decisions you have to make.
Preliminary Route Planning
Just as in real-life you should plan your flight ahead of time.
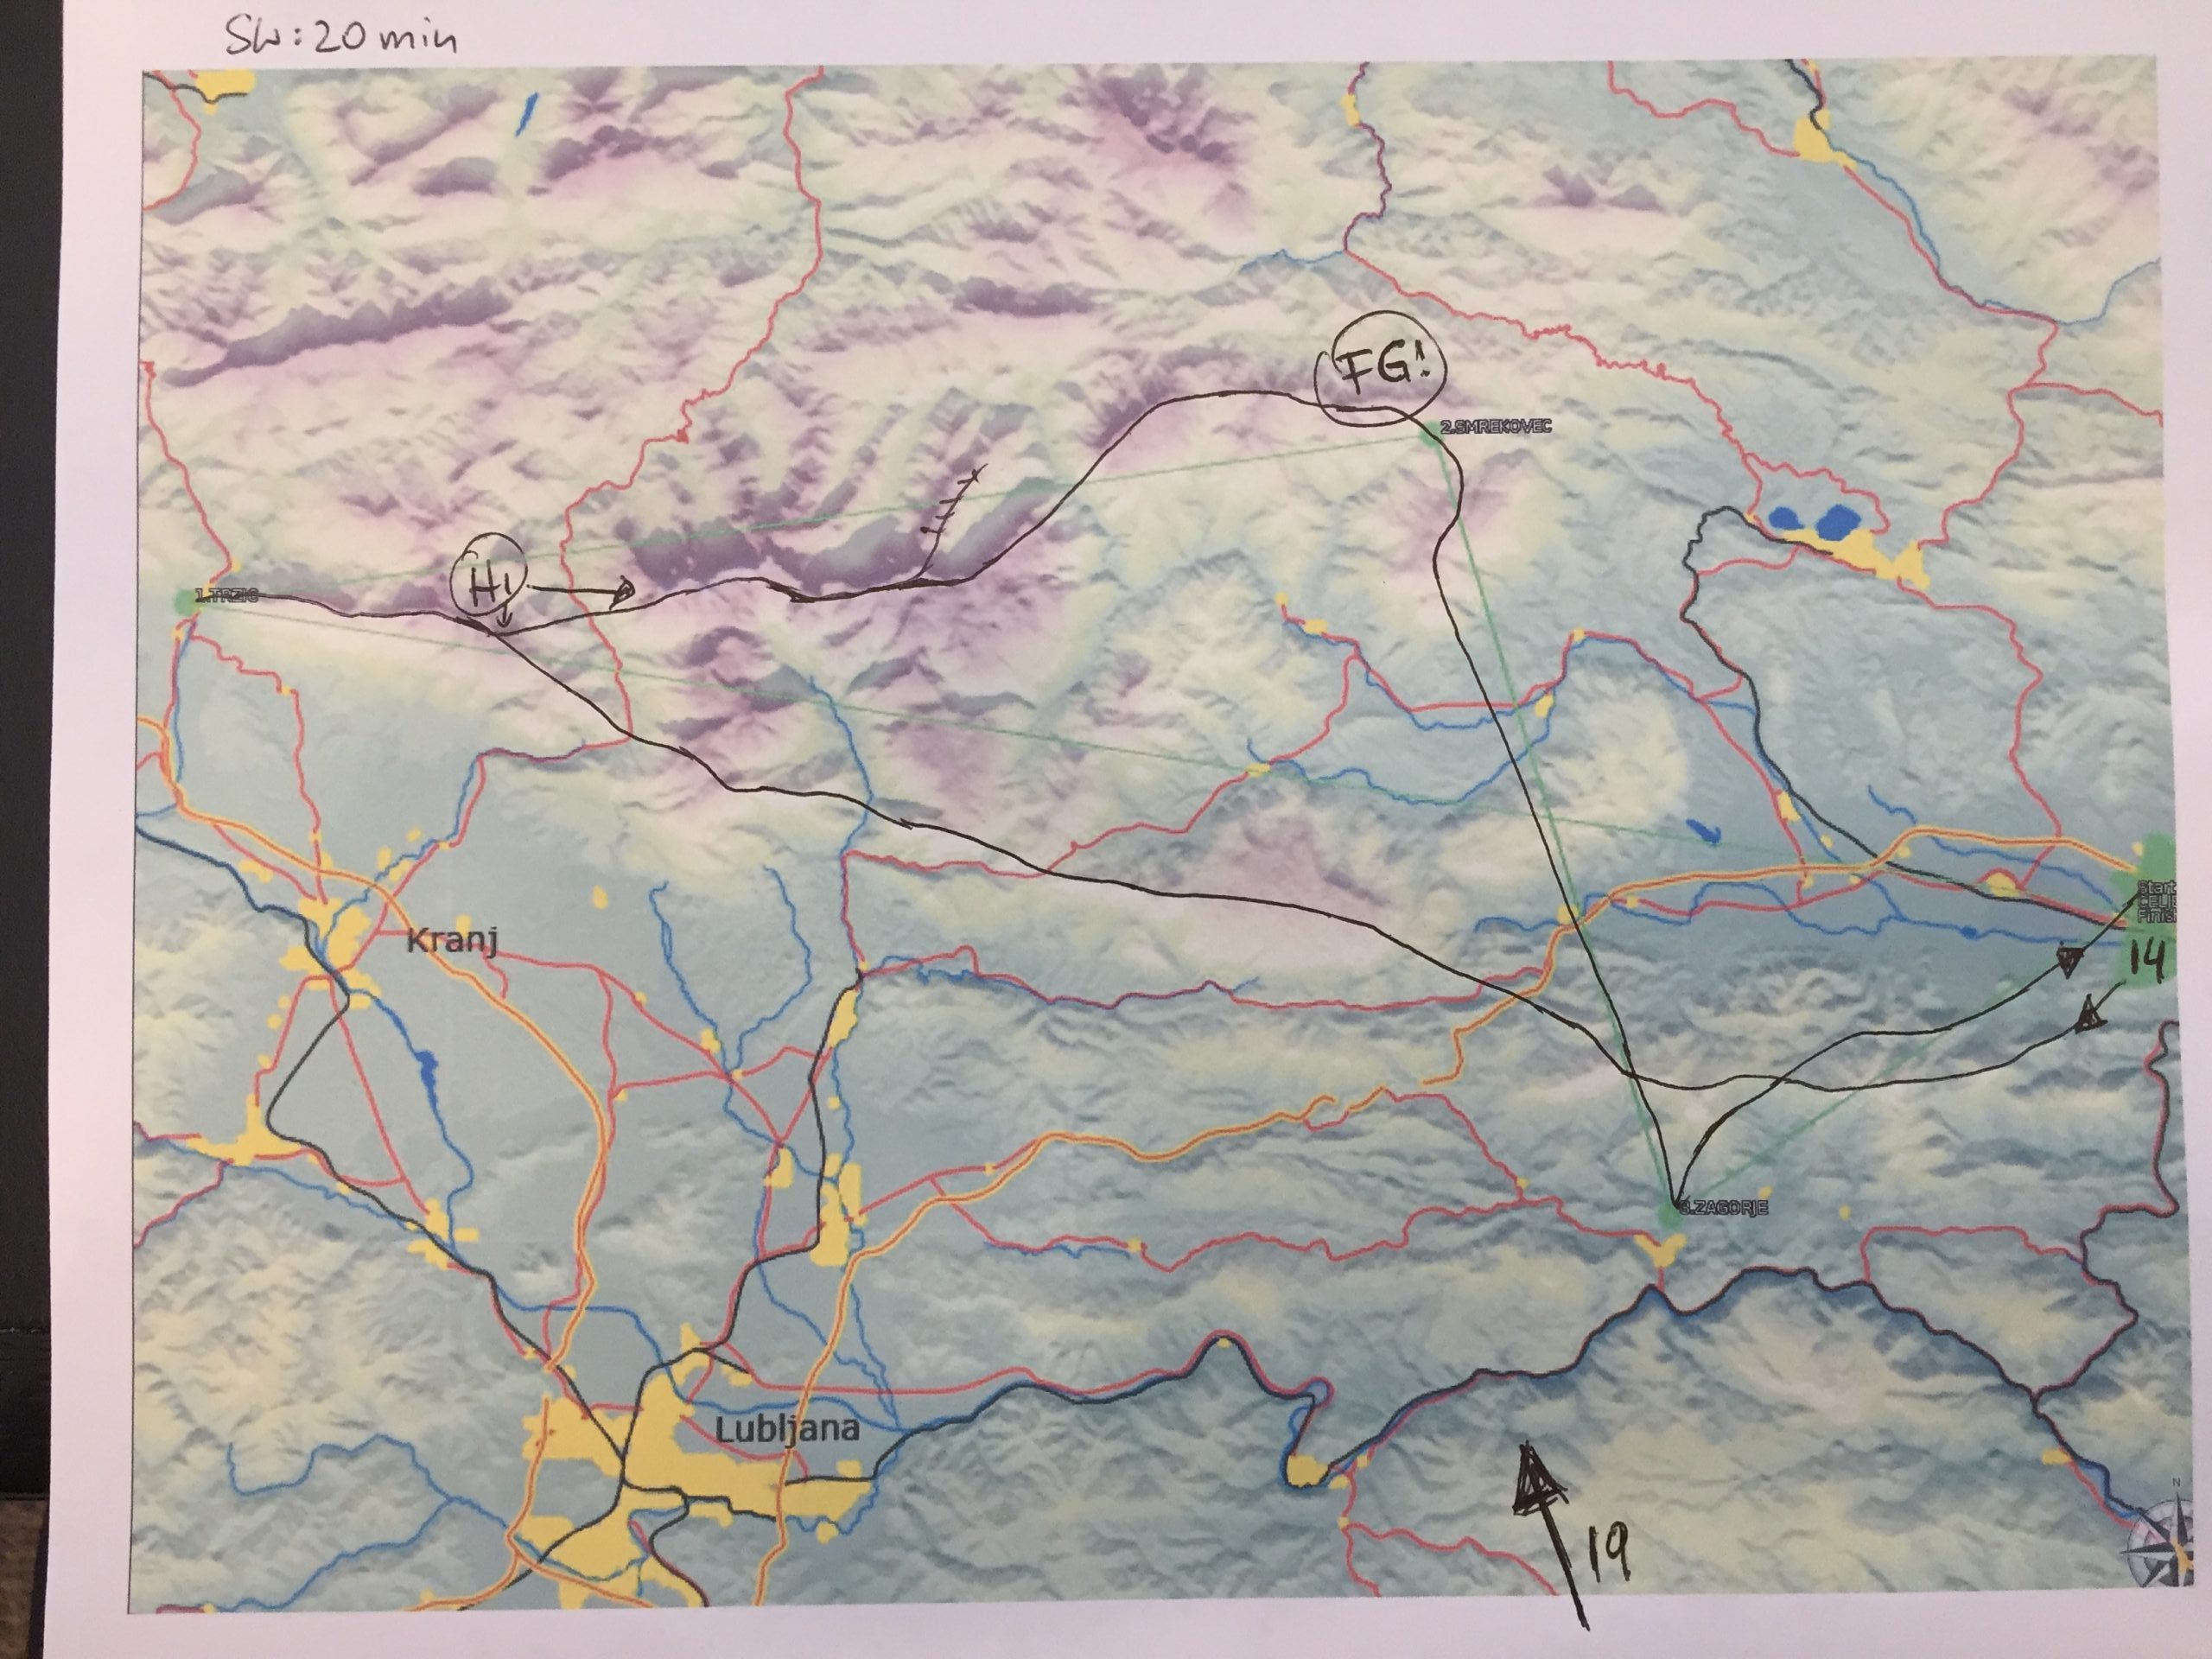
First of all, you should read the briefing that is automatically emailed to you when you sign up for a race. If you have a printer, I highly recommend that you print out the map of the task that comes as part of the briefing. (Depending on the contest, the full briefing including the map may be available right away, or it might only become available 15 minutes before the server starts. In either case, print the map.)
The first thing you should do after printing the map is to draw a wind arrow on the map and take note of the wind strength. You cannot plan your flight route without that. You should also take note of the maximum start height and any unusual turn-point properties. (E.g., sometimes a minimum or maximum height is stipulated for a particular turn point, and sometimes a minimum height is stipulated for the finish. You will get mad at yourself if you overlook one of those things. Ask me how I know.)
The next thing you should do is plan your intended course line. Just like in real-life the biggest factor determining your speed is how effectively you take advantage of “energy lines”. E.g., you want to fly in ridge lift wherever possible. Even if the wind is so weak that you can’t climb, flying along ridge lines will help you sustain altitude and you will need to make fewer stops to climb. And even if there is no wind at all, remember that the air will move up along sun-facing slopes. So fly along such slopes if you can, not in the middle of the valley! Remember that there will only be sink in the lee of any slope, so avoid those areas as much as possible. If your route must take you through the lee to reach a turnpoint, anticipate that you will lose a lot of altitude while crossing those areas.
As you plan your route, pay very close attention to transitions between different parts of the task.
Your first transition typically comes right after the start because the start altitude is often well below cloud base. Think about how you get going efficiently. E.g., can you glide straight to a ridge or will you have to take a thermal first?
When you transition from the flats into the mountains, think ahead where the most likely spots are going to be that will allow you to gain the altitude you need to get close to the ridge tops. (You do not want to find yourself near the bottom of a steep valley – you will lose a lot of time to dig yourself out from there – it you’re even able to do it.)
It is crucial that you identify any upwind transitions across mountain ridges. I usually mark the altitude of the ridges (or passes) that I have to cross on my map and I estimate how high I want to be at the most logical point to climb before the transition so that I have enough height to get across. There is nothing more frustrating than to approach a ridge from the lee and then have to turn around at the last moment. You can easily lose 20-30 minutes with one such mistake. (Or you might even crash.) If you’re having trouble judging how much altitude you need to make it over a ridge, this is a skill you can practice. Daniel Sazhin suggests some specific Condor exercises for this. You can find them here.
You should also think about transitions from areas with stronger lift (i.e. mountainous terrain) into areas with weaker lift (i.e. flats). If you have been driving hard because the conditions were so strong it is very tempting to keep pushing as conditions deteriorate only to find that you get stuck and have to take a slow climb. Thinking ahead pays off.
If there is significant wind, you should also consider the impact of the wind on the altitude at each of the turn points, especially on thermaling tasks. Since you will drift with the wind when you’re circling you want most of your circling to happen when you are on a downwind leg and minimize any circling on upwind legs. That means, all else being equal, you should round downwind turn points high, and upwind turn points low. I usually write “Hi” or “Lo” next to each of the turn points on my map.
Finally, pay attention to the final glide. This is just another special transition. Think ahead as to where the final glide is likely to start. E.g., if the finish is somewhere in the flats where the lift is weak you will want to start the final glide in an area where the climb rates are likely to be better. Carefully look for terrain obstacles on final glide or the likelihood of sink if you have to fly in the lee of mountains.
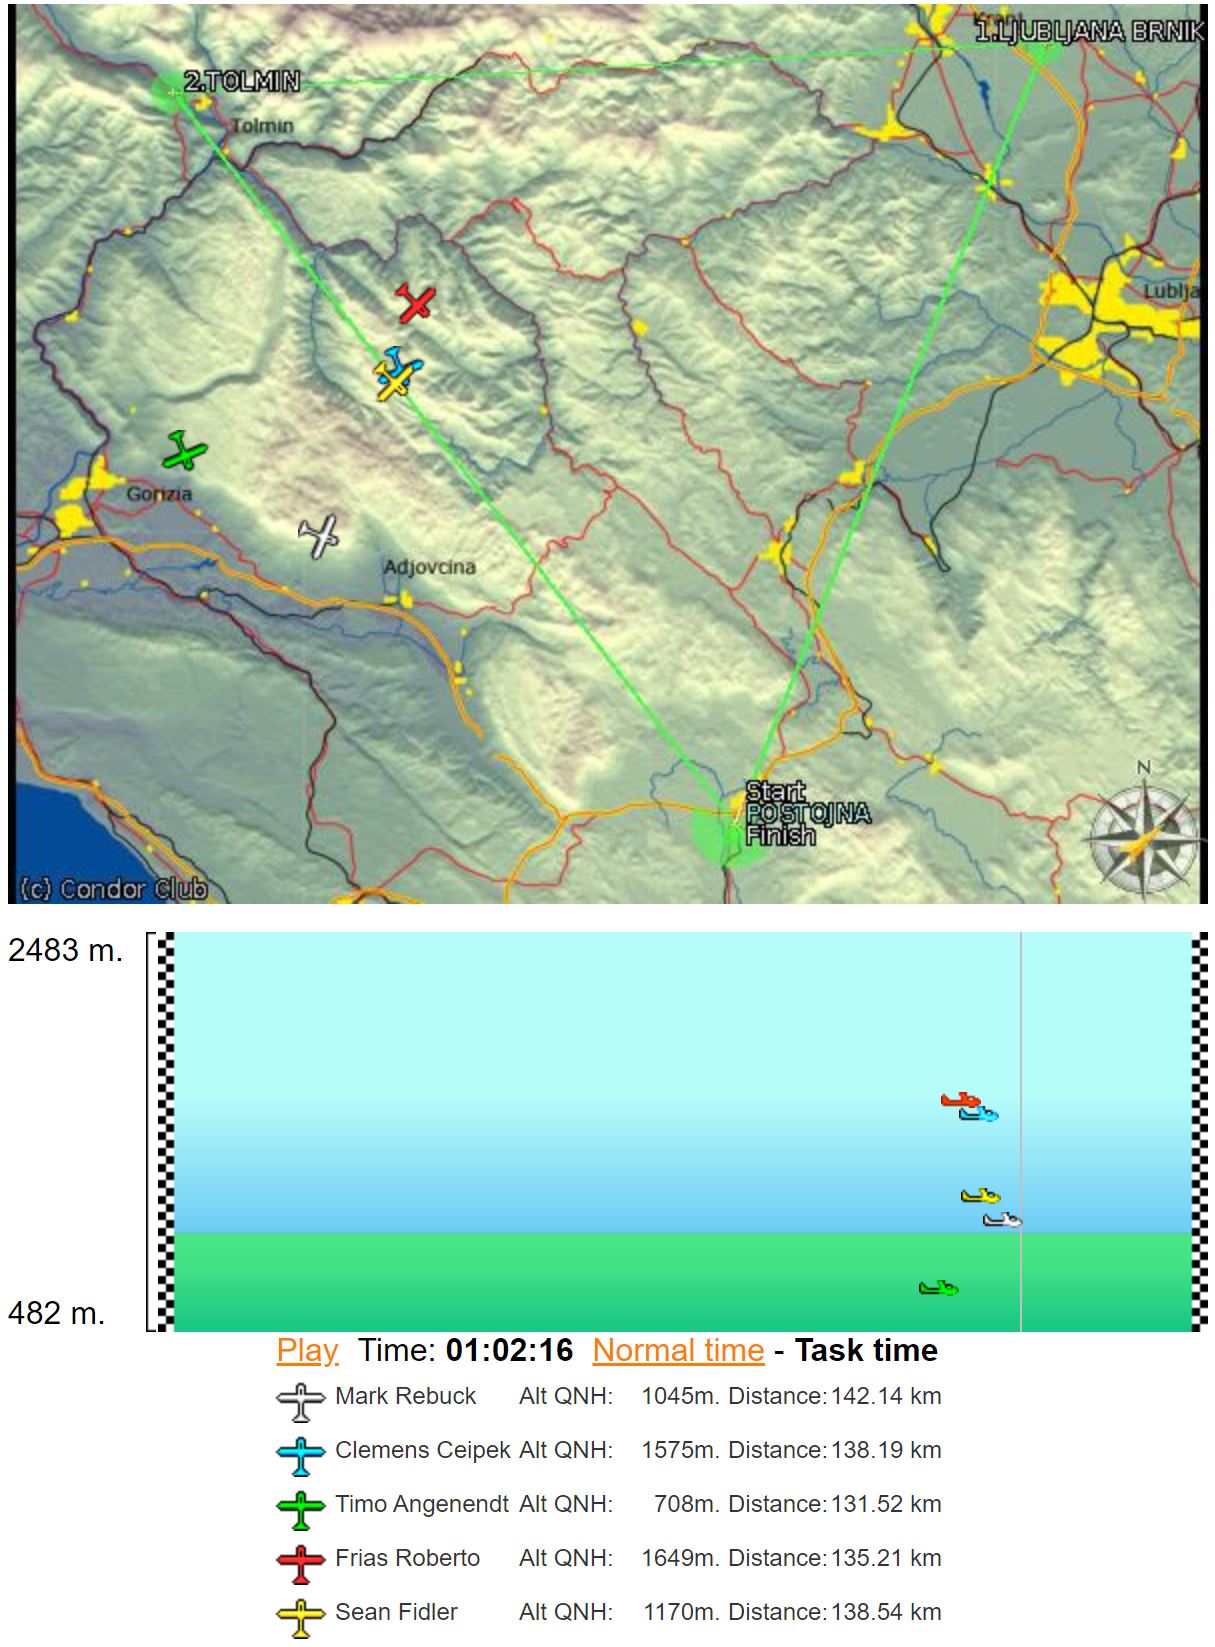
Not all of the things mentioned above are equally important for every race. Below is the map I marked up in preparation for the race on March 26. With a bit of practice it only takes a few minutes to prepare.
Other Pre-Flight Decisions
As soon as the “join time” begins, you should connect to the server. This will start Condor and load the task. However, don’t jump into the flight right away! Instead, take a close look at the Flight Planner where you find additional information about the day’s conditions. Reading this is critical to finalize your route planning and to make decisions about the glider you intend to fly (what glider, how much ballast, and CG position).
In particular, pay close attention to the “Weather” tab and each of the four sub tabs: wind, thermals, wave, and high clouds. E.g., in addition to wind strength and wind direction, you will learn how much variability there will be for each of those factors.
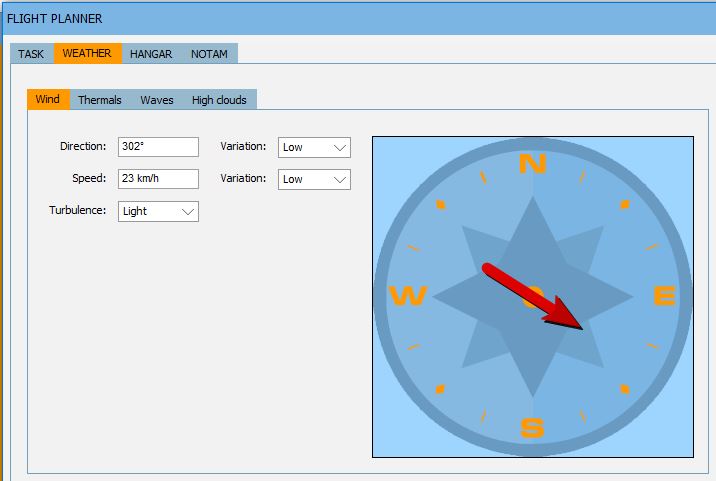
On the “Thermals” tab you can find crucial information about the presence of cumulus clouds, the height of the cloud base, the strength and width of the thermals, the overall thermal activity, how much activity you can expect in the flats, and if there will be thermal streets. Also note the variability of each of these parameters.
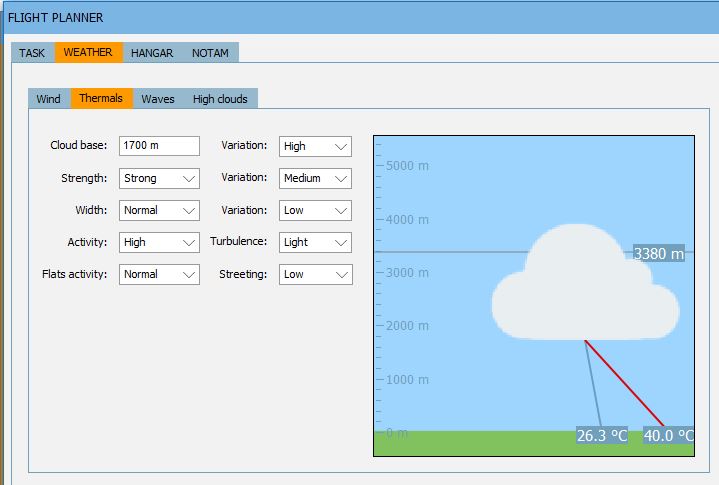
E.g., if there is high flats activity, if the thermals are wide and well-marked, and if streeting is high, you can expect that you will be able to do a good amount of dolphin flying, especially on task legs that are well aligned with the wind direction. Your risk of having to land out will be very low. On the other hand, if you’re dealing with blue thermals, the flats activity is low, and the thermals are narrow you can anticipate that any section over flat terrain will be very challenging. In this case make sure to gain as much height as you need before you enter any flat section and fly more conservatively. Take a look at the wave tab to see if you should expect wave activity in the lee of mountains. This is important to note even if you don’t plan to use wave lift during the flight because the presence of wave may cause some unexpected sink, especially if the wave is not marked by lenticular clouds.
The “High clouds” tab shows how much cirrus cover you should anticipate on the flight. (In the real world, cirrus will cause thermal generation to be suppressed although I am not 100% sure to what degree this is true in Condor as well.)
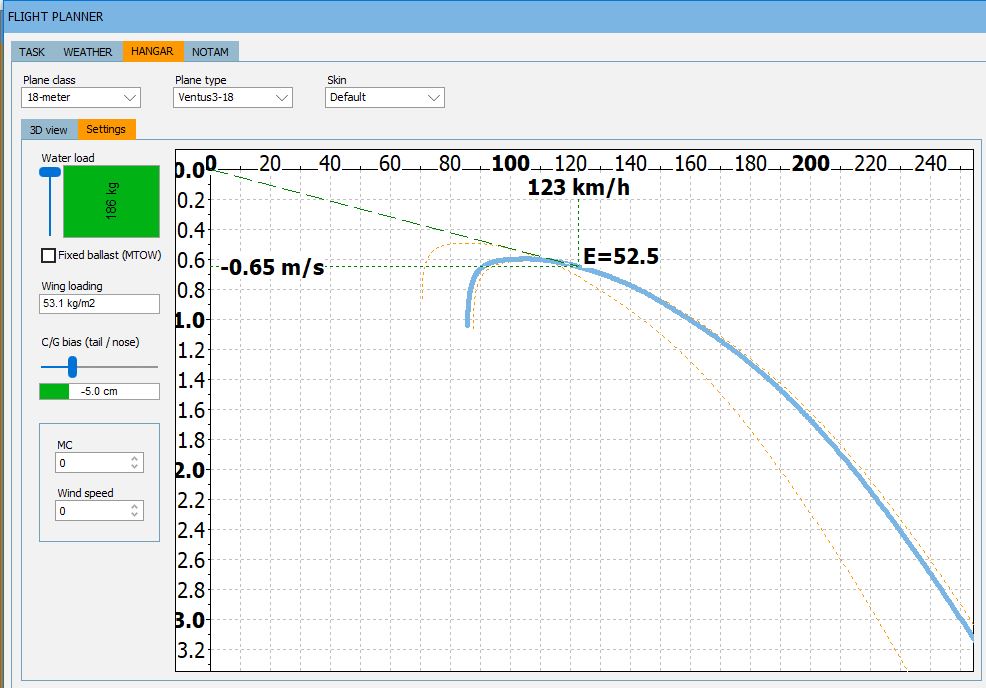
Once you have taken note of these parameters and determined how they affect your route plans it is time to go to the “Hangar” tab and pick your plane.
If there are no handicap rules, pick the highest performing plane that is permissible by the race. You can compare the performance of different gliders by looking at the polar graphs under “Settings” on the “Hangar” tab. You can also look at prior contests that were held for the same plane class and see what gliders the winners used. If there is a handicap in place the decision gets more difficult and depends heavily on the task. E.g., if maneuverability is critical such as when having to thermal close to rock faces in high mountains you will want a different glider than when there are vast stretches of weak lift where you want maximum glide performance.
Ballast or no ballast? Almost all Condor races that I have ever flown were won by pilots who flew with full water ballast. I would say, definitely start the race with full ballast and only drop ballast if you can’t average more than 2-3 kts in climbs and there isn’t much ridge flying involved. If you drop ballast, it’s best to do it early in the race, ideally at the end of your first cruise / the beginning of your first climb. If you hang on to full ballast for most of the race, it makes no sense to drop it towards the end because you will miss it on your final glide.
With respect to setting the CG there are many different opinions. In my view, the overall performance difference of different CG positions is probably fairly minor. In general, gliders tend to circle better with the CG aft and run better with the cg forward but I doubt that this is a big factor for the overall race outcome. Experiment with different CG positions and find out what you like. I tend to fly with a medium aft CG unless the task involves mostly ridge running and/or significant turbulence (you can see this upfront in the flight planner) in which case I put the CG forward.
The Start
Once you’ve finished the route planning and picked your glider, ballast, and CG it’s time to join the flight. Most Condor races start “airborne”, i.e. you won’t have to aero-tow or winch to get up. This is to safe all participants a lot of waiting time before the race gets underway.
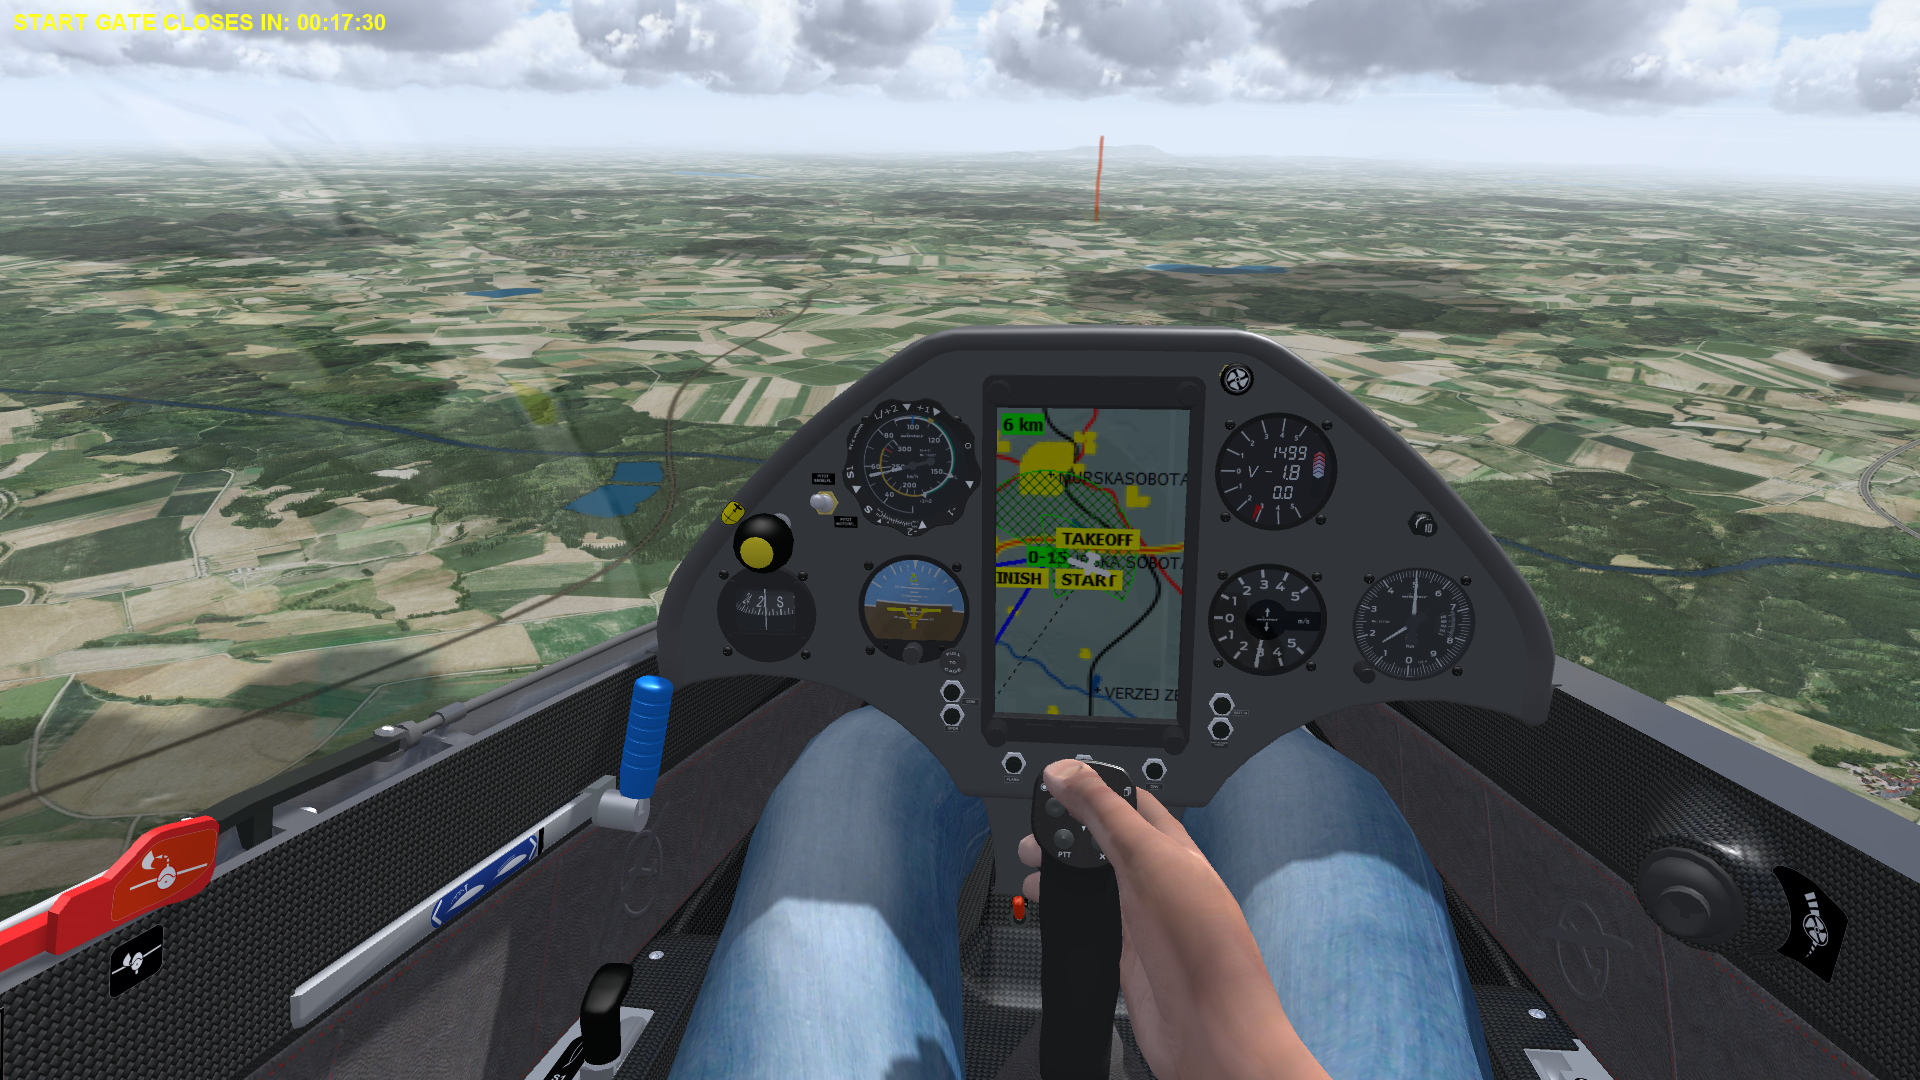
At the left top of the screen a count down will tell you how much time is left for others to join the game. Once the count down reaches zero there is a short delay until the start gate opens. The delay is usually a few minutes and the duration is specified in the briefing email. This is then followed by the start window time, i.e., the length of time that the start gate remains open. This is also specified in the briefing email. It could be as long as an hour or as short as one minute. If there is a “Regatta” start, the clock starts ticking for everyone as soon as the window opens.
Use the time between joining the game and the start of your race to get a feel for the day as you would in real life. Sample a few thermals to get a sense of the thermal strength so you can set your MC to what you expect to achieve at the first thermal out on course. If you have the time you may even fly out on task for a little while to check the conditions ahead, or, if the start is also the finish, you can take a closer look at the terrain on final glide. The briefing may have specified a particular turn direction in the start area – it is usually left turns only. (Out on course you can turn in any direction unless you join someone else in a thermal – in that case you must circle in the same direction as those who were there before.)
Also, remember the maximum start height from the briefing. The start sector on your Condor flight computer (typically a half-cylinder) is marked in red before the task opens. Once the start is open and you are in the sector, the sector will turn green as soon as you descend below the maximum start height. Your race time will start running as soon as you exit the sector (except for Regatta starts).
Before the start you should decide where you want to cross the start line. You should have already considered this in your route planning (based on wind direction and terrain) but other factors may come into play (such as the look of the thermals out on course).
Another tactical decision is to pick the right start time. If you are the first to start you have no-one ahead of you to mark any thermals for you. Instead, you will be marking thermals for everyone else. On the other hand, if you start last and can’t catch up to anyone else you will have a lonely flight and can’t take advantage of other gliders at all. So if you’re a relative newbie it may be a good idea to start early (although not first). This way you have someone ahead of you and you will be able to take advantage of the fastest pilots as they catch and pass. It’s a good idea to know who the fastest pilots typically are as this gives you a better idea who you may want to try and follow for a while. The fastest racers will often start at the back because this means they can use others ahead of them as thermal markers.
When it’s time to start, you will want to cross the line with maximum energy. This means, the ideal start is at Vne and just below the maximum start height (obviously with flaps fully negative). Doing so takes some practice. Condor is not very forgiving when you fly too fast. You will flutter and your ship may break apart. So be careful! There is a good reason this type of start is no longer used in real glider contests! I usually approach the start line from a few miles back, close to VnE and I control my height with the spoilers. (In real life you do not want to open your spoilers at VnE, so in this respect Condor is a little more forgiving.) As soon as you cross the start line, ease the speed back to your intended speed to fly. A common mistake is to fly too fast for the first few miles and unnecessarily destroy energy.
If you didn’t like your start you can go back and restart as long as the start window remains open. The last start counts.
Out On Course
Once across the start line you constantly have to make tactical decisions – just as you would in real flying. How fast do you fly? What climb rates will you accept? What route do you pick above the terrain? Do you divert from course to get to an attractive cloud or do you go straight? What is the right altitude to leave a particular climb? Your speed over the duration of the race is ultimately a function of all these decisions.
Some specific things you want to consider: not all climbs are created equal. You only want to stop for the best ones unless you are so low that you have no choice. How can you tell which ones will be best? Again, consider the terrain, the angle of the sun, and the wind: the best climbs will come off wind-ward, sun-facing slopes. Clouds with high bases are better than clouds with lower bases. New clouds are better than aging clouds. Decaying clouds often only have sink under them. Watch the development of the clouds and get a feel for the cycle time. If a cloud off in the distance looks great, it may be in decay by the time you get there. Look for newly forming clouds as they often work best.
Centering lift takes time. You don’t want to do it too often. Beginners often try to take every climb to stay high. This is inefficient, not only because you’re taking climbs that are weaker than average, but also because you have to center more often and each time you center you’re wasting time. If you can anticipate where the best lift under clouds can be found, you will become more efficient because you will approach slightly to the side of where you expect the core to be and decisively turn the correct way. Even better is the situation when other gliders are already centered in a thermal ahead and you can see them go up quickly. If that’s the case, approach on one side of the circle and then turn so that you are directly underneath them. (Make sure to observe their direction of turn as you approach – you must turn the same way for safety reasons.)
While taking too many climbs is inefficient, getting too low is inefficient as well. First, you may be forced to take a below-average climb because that is all you can find within your remaining glide range, and second, thermals tend to be weaker, broken, and narrow as you get closer to the ground. (Once again, this is no different than in the real world!) Furthermore, as clouds age, they may still indicate lift up high, but there may no longer be any lift coming from the ground. So the lower you get, the less you can trust the clouds. For all these reasons, almost all soaring literature will advise you to stay within the “working band” – this is the altitude band in which the average climb rates tend to be best. Contest soaring – especially thermal contest soaring – is a game of chance and you have to constantly assess uncertainties and probabilities as you examine the sky ahead. Which clouds look good? How many of them are likely to work? What are the odds that they still work when I get there? What are the odds of new clouds forming or finding lift in the blue? If you’re interested to learn more about this fascinating topic, I recommend Daniel Sazhin’s articles “Soaring is Risky Business” and “Modeling Gear Shifting“.
If you are on a cross-wind leg and you anticipate the need to thermal stay on the upwind side of the direct course line for any wind drift will make you move to the downwind side. Your total flight route will be shorter if you account for this in anticipation.
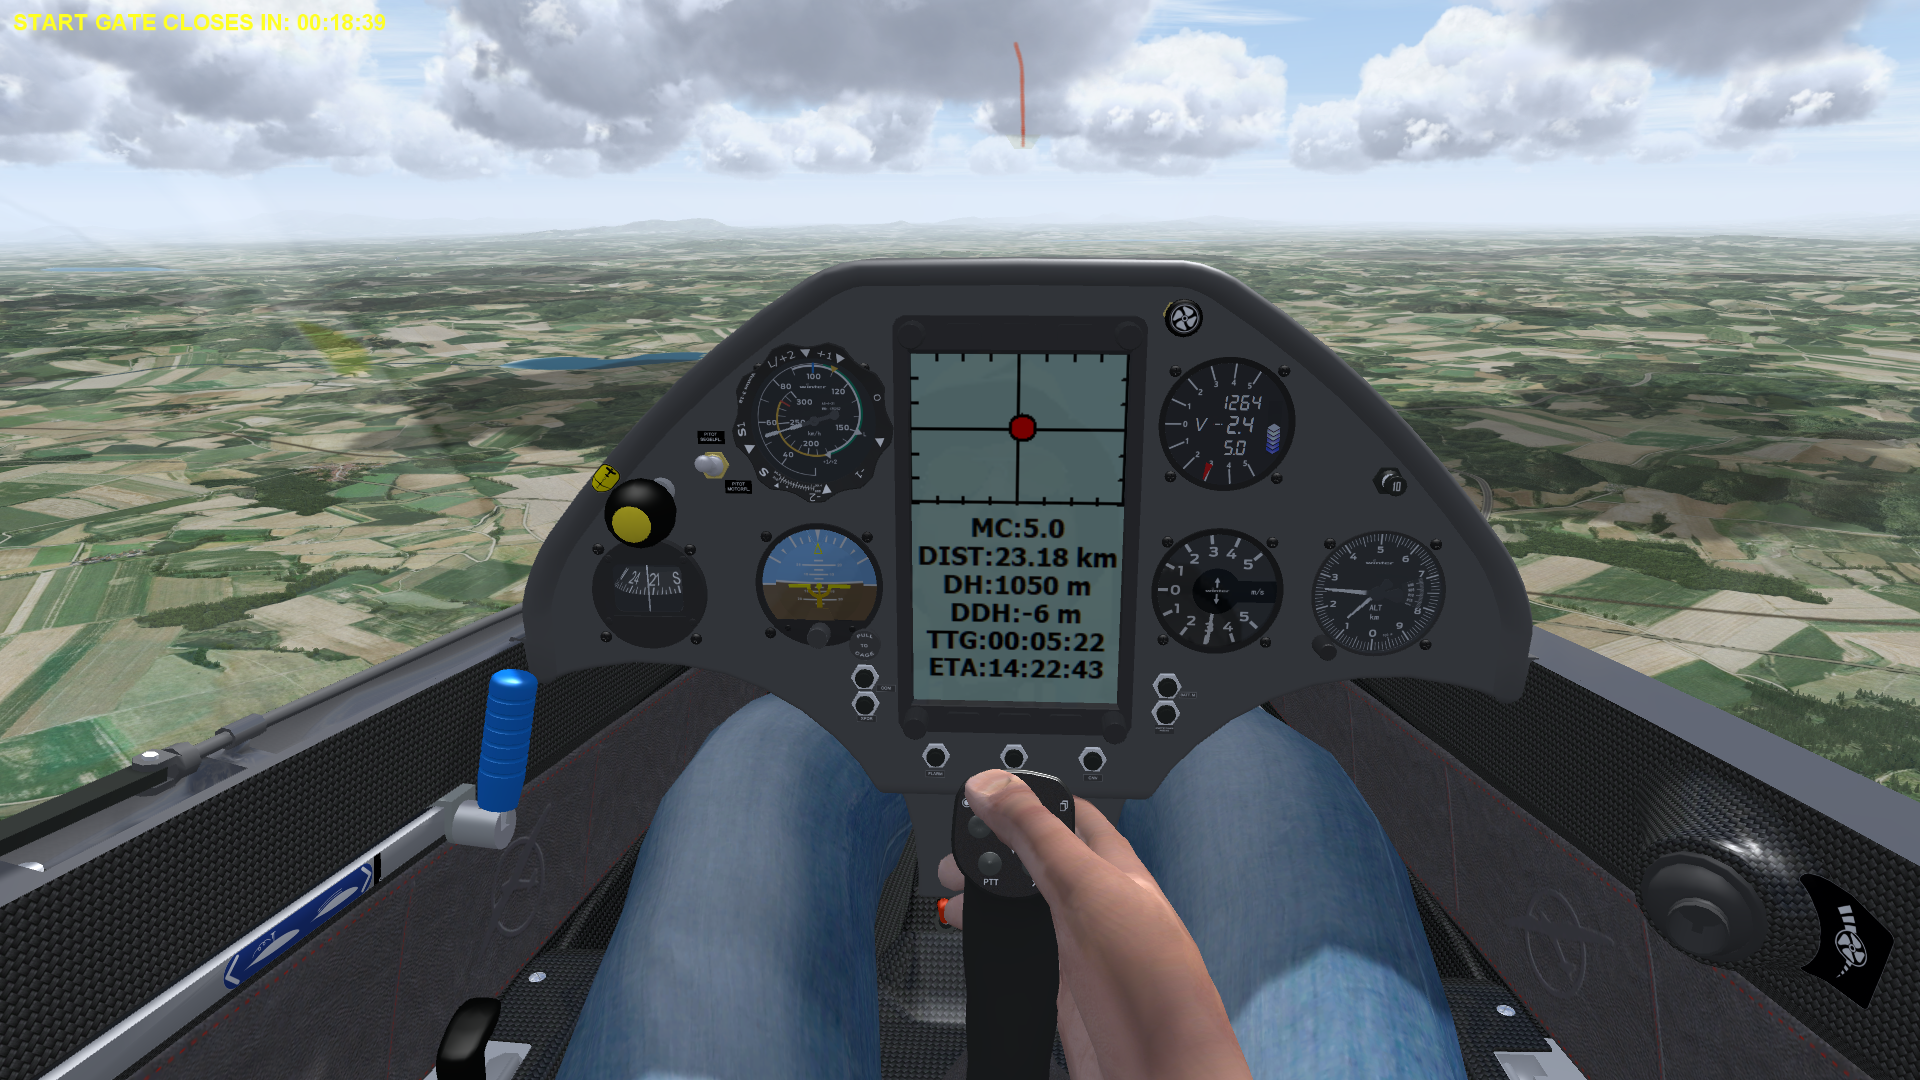
To determine the best speed to fly take advantage of the built-in flight computer and set MC to the value of the anticipated average rate of climb in the next climb ahead. Don’t pick the best (20 second) avg. climb rate that you expect to see in the next thermal but the total average that you anticipate to achieve from the moment you enter to the moment you exit, including any inefficiencies while centering. I tend to use about 75% of the anticipated best climb rate in the next thermal. You can obviously get much more scientific than that. I recommend this article by John Cochrane if you’re interested. (It’s about real life soaring but applies perfectly to Condor as well.)
Use the flight computer to find out at what speed you should fly given your MC setting but do not try to constantly “chase the needle”. Constant speed changes are inefficient. You want to fly with minimal control inputs when you’re cruising to minimize drag. You can also use Condor’s auto-pilot functionality to let the computer fly the plane between thermals (pressing “P” during a race will turn the auto-pilot on and off). You just need to make sure that it is trimmed to the right speed. (This only makes sense when there is no advantage to be gained by following obvious energy lines – either cloud streets or terrain features.) Also make sure that you fly well coordinated and are not inadvertently slipping.
When you are flying in ridge lift, MC theory is of little relevance. What matters most along the ridge is that you fly in the best area of lift. Generally you want to be near the top of the ridge. If you fall below it is important to slow down to get back up quickly so you can take advantage of the best air. When you are well above the ridge you should speed up because you can fly faster if you stay near the top. However, there are exceptions. E.g., if you have to transition to higher terrain ahead, or if you prepare to cross an area of weak lift, you may want to slow down and climb well above the ridge as high as you need to. Try to do that along sections where you anticipate the strongest lift.
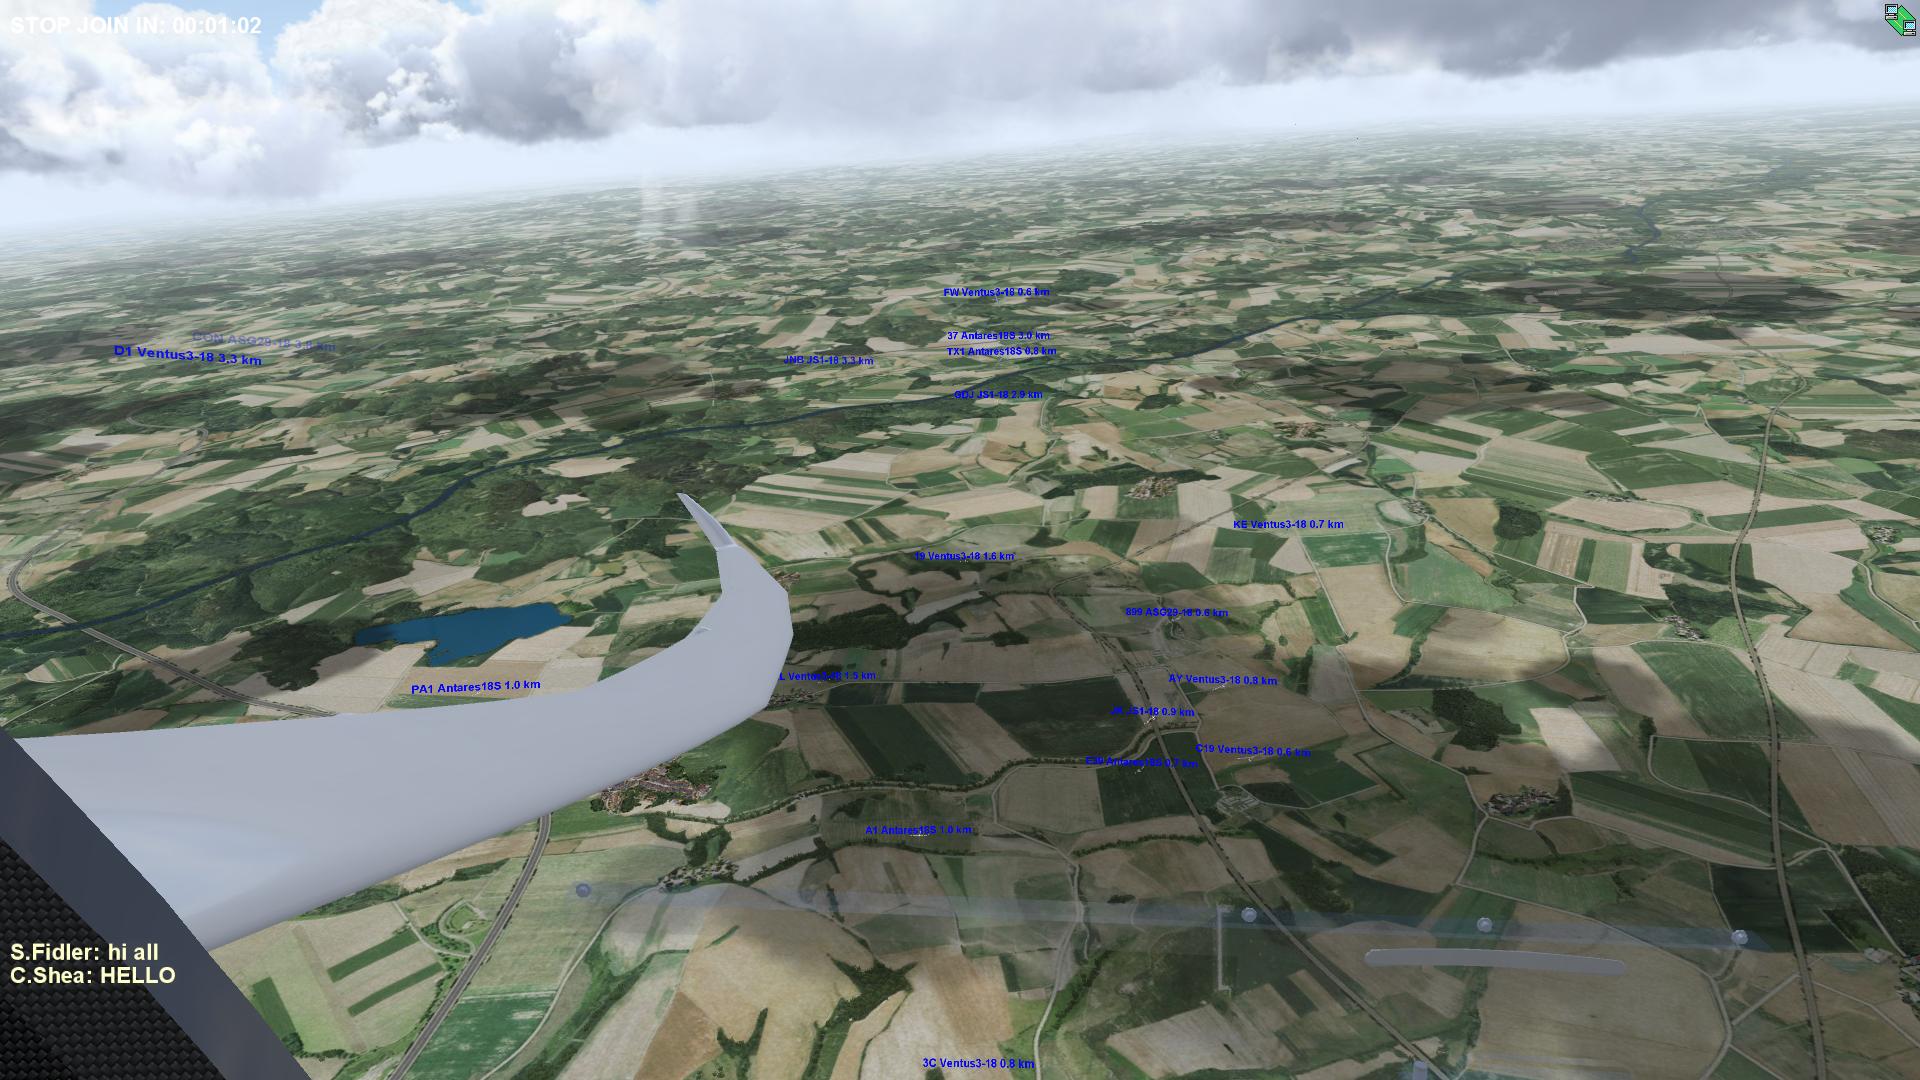
Navigation is also crucially important. Complex mountainous terrain can be confusing. If you’re not careful you may find yourself in a different spot than you thought you would be at. You may even suddenly find yourself in the lee of a ridge when you thought you were on the windward side. One such mistake can easily be the end of your chances and it might even result in a land-out, or even a crash. I always use the map view on the flight computer when I fly in the mountains and I compare what I see on screen to the map that I printed out before the flight.
Should you divert from course or go straight? As with anything else, it depends 🙂 The factors that matter are how much better you expect the lift or the energy line to be along the course deviation, and how big the deviation is (in terms of angle from the direct course line). The cost of a 10 or 15 degree course deviation is very minor and almost always pays off if you’re reasonably confident that you will gain even just a little bit of height (or lose less height) relative to going straight. Even larger deviations of 30 degrees or more often pay off. On the other hand, if you’re moving 90 degrees off course you are no longer moving forward so this will only make sense if you are either desperately low of you just spotted an extraordinary opportunity (or both). Personally, I probably tend to deviate a bit too much but most newcomers fall into the other category, i.e. they deviate too little. Remember, what matters is the angle of the deviation from the course line, not the absolute distance from the course line! Soaring champ and math guru, John Cochrane, demonstrated scientifically when deviations make sense. Check here if you’re keen to dive deeper into this subject.
Always think ahead and be prepared to “switch gears” if the conditions ahead on course are likely to change. It is easy to keep speeding along when you have been doing it for 15 minutes non stop even though the conditions ahead are likely to drastically soften. Conversely, it is easy to remain too conservative when you have struggled to stay aloft and are entering an area where you should be ripping along at high speed. Always fly based on what’s ahead of you, not based on what you are currently experiencing or what you recently experienced. This is easier said than done as we all tend to be biased towards our most recent experience.
Also, do not blindly follow the herd. Just as you are subject to recency bias, everyone else is as well. It takes a lot of discipline to slow down and gain altitude ahead of a soft area when the folks you have been racing with for the last 15 minutes continue to press ahead. It is much better to fly your own race than to blindly follow someone else. The best learning takes place when you make a different decision than someone else and then compare the flight tracks after the race. Did your decision pay off? If the answer is yes, you clearly made a better decision than the the other pilot. If the answer is no, what did the other pilot see that you had overlooked?
Final Glide
If you want to be fast you have to race until the end. This means, don’t take a weak climb up to cloud base if stronger climbs are likely ahead. Your last climb should be at least as strong as those that are likely to come. How high should you climb? Use your flight computer! Set MC to the actual rate of climb in the thermal that you are in and keep climbing until you are on final glide. You may want to take one extra turn because you are going to lose a few hundred feet just to accelerate to cruising speed. Exit the climb as efficiently as possible and get going.
Unlike real races that usually end at a safety altitude (e.g. 1000 ft AGL), the finish line in most Condor races is at the ground level of the airport where the race ends. Normally you cross the finish line at high speed, pull up, drop your water, fly an abbreviated pattern, put the gear down, and land.
Since your life is not at stake, there should not be a mental hurdle to trust the flight computer. There tends to be less unexpected sink in Condor than in the real world and it is very rare that someone ends up coming short. (Just be a bit more careful when the final glide is in the lee of ridges, especially if your MC setting is low.)
Once I am on final glide, I go to the final glide screen and make any fine adjustments to the MC setting such that my arrival altitude is exactly zero. Once I have done that, I simply adjust my speed just to keep it that way.
Even on final glide it is still very important to closely watch the terrain ahead, taking account of the sun and wind. Small route deviations that keep you in good air will pay off nicely because they allow you to increase your speed.
A special case exists when portions of your final glide are likely to be in lift, e.g., when you are able to follow a windward ridge. In this case, there is no need to take your last climb all the way to final glide altitude. You can often get going with a significant negative value and make up the difference en route to the finish line. Unfortunately there is no hard and fast rule for how soon you can get going because it all depends on the strength of the lift you anticipate to find along the way. With practice and experience you will become better at estimating this.
Post Flight Analysis
The fastest pilots are likely to have a lot of experience and you are unlikely to get near the top of the score sheet until you have built some experience yourself. The good news is that Condor-Club gives you easy-to-use tools to compare your flight to those of others. It is very interesting to find out where you lost time against the winners. If you want to take it to the next level, you can even download the flight traces in .igc format and compare them using See You or other flight analysis software.
Condor also allows you to use a downloaded trace from a competitor and set it up as a “ghost” that you can fly against. You can even refly a task against your own “ghost” and see how much you can beat your previous time.
Conclusion
I hope this little tutorial has been helpful and inspires you to join the Condor racing circuit! There is no doubt in my mind than many of the skills learned here will make you a better cross-country pilot in the real world (whether you’re racing or not). However, please always keep in mind that this is just a simulator! Condor encourages you to take risks that you should never assume in reality. Make sure that stays front and center in your mind.
Now, come and join the fun!
Very helpful, thanks.
Excellent! I’ll be trying it out.
Could you write something further about other gliders, perceiving them and avoiding mid-air collisions? I’ve watched a couple of streamed Condor 2 races and I am spatially uninformed by the floating text that from time to time may change to an image of a glider. A search of the online manual finds nothing for “FLARM”. A search for “collision” leads to Flight Settings, which has options to allow recovery after a mid-air, so they must be possible…
Hi Lon, great question! There’s no FLARM System per se in Condor but the built-in flight computer provides a moving map display of other gliders. You can zoom in and out so you can have fairly good situational awareness of where other gliders are. In addition, you can hear other gliders getting close a few seconds before a potential impact. This definitely catches your attention. I highly recommend that pilots use a head-tracking device such as TrackIR. With this device you can look around like you would in a real cockpit and see what is going on around outside. Or you could use a Virtual Reality (VR) headset. This accomplishes the same thing. That said, midair collisions do occur from time to time, especially in dense gaggles and highly populated contests. If you get into a midair collision Condor has a “miracle” plane recovery function – the “Q” key which allows you to repair the plane on the fly. It is up to each race organizer, how to handle the “Q” functionality. Many races allow Q after midair collisions only and often do not even assign a penalty to using it. Others assign a penalty, or the feature may be disabled. Each race organizer publishes the rules for the particular race on the Condor Club website, which is where you register for races. Check out the rules that apply to the particular race series that you may be interested in. Pilots are generally pretty good at trying to avoid midair’s even if there is no penalty assigned. It is not considered good form to shoot someone else down. ;-). There are usually also rules to minimize the risk, such as left turns only in the start area. Out on course everyone must turn the same way in a thermal as the first pilot that entered it. Hope this helps!
I’m new to this. I love learning with Condor 2. But I’m still very confused by the start procedure.
I use the built-in tasks of Condor 2. I’m not participating in any multi-player stuff until I master the basic skills. So I have no briefing documents, no maximum height to enter.
In the first task, Slovenia2 [1.0] the first waypoint is SE of the start. Before the race the zones show green NW of the start and red SE. Should I wait in the red zone, then fly NW after the start to circle around the start point, then exit in the SE direction? If you cross the start at VNE, are you flying SE?
Because of my confusion, I have been just flying spirals around the red/white start pole until I see the waypoint on the PDA switch to the first waypoint.
Thanks for any help.
Hi Dick, in Condor there is always a maximum start altitude specified for the start area. Before you start your flight, go to the Flight Planner and look at the TASK tab. There you can look at (and change) the specifications for the start area and each of the turn points. Once you start the flight, the maximum start altitude is also indicated on the map screen of the PDA (it is shown in 100s of meters, i.e. “19” means 1900 meters). You must be below the max start altitude when you exit the start area to get a valid start. I suspect that you are flying around the start pole until you are below start altitude. You don’t need the start pole at all. Try to turn it off altogether and just use the PDA. Look at the Condor Manual and try to figure out how to use it. To fly tasks successfully you need to learn it just as you need to learn to use the flight computer in a real glider if you want to compete. You may also want to look at this article: https://chessintheair.com/condor-from-starting-to-racing-a-brief-guide-for-beginners/
Hope this helps!
Hi Dick,
Your ‘little’ tutorial is very helpful to me to get on with it.
Thank you!!
I sometimes can’t get fixed to sequence after I’ve passed them. The red dot was centered. I flew along the blue line. Passed the fix. Turned around. And never got the notification that I’d passed the fix, and the flight computer never sequenced. It’s just stuck. I can fly around in circles past the thing endlessly until I crash, out of energy. What the heck am I missing? It isn’t a normal triangular box but a straight line with a single hash mark on each end facing away from my original and next route. I really wish Condor did a better job explaining that computer and the routes. I don’t get it.
Hi Jason, I’m not 100% sure I understand correctly what you’re describing but I suspect you are referring to a situation when the flight computer does not recognize that you have rounded a turn point. If that’s the case, the most likely reason for this is that you did not get a valid start on your task first. The computer will only recognize turn points as turned if your start was valid! The most likely reasons for not getting a valid start are : a) you were too high when you crossed the start line / left the start area (there is a maximum start altitude for each task – you can set it / review it in the flight planner); or b) you did not cross the start line / exit the start area while the start window was open (when you enter the game there is a certain time period set until the start gate opens, and there is a certain time period set for how long the start gate remains open) – you must cross the start line below maximum altitude while the window is open to get a valid start. Hope this helps!
Hi Clemens. Thx for an very very detailed manuscript for flying with condor pilots friends around the world.
Greetings Gerd
alias Bodo GBO (I am normally streaming the daily task tchinchin at 1630Z).
In the text you talk about “Condor also allows you to use a downloaded trace from a competitor and set it up as a “ghost” that you can fly against. You can even refly a task against your own “ghost” and see how much you can beat your previous time.” but how does that work. I can’t find anything about it on google (or I’m not looking in the right way)…..
In the meantime I have made several flights with “Ghosts” and it strikes me again and again that those “Ghosts” reach very high altitudes in a very short time after the launch and manage to maintain them until the FG. They also reach average speeds of 300+ km/h. How can I reach such a high altitude (far above the mountain tops…) in a short time after the start? Am I making mistakes with the arrowtow or with the thermals? Where do these significant differences come from?
Can someone give me some tips to improve my skills?
Hi Ferry, ghost traces are typically from multi-player games when players join at different times. So it is possible that others have climbed before the time you joined and are already higher by the time you join. This should not matter because in most multi-player races everyone has to descend below a maximum altitude for the start and this levels the playing field for everyone (irrespective when they joined and much they already climbed).
I have never seen average speeds of 300 km/h and this really isn’t possible because practically all gliders break up at such speeds (Condor has very little tolerance and gliders will flutter and break up if you exceed Vne by more than a few km/h). One other tip I have would be to fly races (with ghosts) that have reasonably realistic weather settings. You may also want to pick ghosts that are not from the top pilots. (It will be hard for a newcomer to keep up with the best because they often have 1000s of hours of experience.)