What Strava is for runners and bicyclists, OLC is for glider pilots: a place where you can upload, share, and compare your flights with those of other soaring pilots. At the end of a soaring day, it’s fun to see where your friends were flying, and to check how you did in comparison.
Such comparison is not limited to a specific soaring site. With the help of OLC, pilots can analyze their performance against the flights of other pilots nationwide, and even globally. Weather conditions are obviously very different from day to day and from site to site. However, over the course of an entire soaring season many differences tend to even out and the overall performances become more comparable.
OLC scores multiple different contests, both at the individual level and and at the club level. In this article, I want to focus on one specific type of competition: the OLC Speed League.
The Speed League (the rules are here) has a number of unique characteristics that make it particularly fun and accessible to everyone:
1. It is a team contest that is scored at the club level. On each weekend during the Speed League Season (which normally runs for 19 weeks starting on the 3rd weekend in April), the top flights of three different club members count for the team score in each round. On some weekends only two or three pilots are available to fly, which means that you don’t have to be an experienced contest pilot to contribute; in fact, every club member has an opportunity to contribute to the club’s overall performance.
2. It’s a great way to practice for soaring contests. You practice flying in less-than-stellar conditions (because every weekend of the season counts, no matter the weather). You practice all the skills necessary to improve your speed, e.g. quick thermal centering, finding and following energy lines, flying at the optimum speed-to-fly, judging course-deviations, etc. And you learn to fly with specific goals in mind rather than just meandering around.
3. You don’t have to fly extraordinary distances or get far away from home to score well. The four fastest legs during a 2:30 hours soaring window count for your flight. For those flying from Boulder it is often possible to achieve a good score without ever getting out of glide range of the home airport! Scores are handicapped based on the glider’s performance, which means you also don’t need to have the fastest racing machine. You can achieve a competitive score with any of our club gliders, even the ASK 21.
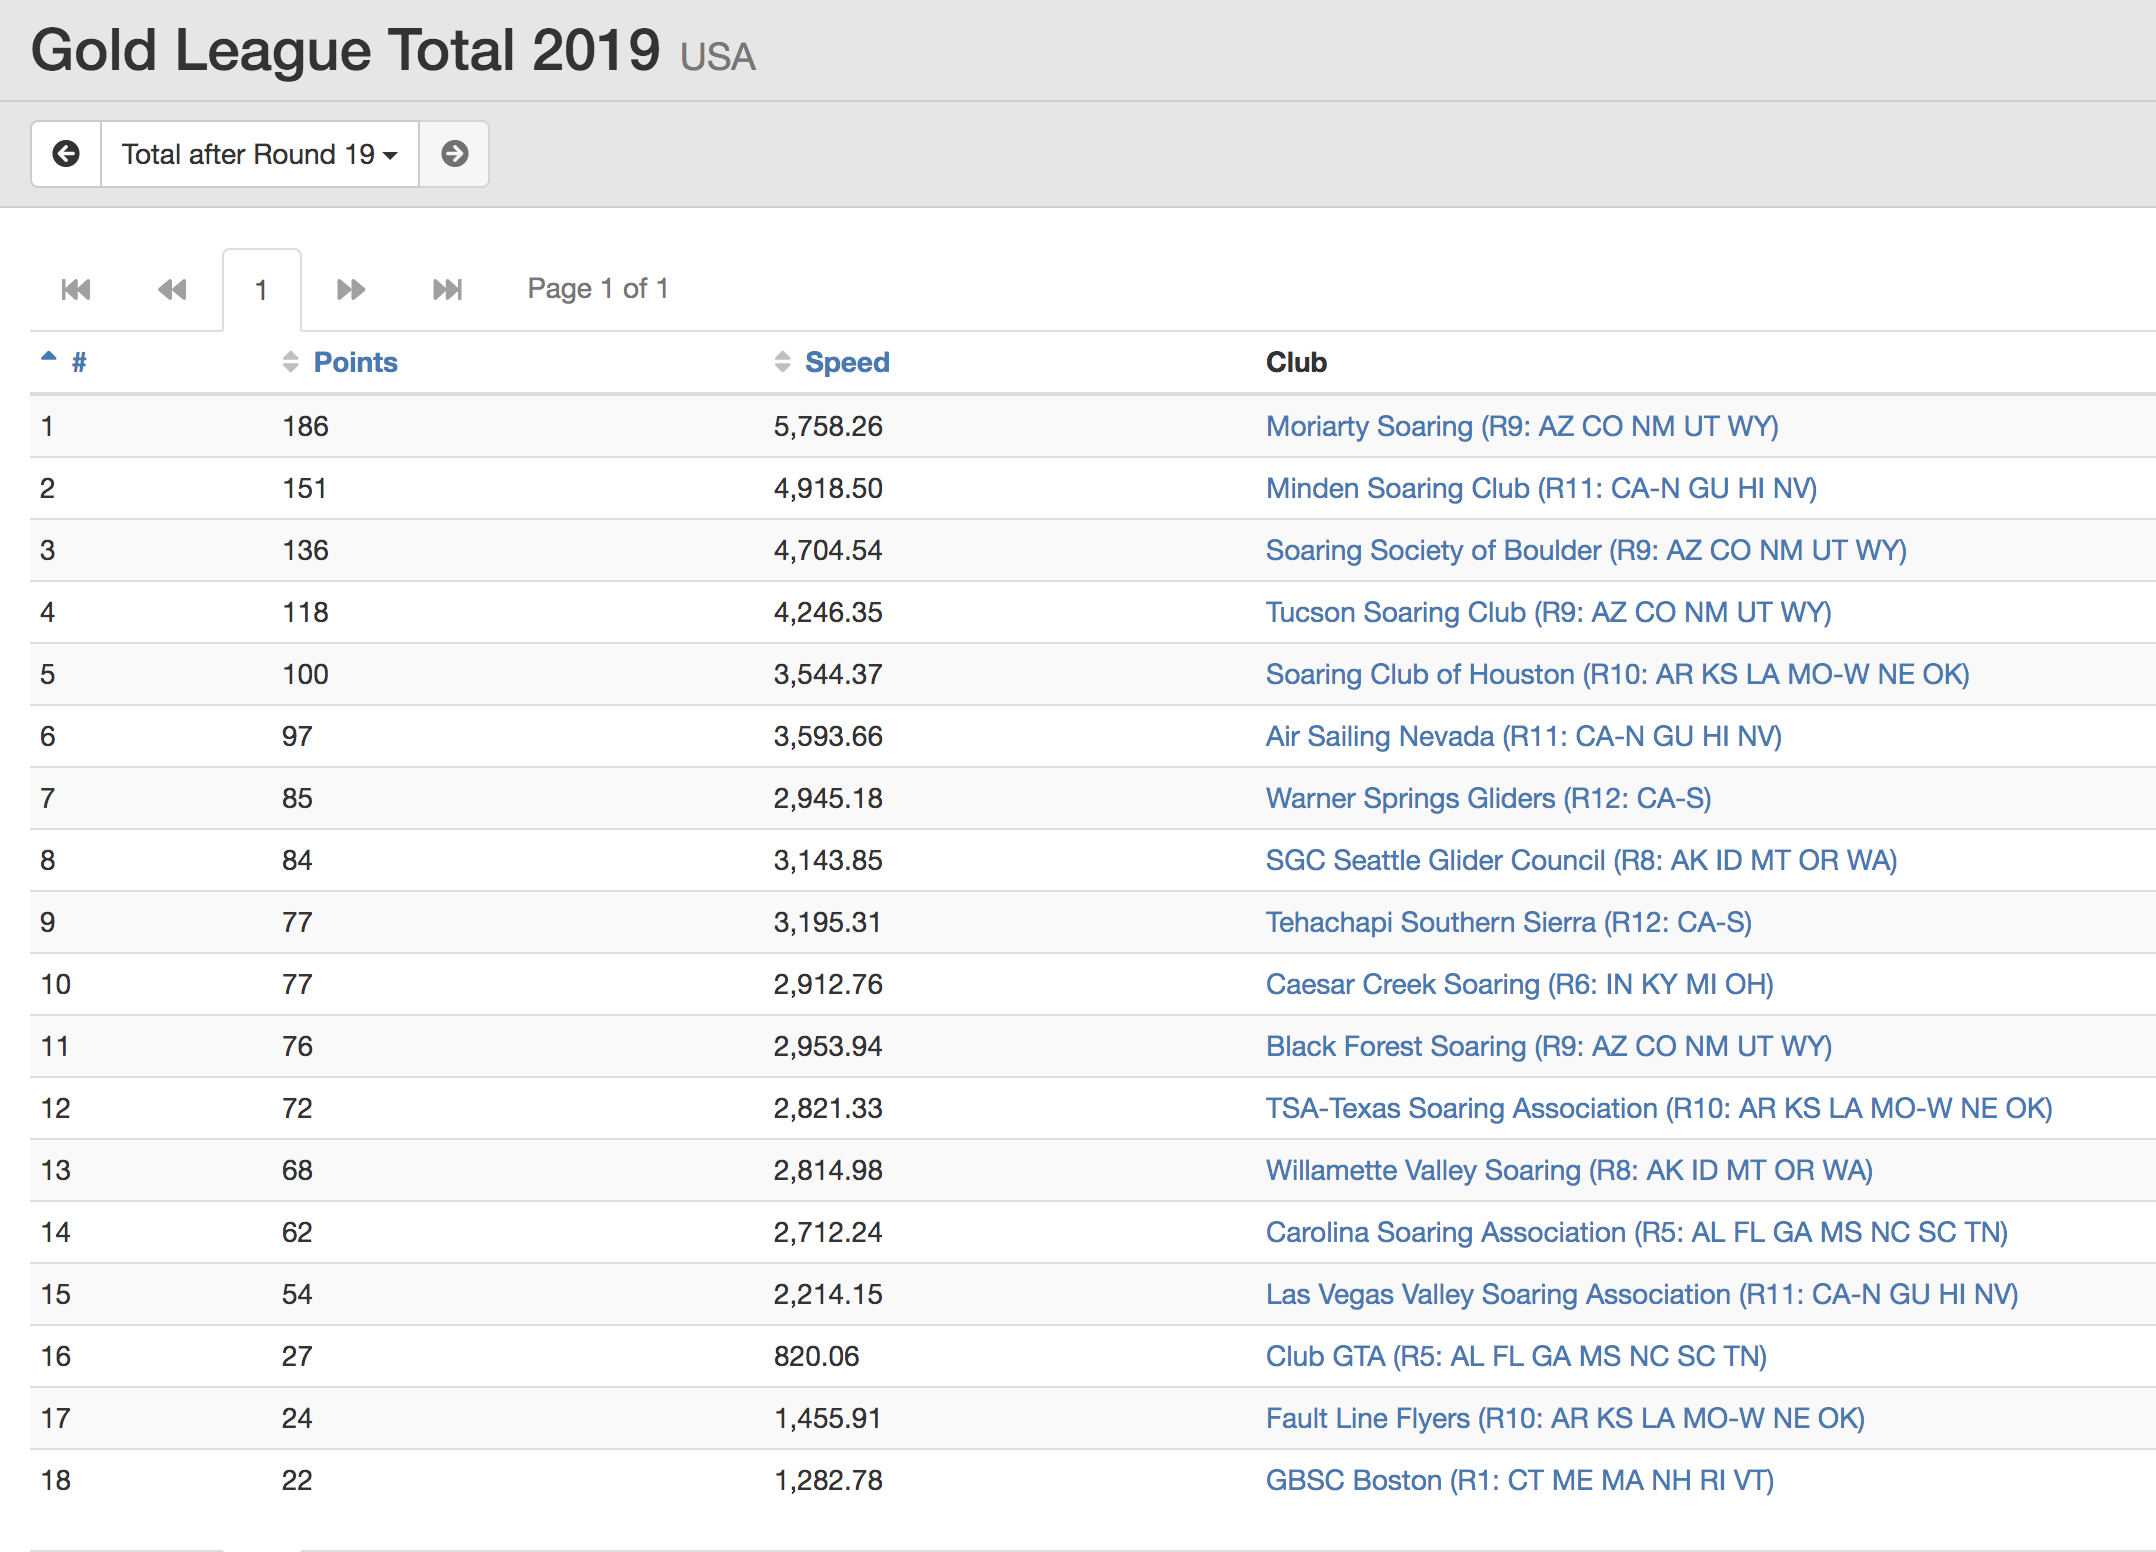
My club, the Soaring Society of Boulder, has a long tradition of performing very well in the OLC Speed League. E.g., in 2019 SSB finished in third place among all US Clubs, in 2018 SSB finished second, and in 2017 the club came in first place.
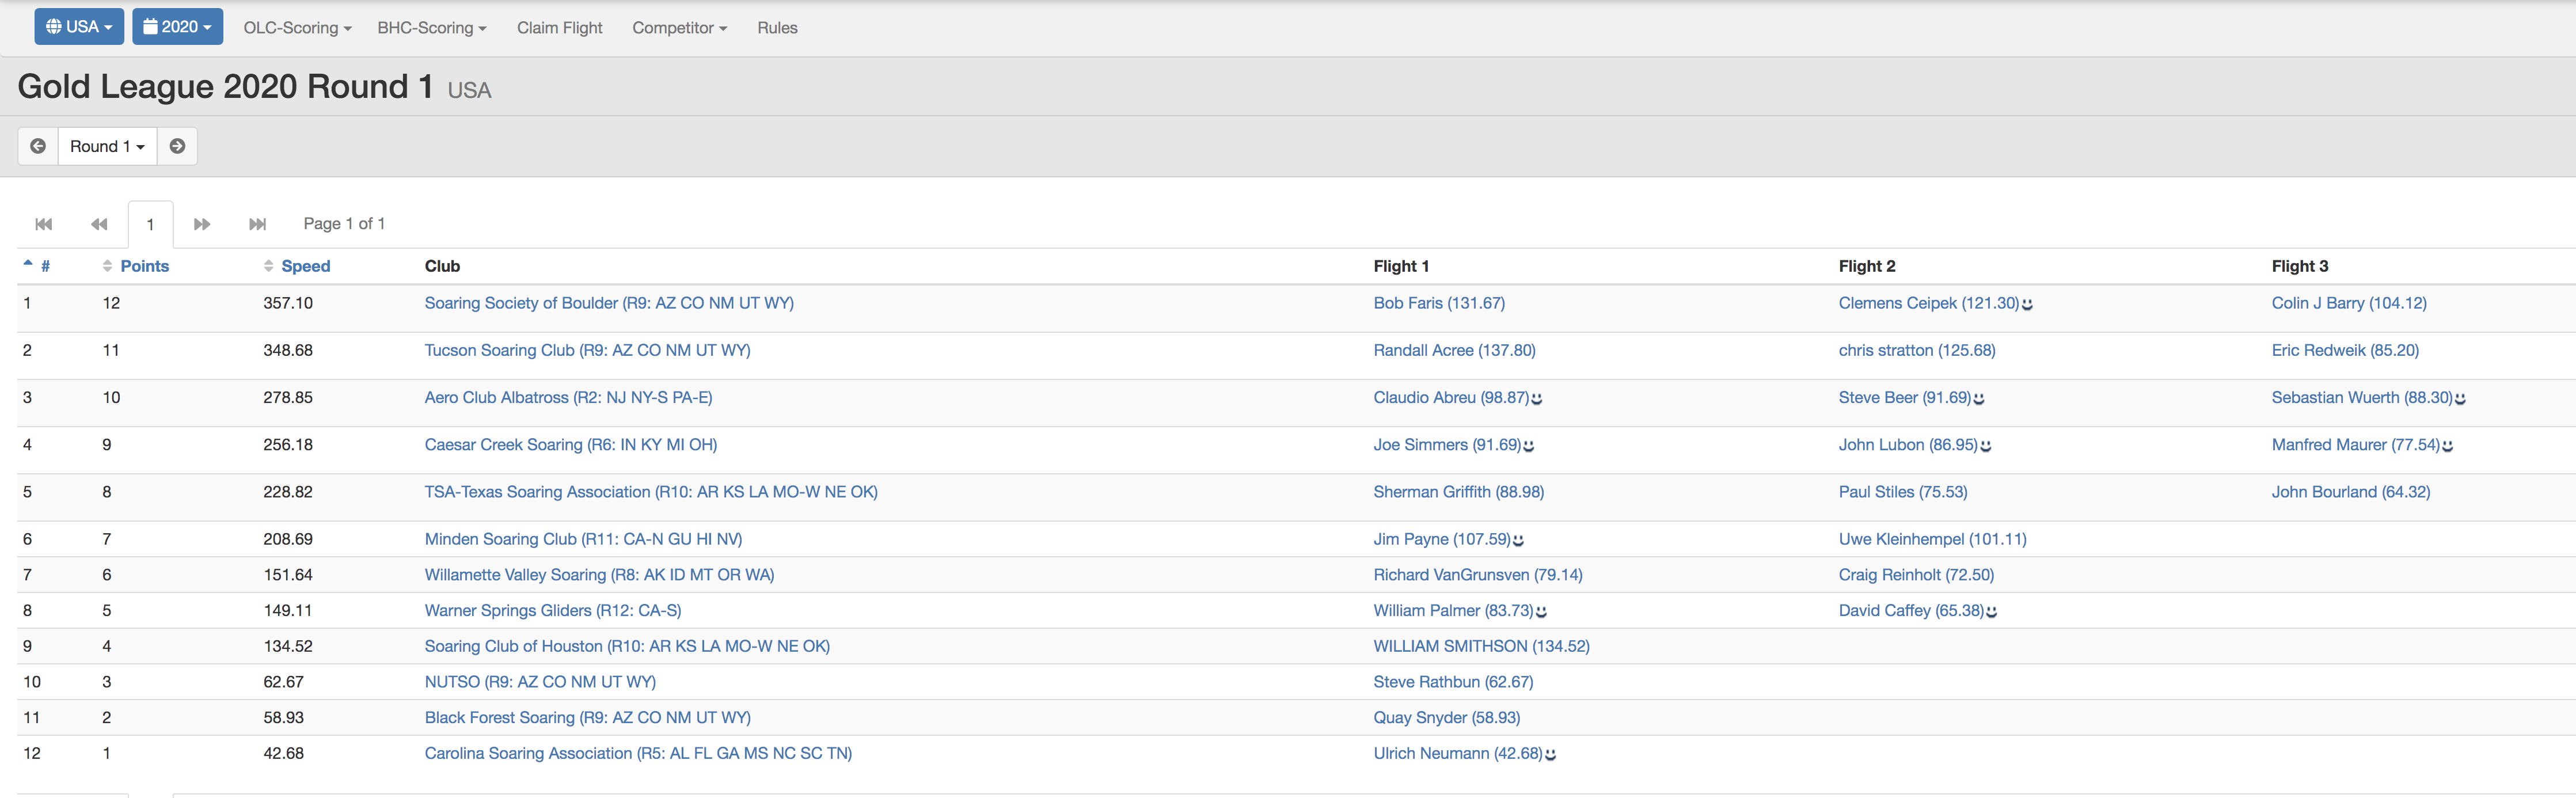
This past weekend was the first of 13 rounds of the (shortened) 2020 season and SSB is in # 1 position of the US Gold League and in #9 position globally – a great start to the season!
To do well as a club, it is critical that enough pilots come and fly on the weekends, especially when the conditions are ok but not great.
In this Beginner’s Guide I am offering 12 tips to help anyone contribute to our club’s performance. These suggestions are particularly geared towards new participants who want to stay within glide range of the home airfield. But they may also be relevant for everyone else, especially on mediocre days when most pilots will want to stay relatively close to home.
Here’s a link to my first-ever speed league flight attempt in April 2018 at a time when I my total experience was just a little over 100 hours in gliders. It was weak day with low thermal heights over the hills and I wasn’t able to get to the west side of the convergence. My speed was just barely faster than the required 40 kph minimum for the Gold League but I had the third best flight among those flying from Boulder and the flight earned valuable points for our club.
Some of the tips are fairly specific for the conditions in Boulder, Colorado. However, many are perfectly applicable to other soaring sites as well, and those that aren’t can be adjusted for typical site-specific conditions.
(1) Be Prepared and Have a Plan
First, look at the weather forecast (I like to use Skysight but RASP is perfectly fine also), and decide whether Saturday or Sunday is the better day. (Or, if you can fly on both days, your better score will count.)
Once you’ve picked a day, decide on your best soaring window and plan a tentative route based on where and when the best conditions are. Remember that you need to fly up to four (more or less straight) legs over a 2 1/2 hour time period in order to score well.
OLC does not require a flight declaration. You can simply take off and follow the best lift lines.
However, personally I like to declare a Turn Area Task (TAT) in my flight computer that is aligned with the fastest projected routes for the day. This forces me to figure out upfront what the best route is likely to be and it is great preparation for contests because I get to practice flying TATs (the most frequently used task type at US contests.)
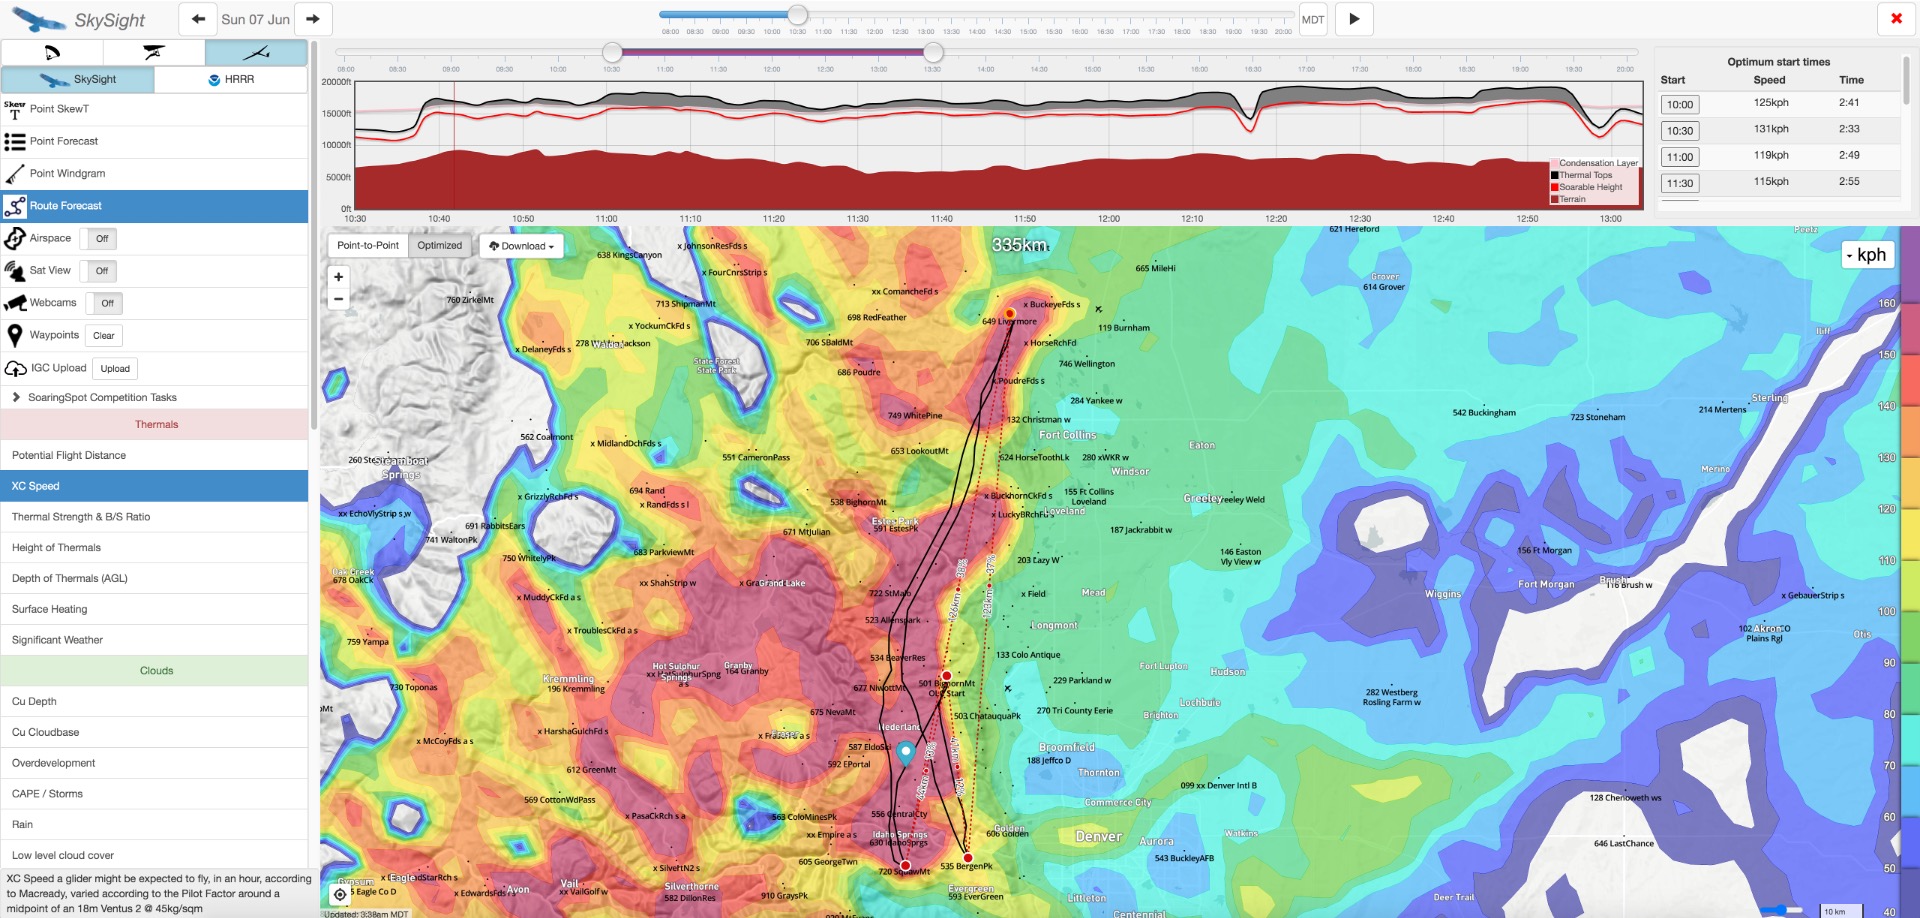
Skysight has a very handy “Route Forecast” tool that, in conjunction with the “XC speed” screen, is of great help in identifying the fastest projected routes and picking the best start time for the task.
I usually use three turn areas as this will help me generate four legs. The minimum task time must be at least 2 1/2 hours but more often than not I plan a somewhat longer task and use a minimum flight duration of at least 3 hours. OLC will then automatically pick the fastest 2 1/2 hour segment (using four legs). I keep the radii of the turn areas quite large (e.g. 25-40 km) so I have sufficient flexibility to use the best available energy lines, even it the forecast is considerably off.
For start and finish, I set up a 15 km cylinder centered at the takeoff airport. This helps ensure that I get a valid start (see tip #3 below).
I can always abandon my task to follow better energy lines once I am underway but I found it much better to have a plan that I can modify, than to have no plan at all.
In addition to having a plan for your flight, also make sure to check for TFRs (temporary flight restrictions), especially during wildfire and football season. And make sure that you have a valid flight logger and that it is turned on a few minutes before the flight. (It must start recording when the glider begins to move on the ground otherwise OLC will not accept your trace.)
(2) The Most Basic Flight Is Often the Fastest
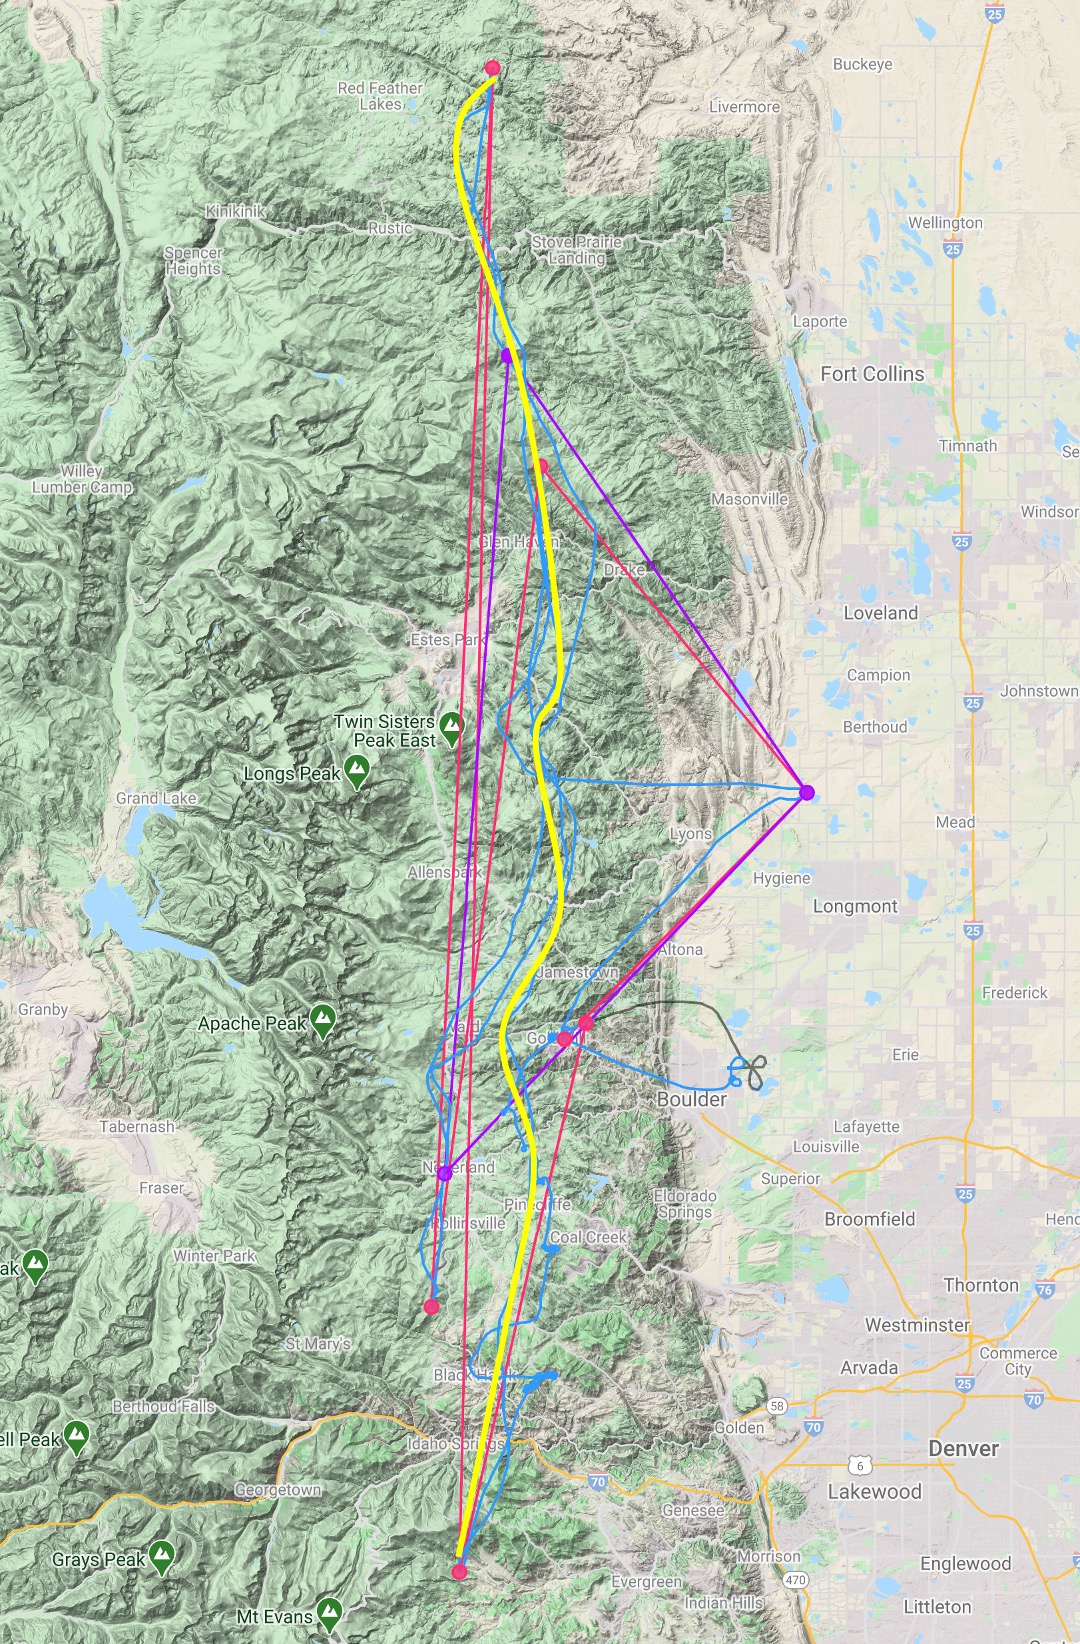
The most basic (and yet often the fastest) speed league flight from Boulder is a four leg yo-yo up and down the Front Range. (The entire flight path is often roughly parallel to the Peak-to-Peak Highway.) Especially good speeds can be achieved if the typical “convergence line” sets up over the foothills. This flight can be accomplished entirely within glide range of Boulder, even on days with modest conditions.

The basic strategy for this flight is as follows:
a) Initial climb: After releasing from tow, climb into the convergence (if there is one), or up to cloud base (if there isn’t). This may take a while and your speed along this stretch is usually poor. Think of the point when you are finally “connected” (with the clouds or the convergence) as the true start of your speed league flight. This is the point when your 2 1/2 window should begin. Make a mental note of the time and your altitude (or write it down on a notepad). (It will be very important that you remember this at the end of your flight!)
b) Pick a Direction for Leg 1: Once you are connected, decide whether to go north or south along the convergence (if there is one) or along the best lift line that you can make out. (You should already have an idea from the weather forecast which direction will likely offer the better conditions early in the day (e.g. higher cloud bases, and/or stronger lift early in the day). If OD is forecast in either direction, it is usually best to go there first.
c) Leg 1: Follow the convergence (or other energy line) in more or less the same direction (north or south) until you are no longer comfortable to continue or until the conditions get too soft (whichever comes first), then turn around. This will be the first leg of your flight.
d) Leg 2: Your second leg will typically backtrack your first leg although the position of the best energy lines may have shifted somewhat. Follow the best energy line past Boulder in more or less the same direction and once again keep going until you are no longer comfortable or until the conditions get too soft. It is likely that the conditions will have improved from the beginning of the flight (higher cloud bases, more cus, stronger lift) so try to go a bit further away from Boulder than on your first leg (provided that you can do so safely). Then turn around.
e) Leg 3: Your third leg will likely mirror your second leg – just in the opposite direction. If conditions allow and you are comfortable, push a bit further than you did on your first leg. Then turn around.
f) Leg 4: Now is a good time to check your watch from the time when you first connected (i.e., the start of your first leg). If 2 1/2 hours have already passed and you have maintained your direction on each leg reasonably well, you should already have a good score! However, more likely than not, the 2 1/2 hour mark will still be in the future. If that’s the case, you should try to get a good fourth leg by backtracking your third leg (and possibly beyond) until the full 2 1/2 hours have passed.
e) Finish: At the end of your 4th leg, make sure to climb up to the altitude when you started your first leg. (You must be at least as high at the end of your fourth leg as you were at the beginning of your first leg!)
(3) Get a Valid Start
For OLC Speed League flights to count, the start of motorless flight must be within 15 km (9.3 sm, 8.1 nm) of the center of the takeoff airport.
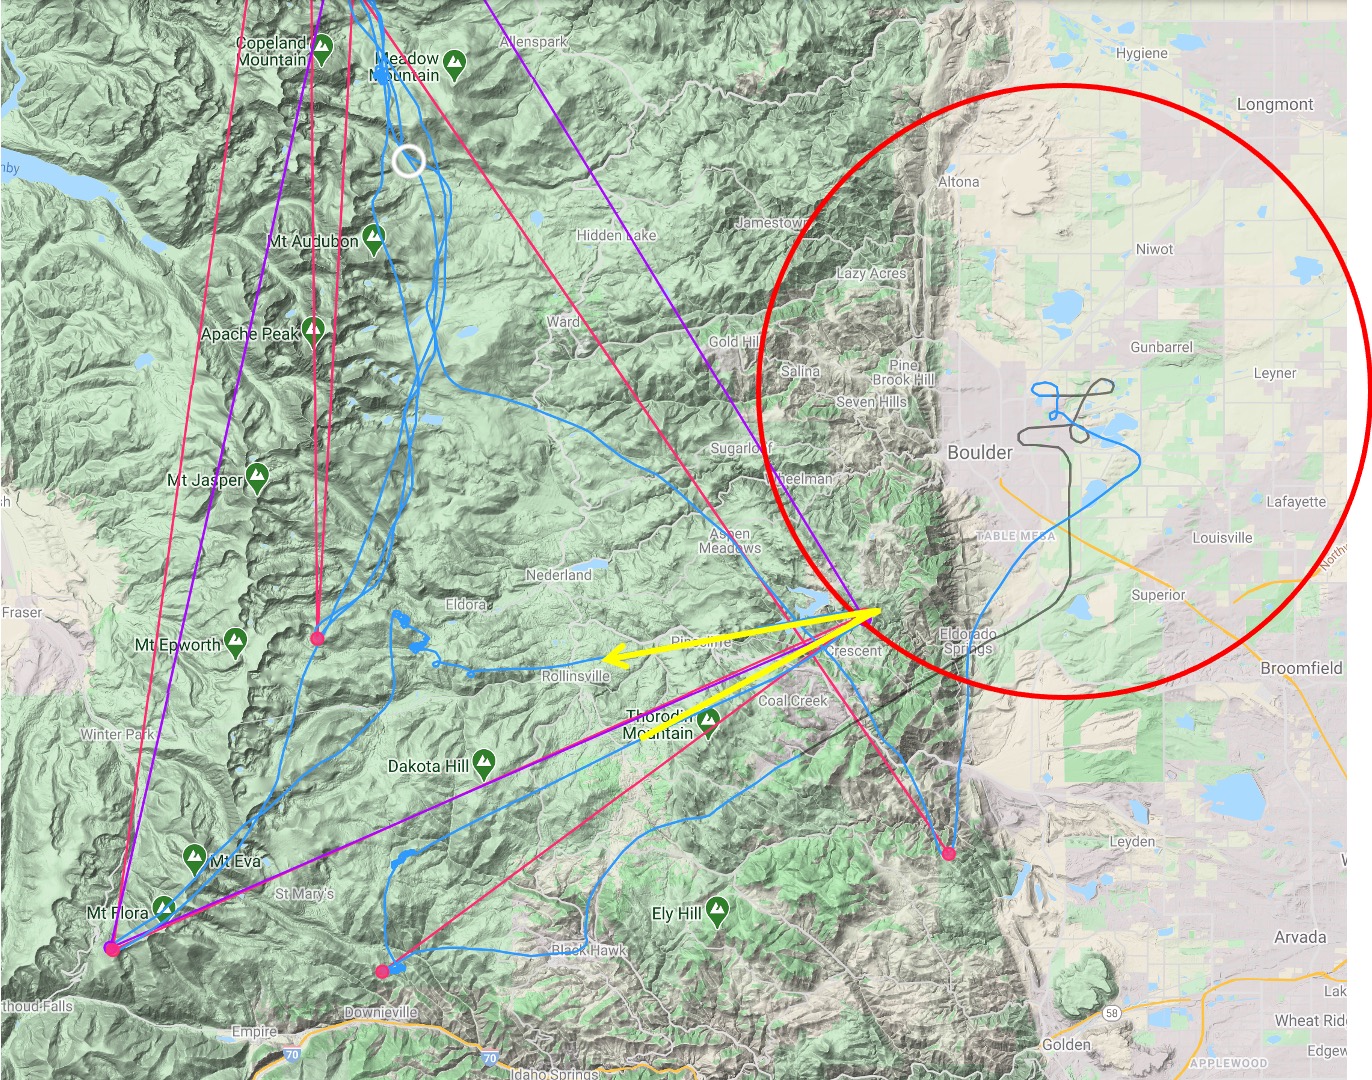
Boulder pilots have all flown on days when there is a powerful ground inversion over the plains and a high tow is needed to get into lift above the mountains. Sometimes that tow will take us beyond the 15 km start cylinder. (For reference: the top of Bighorn Mountain (west of Lee Hill) is just within the start cylinder, the town of Gold Hill is just outside the cylinder. Lower Nugget Ridge is inside the cylinder, Jamestown is outside the cylinder. Bear Peak is inside the cylinder, Gross Reservoir is just outside the cylinder.)
A great way to make sure that your motorless flight takes you into the 15km start cylinder is to set the correct start cylinder on the flight computer.
If you have towed (or motored) beyond the start cylinder you can still get a valid start by flying back into the start cylinder before you head out on your first leg. To do that, climb high enough first and then come back, “nick” the edge of the start cylinder, and fly back to where the lift is.
Getting into the 15km start cylinder after release from tow is critical because your flight will not count at all for the Speed League until your flight path includes a location “fix” within the start cylinder after release from tow. (This rule is Speed League specific and does not apply for OLC plus.)
(4) On Each of the 4 Legs, Always Fly Forward In The Same General Direction
This should be pretty obvious but it is the most crucial thing to do to get a good result. Nothing destroys your speed as much as getting low being forced to backtrack to the previous thermal. You’ll quickly end up with too many short legs and you will not be pleased by the average speed calculation. If the conditions ahead look weaker, try to stay higher and fly slower. But move forward whenever it is safely possible and you are fairly certain that you will find lift ahead.
(5) Move On When You Can’t Climb
When I started out I often tried to milk every lift as long as possible. This meant that sometimes I would keep circling without climbing at all. Needless to say that I wasted a lot of time doing that. You only gain distance and points if you move forward, not if you stand still.
It’s also worth considering that you lose a lot of time in very weak climbs. Whether you can climb at 5 kts or at 10 kts matters much less than whether you can climb at 1 kts or at 3 kts. Think about it: let’s say you need to gain 3000 ft to close your course. If you climb at 10 kts it will take you about 3 minutes; at 5 kts it will take you 6 minutes; at 3 kts, you need about 10 minutes, and at 1 kt you need a full half hour! The difference between climbing 3000 ft at 5 kts and 10 kts is only only 3 minutes. But the difference between climbing 3000 ft at 1 kt and 3 kts is 20 minutes!
Average climbs tend to be very good climbs overall. It’s the very weak climbs that will destroy your speed!
(6) Always Follow Energy Lines
“The best speed to fly is the one where you can fly forward on course without having to stop to thermal.” (Sebastian Kawa; watch this video to get Sebastian’s tips on how to fly faster).
One of the great advantages of flying from Boulder is the frequent presence of strong lift lines that allow for straight forward flight without having to stop and turn. I had already two flights this year where I was able to fly more than 250km in a straight line without ever having to stop to thermal. Such flights automatically result in excellent average speeds even if your cruise speed isn’t particularly fast per se.
Let’s say you’re cruising in a club Discus at a modest indicated airspeed of 65 kts. If you’re flying at 15,000 feet, your true airspeed is 84.5 kts! Even if you’re loosing as much as 20% due to some course deviations and having to crab into a cross wind, your ground speed is still 67.6 kts (125 kph). And if you don’t have to stop to circle, that speed will be your average ground speed. If you can maintain this way of flying for 2 1/2 hours you will achieve 117 pts for the speed league (125 kph / 1.07 (Discus Handicap)). Not bad! And you can obviously do even better if you fly faster through any sink and slower through areas of strong lift. Three flights like this on a particular weekend will inevitably guarantee your club a top result in the Speed League!
In Boulder, the most frequent and most reliable energy line is the convergence line that sets up when there is a westerly airflow aloft coming across the Continental Divide, and thermals over the foothills generate an easterly airflow over the plains. Read this article to learn more about how you can climb into the convergence, identify it, and follow it. For Boulder pilots, being able to locate and follow the convergence is perhaps the single most critical skill to achieving good speed league results.
During the summer season we also often see powerful thermal streets setting up, e.g., over the Poudre, into South Park, and west of the Divide towards Kremmling and beyond. In spring, fall, and winter wave conditions may create even more powerful energy lines.
Look for such energy lines (especially convergence) in the weather forecast and then seek to follow them during your flight. The better you’re able to do that, the higher your average speed will be.
A convergence line often sets up on blue days as well. It is then obviously much more difficult to locate but there are great rewards if you can find and follow it. Certain flight computers (e.g. the Naviter Oudie) will allow you to download the weather forecast before your flight and display the projected location of the convergence line at the correct time while you’re flying. Provided that the forecast was accurate, this can be of great help!
(7) Stay in the Lift Band
In Boulder we frequently benefit from high cloud bases. In fact, the bottom of the clouds is often 10,000 feet above the ground, sometimes even more. Things are often great when we can cruise under clouds. However, everyone has experienced that getting “connected” with the clouds can sometimes be quite difficult and take a while. To achieve high speeds we have to be careful not to lose the connection once we’ve made it. Otherwise, if we “fall out of the band”, we have to go through the time-consuming process of working our way back up again. Needless to say that this will negatively impact our average speed.
It is not always easy to determine how deep the good lift band is. If you divide the distance between the ground and the cloud base in thirds, a rule of thumb is that the upper third almost always works and the lower third is almost always difficult.
E.g., let’s say the cloud base is at 16,000 feet and we’re flying over the foothills over terrain that is at 10,000 feet. The altitude band between 14,000 and 16,000 tends to work best and the band between 10,000 and 12,000 ft is likely very challenging. The area between 12,000 and 14,000 is the “murky middle”. On some days, conditions are great, or others not so much at all.
E.g., this past weekend, cloud bases were around 15,500 ft and I struggled mightily until I broke through 13,000 feet. From then on I managed to stay high and did not test the lower sections of the band. Looking at the traces from other pilots suggests that conditions improved in lower levels and that good lift could later be consistently found even at only 12,000 feet.
I tend to err on the cautious side and stay relatively high at the expense of climbing more often in less than optimal lift. Others are more aggressive, stop less frequently, and assume a greater risk of “falling out”. On some days one strategy works better than the other and luck can also be a factor. If you’re relatively new to cross-country flying you’re probably better off with a somewhat more conservative approach: more altitude gives you more options to find good lift, reduces the likelihood that you have to waste time digging yourself out, and also minimizes your land-out risk. You might not be the fastest but you will be more consistent and sometimes just as fast as those who push their luck a bit more. Your flight will also be a lot less stressful.
(8) Successfully Cross Blue Gaps
When I started to venture further away from my home airport, I was very concerned about blue gaps between clouds. When I came to the end of a street with a 5-10 mile gap ahead of me I often got cold feet and turned around.
The problem is that crossing blue gaps is often inevitable if we want to score Speed League Points (or fly XC in general). Otherwise we may end up with too many legs over the 2 1/2 hour scoring window. I.o.w., our best four subsequent legs won’t add up to a lot of miles even if we otherwise had a good and fast flight.
So how can we deal with blue gaps?
First, we should always look ahead so that we are not caught by surprise when we come up to a blue gap. The last cloud in a street may not work so well, so it is always a good idea to get close to cloud-base well before we reach the end of the street.
Second, we should assess the nature of the gap as best we can. Does the gap mark an area of sink or is the air just dryer? This may not be obvious but it is always a great idea to look for any kind of cloud activity. Often there are tiny wisps across the gap and those are usually a good indication that we won’t fall out of the sky if we follow those wisps. E.g., along the convergence it is fairly common (especially early in the day) that we run into areas with lower moisture but the convergence line is not interrupted at all. We have to look for any signs of clouds across the gap, connect the ones we can identify into a line in our imagination, and then fly along this imaginary line just as we would if the gap did not exist at all. More often than not, this works much better than we think!
Third, if we’re not confident that an existing lift line extends throughout the gap, we should treat the gap as a “transition”. This means we should start high and “downshift”, i.e. fly more conservatively if there is a risk that we might get to the lower end of the lift band. We must still accelerate through sink and slow down in lift but we should fly less aggressively than we would otherwise. E.g., if we used MC 5-6 before to determine our Speed-to-Fly, we may decide to now use only MC 2-3 until we are confident that we are able to connect with stronger lift on the far side.
Fourth, a good way to monitor our glide performance throughout a gap is to set up a NAV box on the flight computer that shows the Current L/D. I find this a better way of understanding the actual glide performance that I can achieve through the gap. Understanding this is especially important in case I have to decide to turn around and fly through the same air again.
Fifth, if the gap is so wide that we don’t know for sure that we can cross it successfully we should decide upfront at what point we will abandon our attempt and turn around even if it means that we won’t achieve a good speed-league score. E.g., let’s say we want to make sure that we stay within glide range of Boulder. In that case, we can set Boulder as our “Go-to” airport into your flight computer even if we’re heading away from it. We should use a safe MC setting (i.e. one that is relatively high, let’s say 4 or 5, and keep track of the arrival altitude on your flight computer so we can turn around before we get out of glide range. (Also we must always make sure that we have set an appropriate arrival altitude. The club recommends 1,500 ft AGL so we have an extra cushion and can still fly a normal landing pattern even if we encounter some sink.)
(9) Thermal Strategically
Every textbook on gliding has good tips about thermal centering and I won’t repeat those here. It goes without saying that flying consistent, well-coordinated 45-degree bank circles at a consistent airspeed is a critical skill that we all must practice over and over again. It’s also self-evident that we will do much better if we only stop for stronger thermals, center them faster, and continuously adjust our circles so that we are in the best area of lift.
In addition to these “standard rules” here are a few tips that are more specific to our conditions.
First, if in doubt, turn into the wind. The best thermals are usually on the upwind side of the convergence line. When we follow the line, we necessarily fly in a cross-wind (usually out of the west). That means that on northbound legs we should typically turn left if we stop to climb, and on southbound legs we should typically turn right. There can be exceptions of course but they tend to imply that we did not fly along the optimal line to begin with.
Second, observe where the best lift can be found under clouds. The best lift tends to be on the upwind side and/or the sunny side. Fortunately for us, typical Boulder conditions mean that wind and sun tend to be fairly aligned with westerly winds aloft and the sun in the afternoon in the south west. So more often than not, the best lift is in the south-west corner or along the western edge of the clouds. However, if you notice it to be different on a particular day under one cloud, check if that is true for the next cloud as well. Chances are good that it is. E.g., at one of my flights this year there was a 20kt wind from NNW and the best lift was consistently under the NW corner of the clouds.
Third, large clouds often have multiple cores. If you find lift under a big cloud this does not mean that you have found the best lift under that cloud. The best lift can be on the upwind/sunny side or underneath the darkest, flattest (or even concave) portion of the cloud. It makes a big difference to your overall speed whether you thermal at 2-3 kts or at 7-9 kts.
Fourth, if the lift is very strong under a cloud street, fly 1500-2000 feet below the cloud bases. This way you can pull up in strong lift and fly faster through areas with weak lift or no lift. If you’re too close to cloud base, you’re forced to fly fastest through the strongest area of lift (so you won’t get sucked into the cloud) and fly slower through areas of weak lift or sink. It should be obvious that the first technique will result in higher speeds.
Fifth, in strong positive surges it pays to turn into the wind and gently pull up (using the flaps if you have them). If the surge persists, you can then bank steeply and might get the core on the first turn. If the surge goes away quickly you can turn back on course and pick up speed again without loosing a beat.
Sixth, remember that it is always the weakest climbs that destroy your speed. If you take all the climbs that are average or better you might not be the fastest of the day but you will do very well because you drastically reduce your risk of having to dig yourself out from down low in very weak lift.
(10) Optimize Course Deviations
Notice that I did not say “minimize” course deviations. Flying straight is obviously the shortest way to go but very rarely the fastest. If you can follow a lift line without having to stop and turn, course deviations of up to 30 degrees will almost always pay off. (John Cochrane showed that a 30 degree deviation implies a detour of only 13%. Smaller deviations have minimal negative effects.) If there is a strong convergence, you may sometimes need to make deviations of 40 degrees from the course line and it will often still be be better than flying straight.
During my Diamond Distance flight last year, a convergence line near the end of a long soaring day saved my flight. I was very happy to follow it despite a 40 degree course deviation.
(11) Strategically Decide When To Change Directions
The most important factor to scoring well in the Speed League is to not have more than three major course changes over the 2 1/2 hour soaring window so we generate four more or less straight legs.
Our best strategy is to follow a clear lift line for as far it is working well and to turn around and use the same line in reverse.
Sometimes we get to the end of the lift line but are in need of more miles in the same direction. In this case it makes sense to stop in the last good lift, climb up high, continue in the same direction even if it means flying in no lift or slight sink and turn around at a point that will still allow us to get back to the same climb that we left before. E.g., sometimes, going northbound, the good lift line will stop north-east of the Twin Sisters but we may need more northbound miles otherwise our leg is too short. In this case we can take a high climb east of the Twin Sisters, head out further north (often in the blue), and then turn southbound in time to have enough altitude to connect with the climb that we previously left. (We may also find out that we’re able to connect with the next lift line and continue further north over the Poudre.)
If there is a strong headwind or tailwind component, another tactic is to change course direction when we are low on an upwind leg, and when we are high (e.g. right after a climb to cloud base) on a downwind leg. This way we benefit from the wind drift while climbing in both directions.
(12) Climb Back Up At the End of Leg 4
I already mentioned that the end of your 2 1/2 hour scoring window must be at an altitude equal to or higher than your altitude at the beginning of the scoring window.
This is very easy to overlook and a frequent cause for an unnecessary loss of Speed League points. Hence it is very important to remember how high you were flying during the early parts of your flight and that you climb up to your low points during those early parts of the flight.
Pilots who’s flying style involves a lot of climbs and descents tend to have less of an issue with this rule than pilots (like me) who tend to stay relatively high. If you go on Final Glide after TP 3, the portion of your last leg that is below the altitude at the point when your scoring window started, will not count for the Speed League!
Bonus Tip for OLC Plus Scoring: If you climb up high at the end of your fourth leg you will not only make your fourth leg count, you can then also use the extra altitude to turn your flight into a bonus triangle. (This will count for OLC Plus but not the Speed League.) To do that, head out into the plains to the edge of Class B airspace and then return back to the point where you released from tow to close your triangle. (To close the triangle you do NOT need to be at or above release altitude. You just need to cross any previous portion of your glide path that is necessary for your triangle to be “closed”.) If you succeed in closing the triangle you will get 1/3 of your FAI triangle distance as bonus points for OLC Plus scoring. (Note: This may not be practicable on days when you released far west and never had a trace near Boulder. It helps to display the full trace of your flight on your moving map screen (and not just the last few minutes) so that you can easily locate the best place to close the triangle.)
Be Safe and Have Fun
Learning to fly competitively focuses your brain and is a lot of fun. However, it must never mean that you relax your personal safety standards. Do not become single-mindedly focused on optimizing your score. Safety must always come first. Always maintain a Plan B and a Plan C if Plan A does not turn out as you hoped. If you can’t get a great score on a particular day you can learn from your mistakes and try again on another day! Not so if you ruin your glider or even your health.
Be safe and have fun!
One Reply to “A Beginner’s Guide to Scoring Well in the OLC Speed League”