Yesterday, CX scored 350 km in 2.5 hrs for the OLC Speed League, commenting, “today was probably the best cross country day out of Boulder since last September. The convergence was strong and well defined to the North and workable to the South. Unfortunately there was only one flight posted for League scoring.”
I had a fun flight too, but it was all down low and in terms of league scoring? – Nothing! And it’s not that I didn’t try. So I thought I’d try to look at my flight versus CX’s and find out what happened.
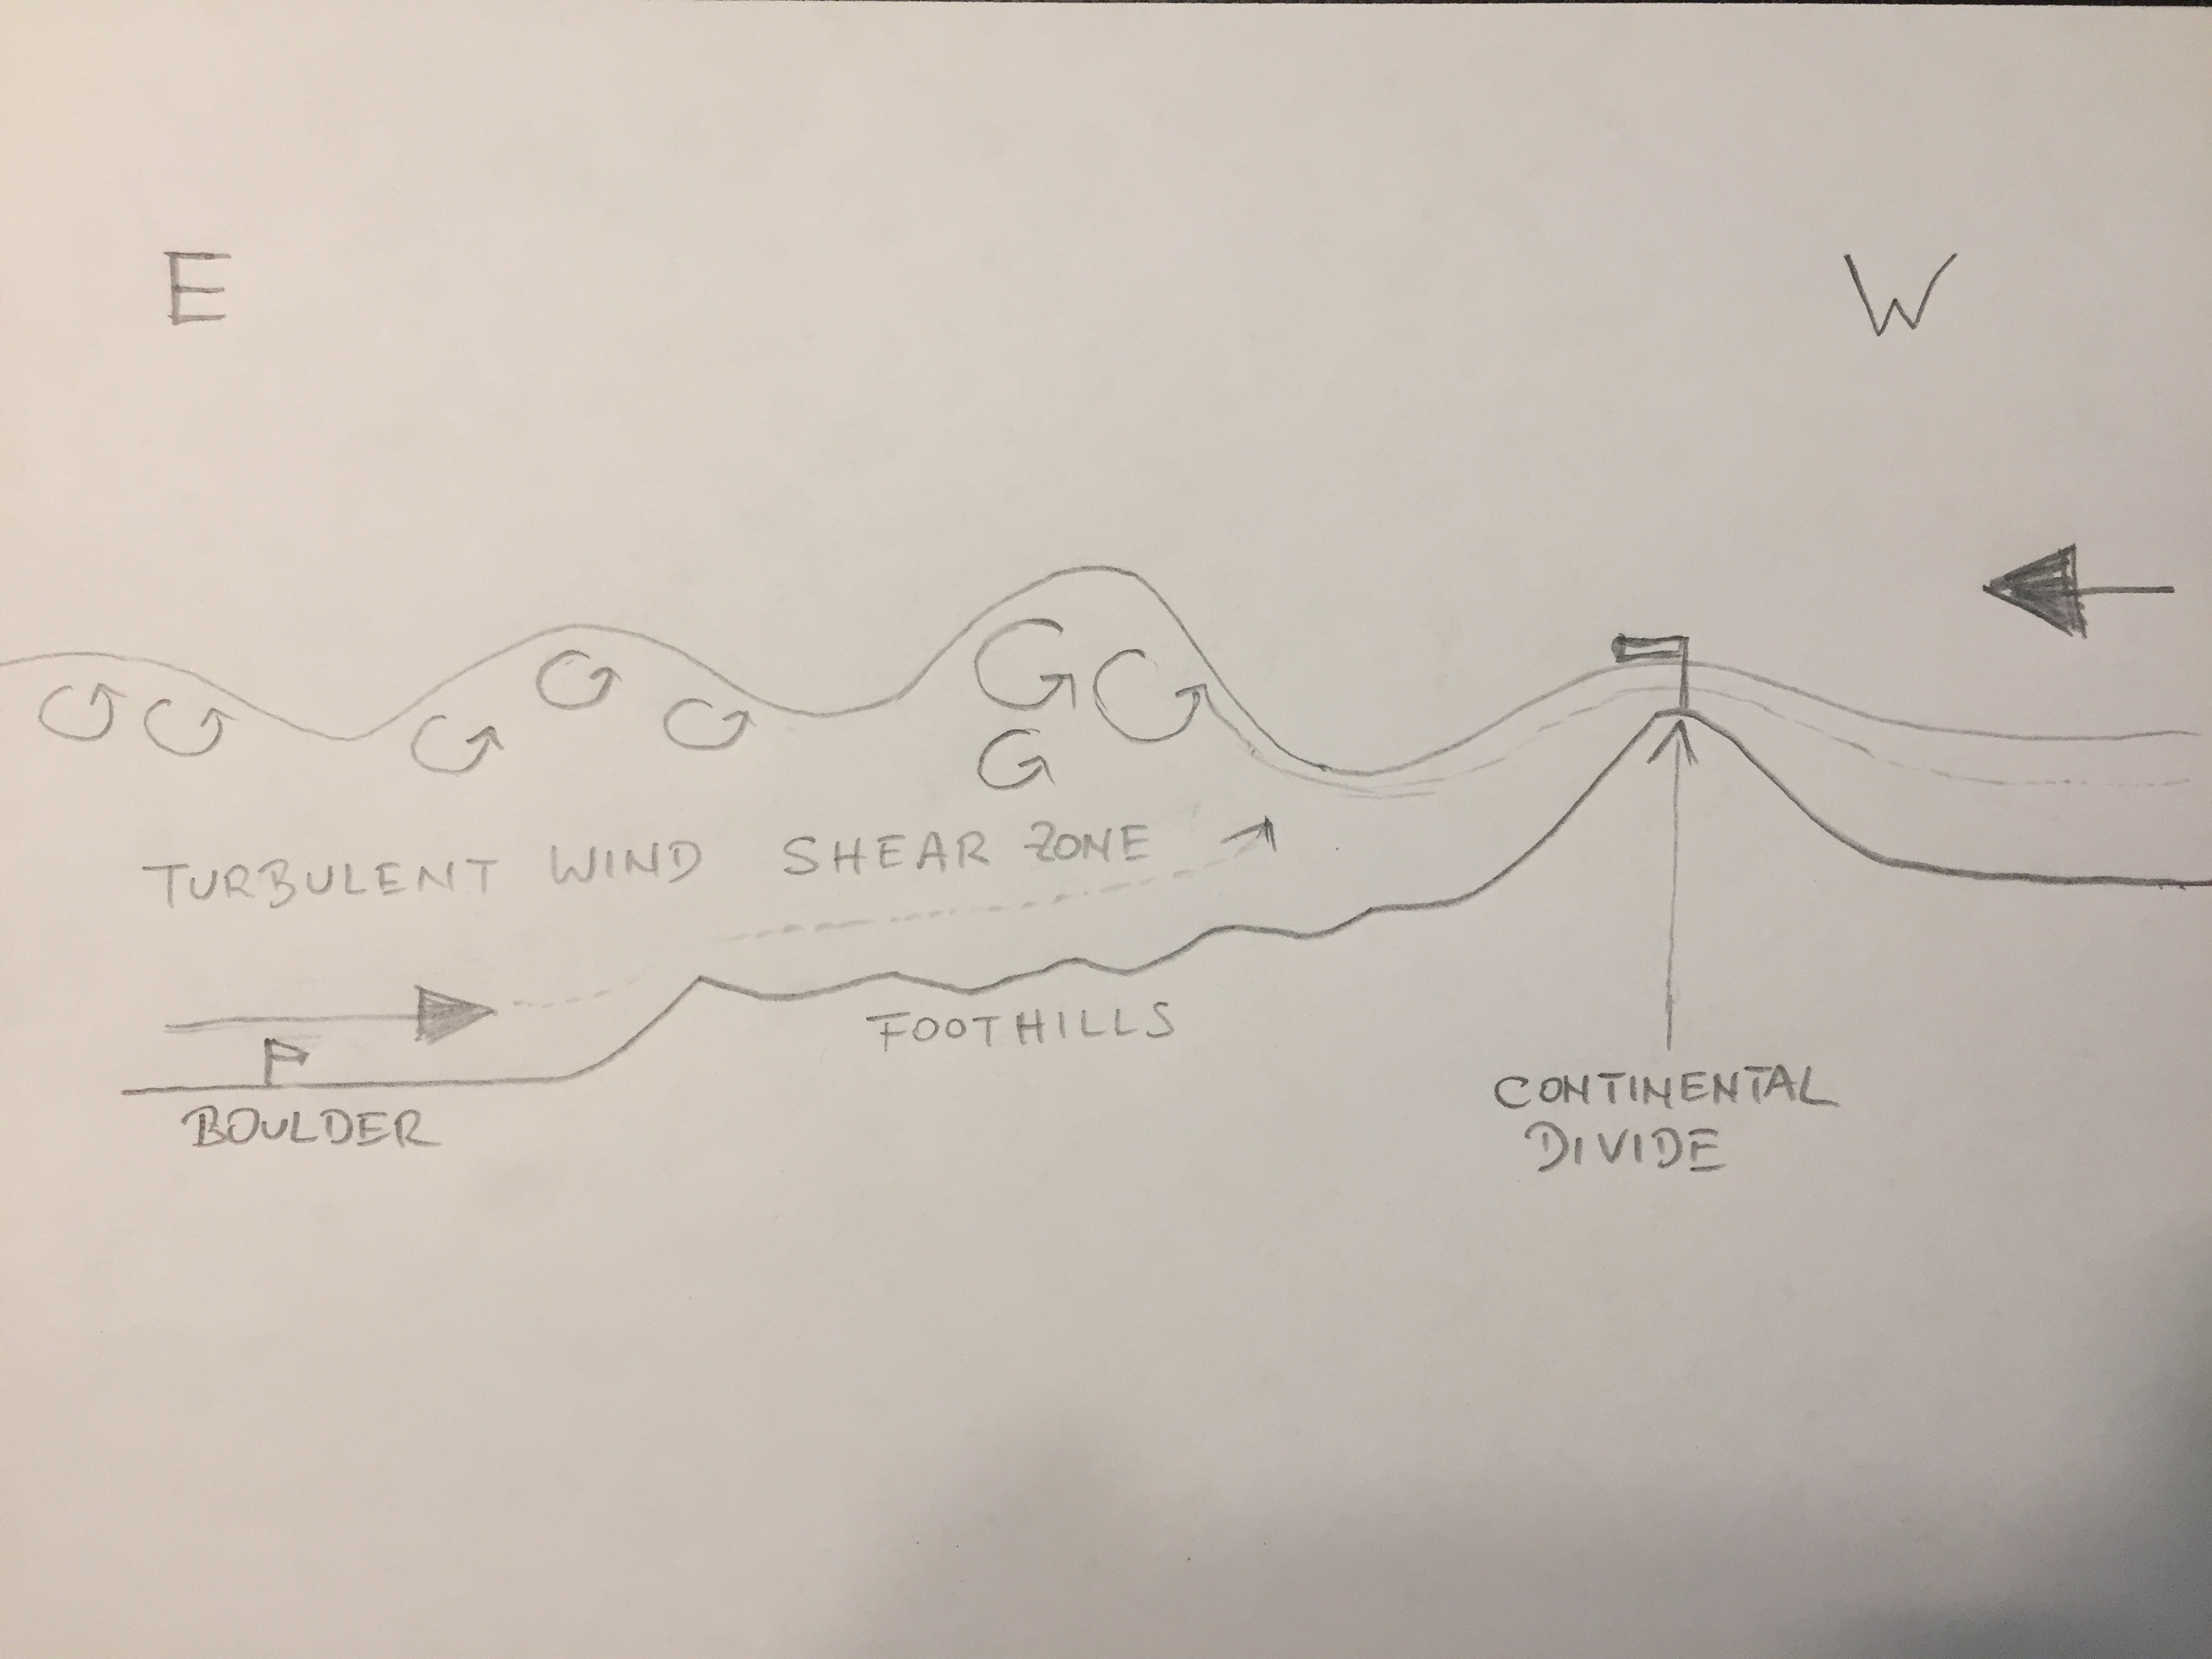
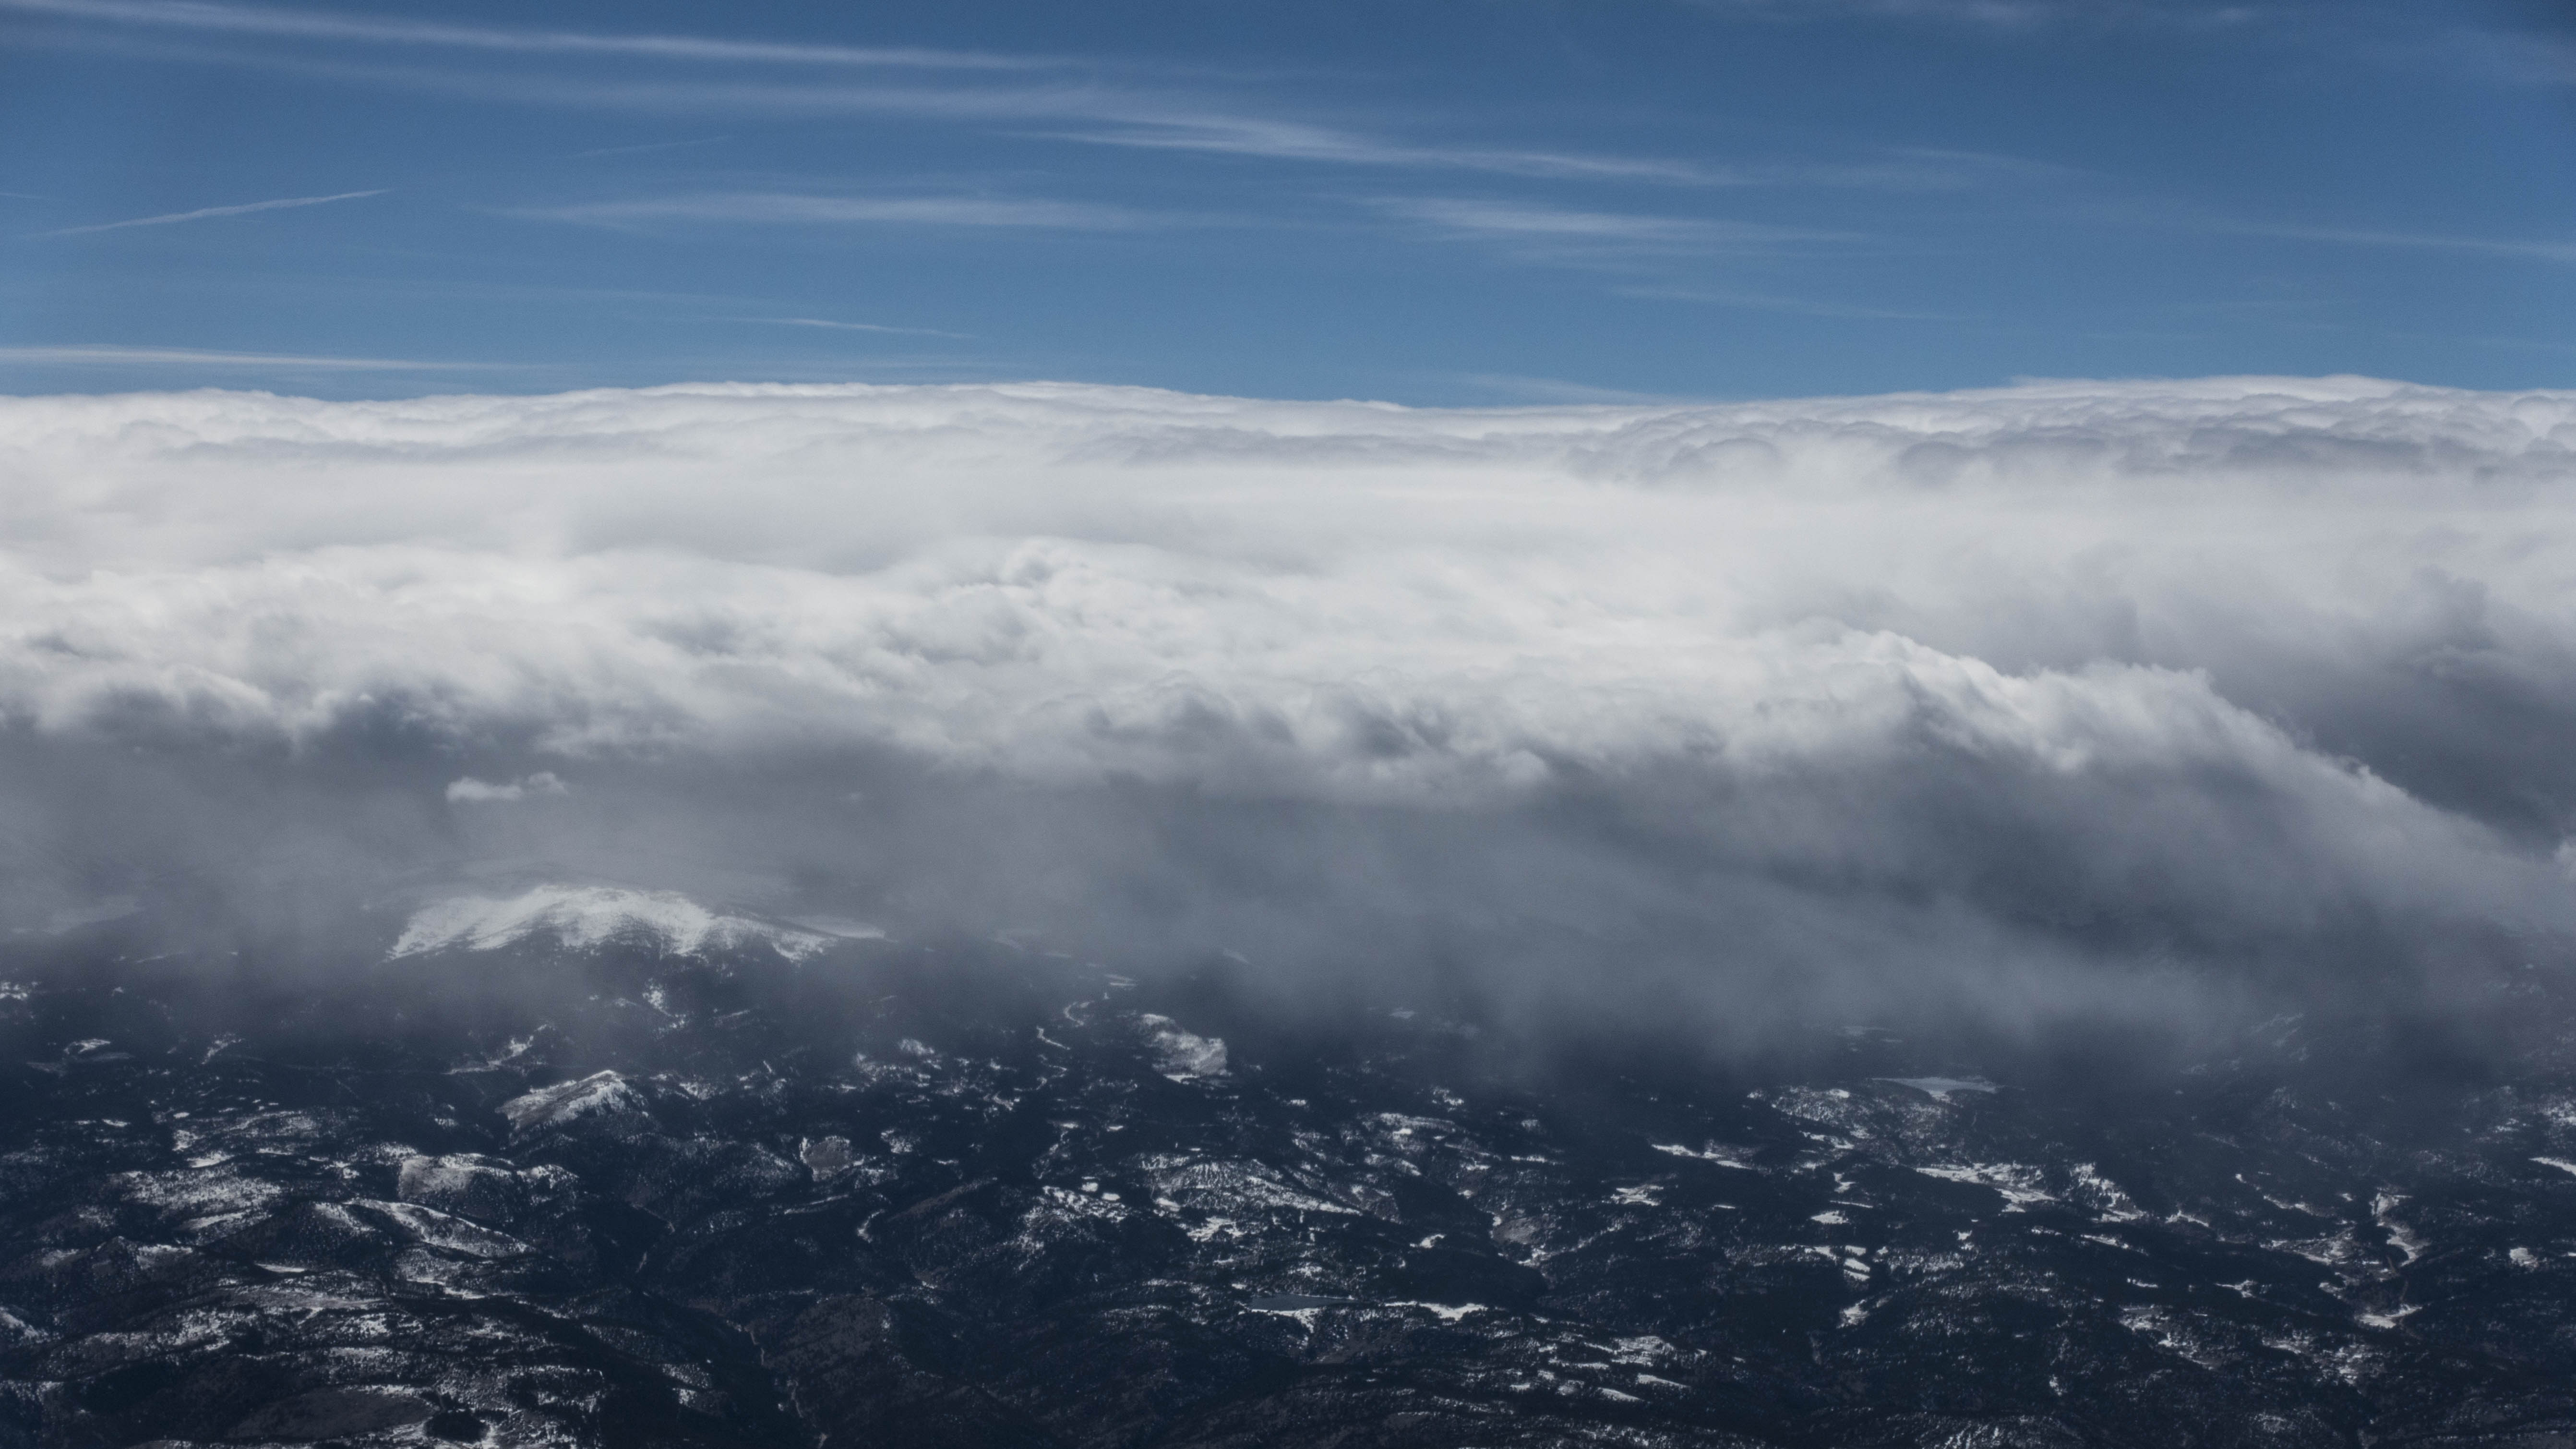
First, let’s recap the conditions. There were very strong westerly winds coming across the Continental Divide. And there was a weaker easterly flow approaching the mountains from the plains. (You could see it at the airport in the morning: there were low clouds moving westwards and building up a stratus layer that later burned off. A few thousand feet higher were rotor clouds that were rapidly moving east with obviously significant wind-shear between the two layers.
These conditions are very frequent at Boulder so it’s important to try to form a mental picture of what was going on. The following is a simplified illustration of how I see it. (This could be wrong but it pretty much matches my still limited experience.)
In Boulder there is a frequent easterly flow at the surface. (After all, we typically launch to the east). The depth of this flow varies between just a few hundred feet and a few thousand feet. As thermals kick off over the foothills by mid-morning, this flow can further intensify during the day as air is pulled in from the plains to the foothills to replace the air that rises up. At altitude, west of the Continental Divide, there is a prevailing westerly flow streaming over the mountains. The air coming across the mountains is pushed down in the lee. At some point the westerly air flow and the easterly air flow have to meet, i.e. they converge. This means that there is basically a surplus of air that has to go somewhere. Since it can’t go into the ground, it must go up. (Note that this effect can even be enhanced by strong thermals breaking away in the convergence zone: where the easterly and the westerly flow meet on the ground and the air is pushed up, the surface winds are usually only mild. That means, the sun has a lot of opportunity to heat the ground because the warm air doesn’t get blown away.) The geographic location of the convergence line varies based on the strength and depth of the easterly and westerly flows. Most often the line is somewhere between the lower foothills and a few miles west of the Peak-to-Peak Highway but there are instances when it can be out in the plains east of Boulder, and there are instances when it can be even to the west of the Continental Divide. (There are of course also days when there is no convergence at all.)
The trick to high XC-speeds is to find the place where the easterly and the westerly flow converge, i.e. the air is pushed up, and then to follow this line as you fly north or south, usually somewhat parallel to the mountains.
Fast XC speeds aren’t the only reason to look for the convergence line. The air on the west side of the convergence is almost always dryer and clearer (less hazy). This means the ground can heat better, the thermals will be stronger, they will develop earlier, and they will reach higher. Soaring on the west side is almost always better than soaring on the east side, especially in the morning when there is often a ground inversion in the valley that has to burn off before thermals can develop at all.
The differences in air quality to either side of the convergence also mean that clouds will look different. Most notable is the difference in cloud bases – they tend to be noticeably higher on the west side. So if you see a step in the cloud base, always try to stay underneath the higher base to the west. You may also see scraggly looking curtain clouds along the convergence line. Stay just to the west of these clouds and you should be in the area of good lift.
Back to yesterday’s flight. I knew there was a strong convergence line but I didn’t get into it. Why?
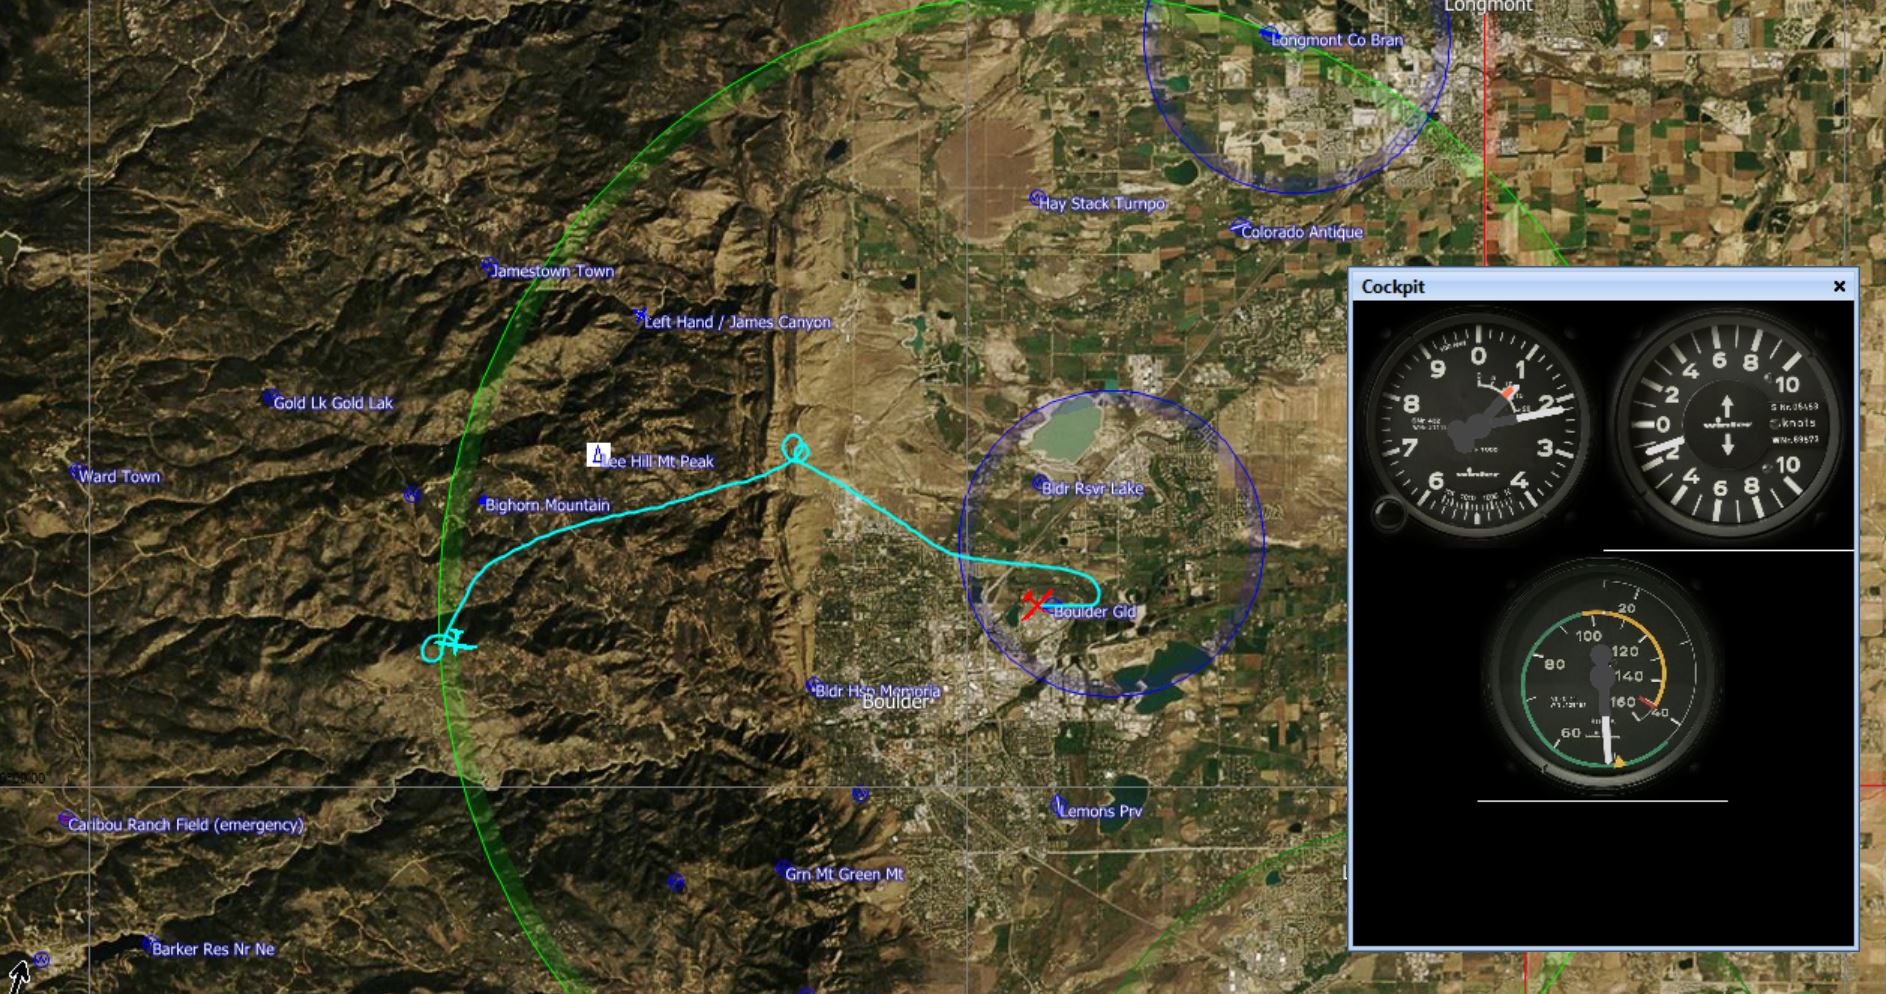
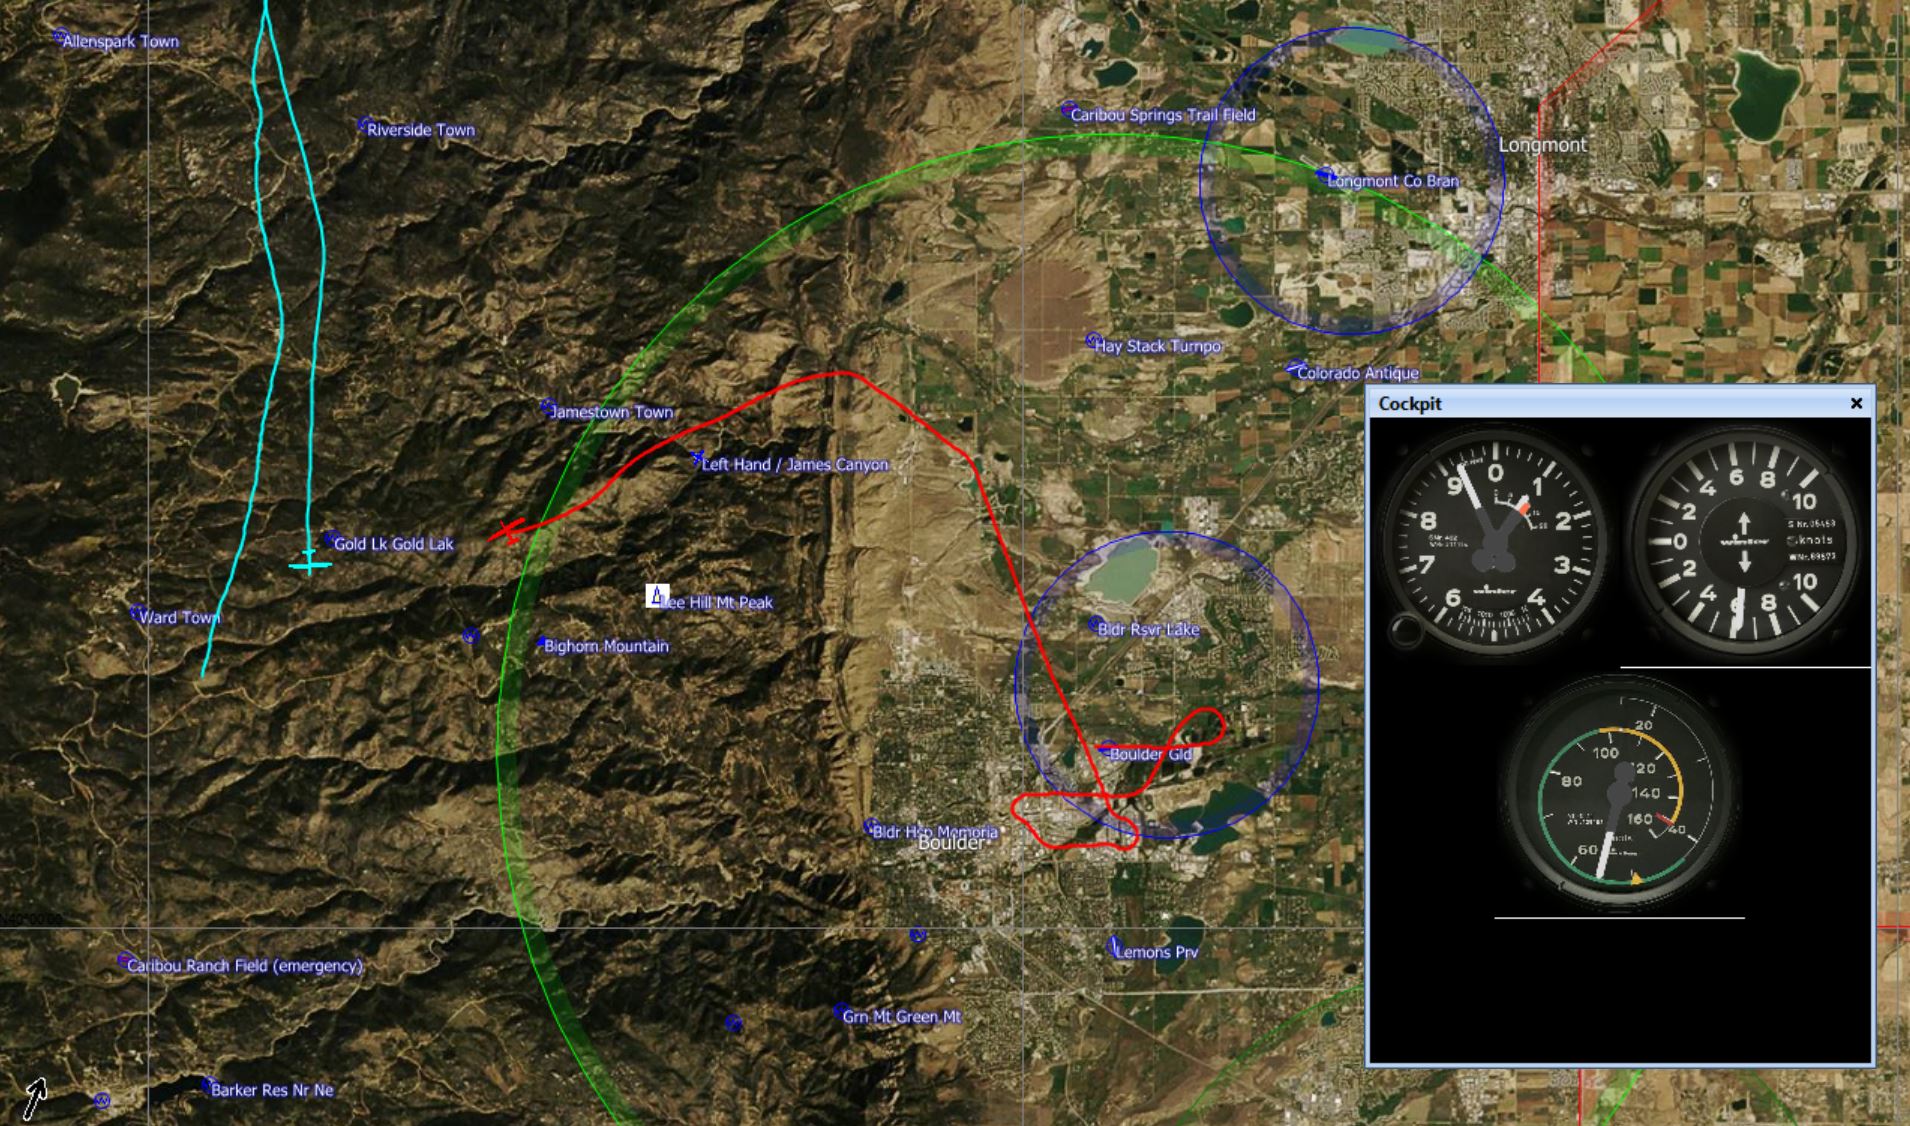
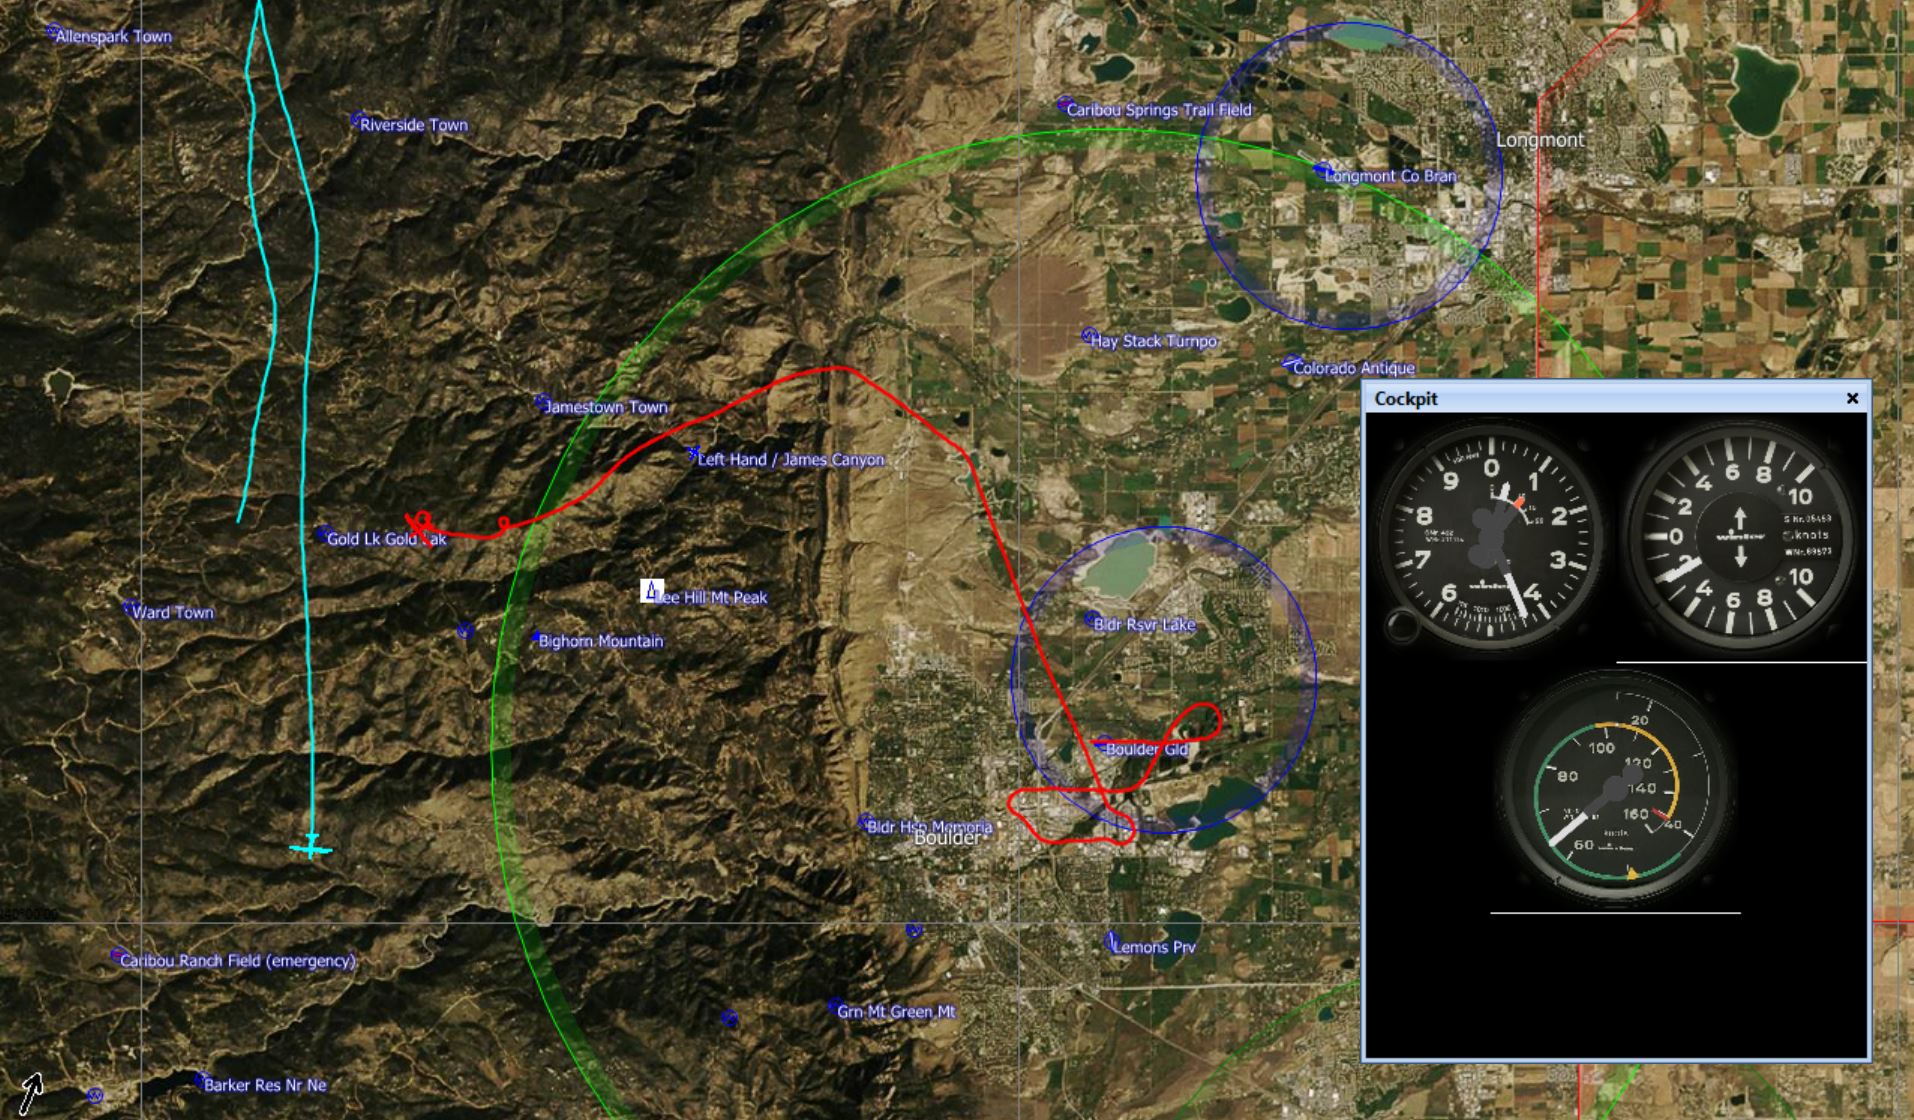
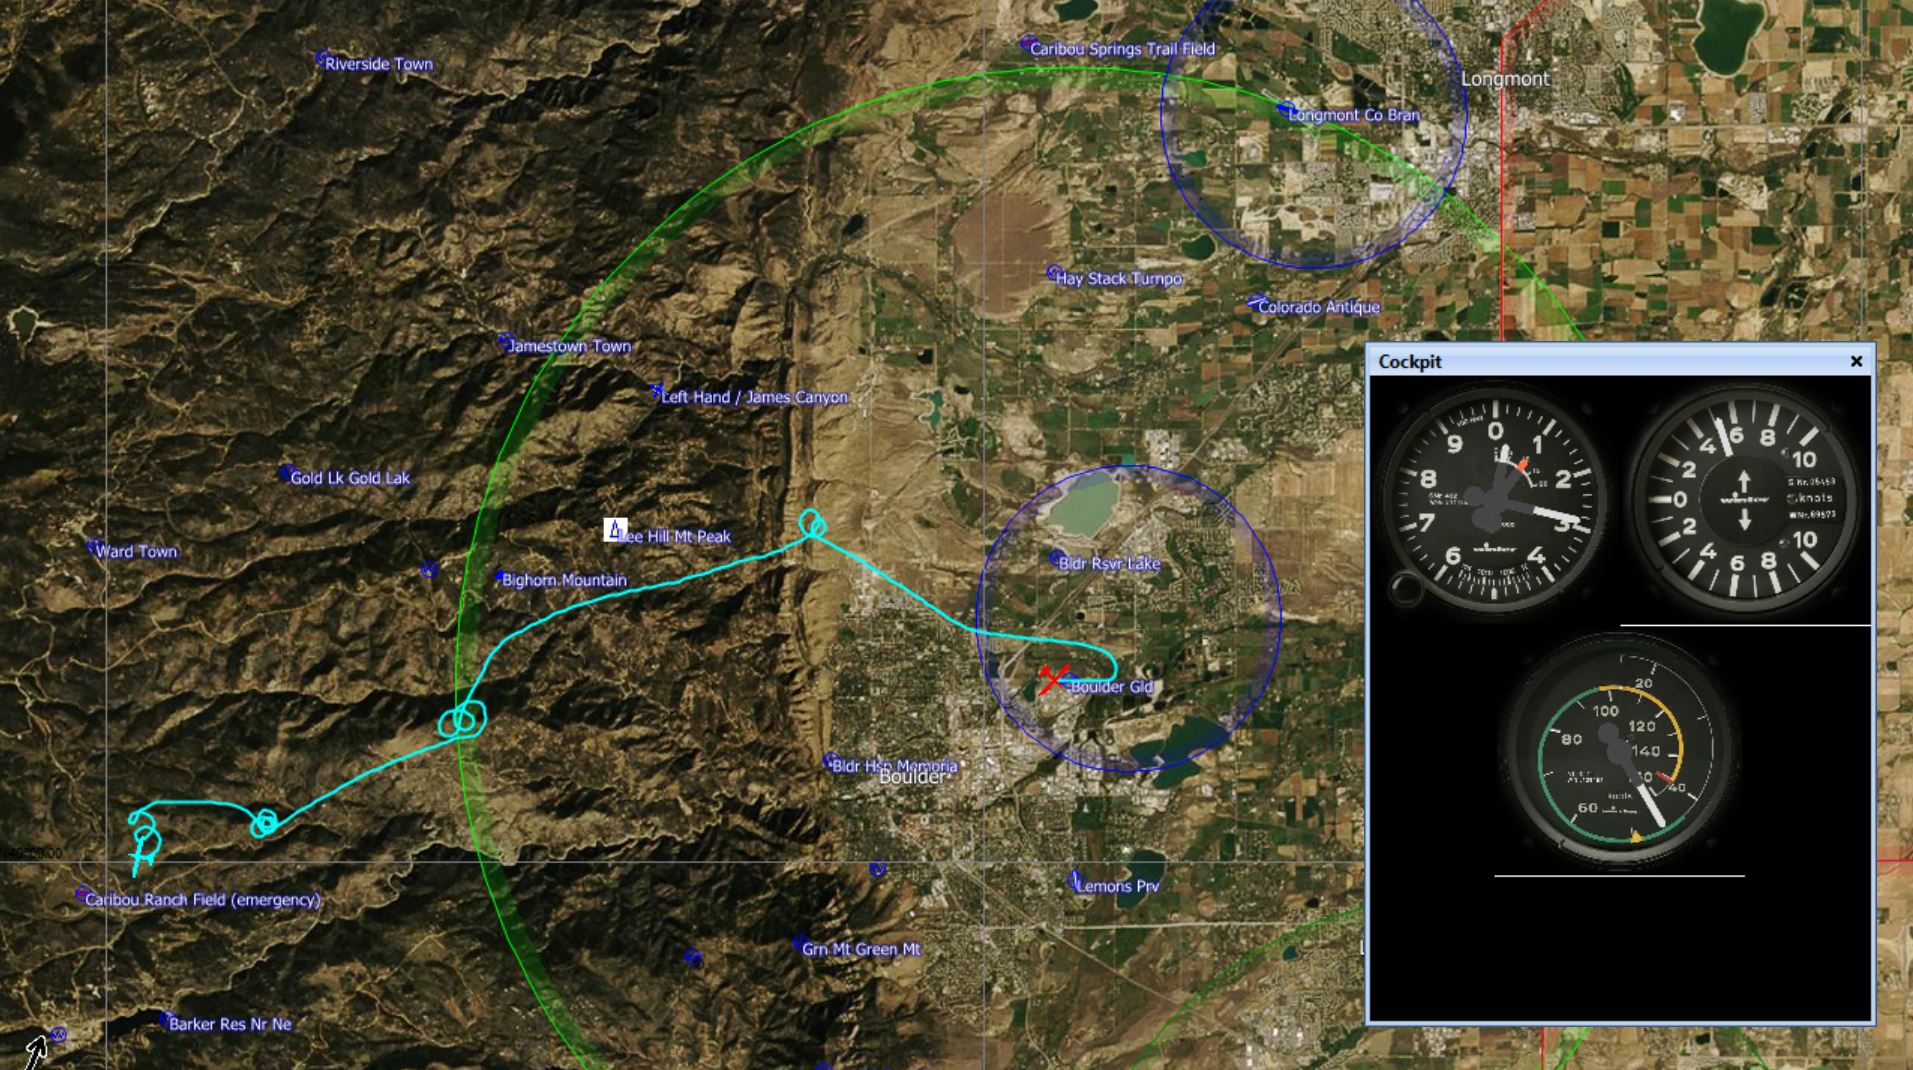
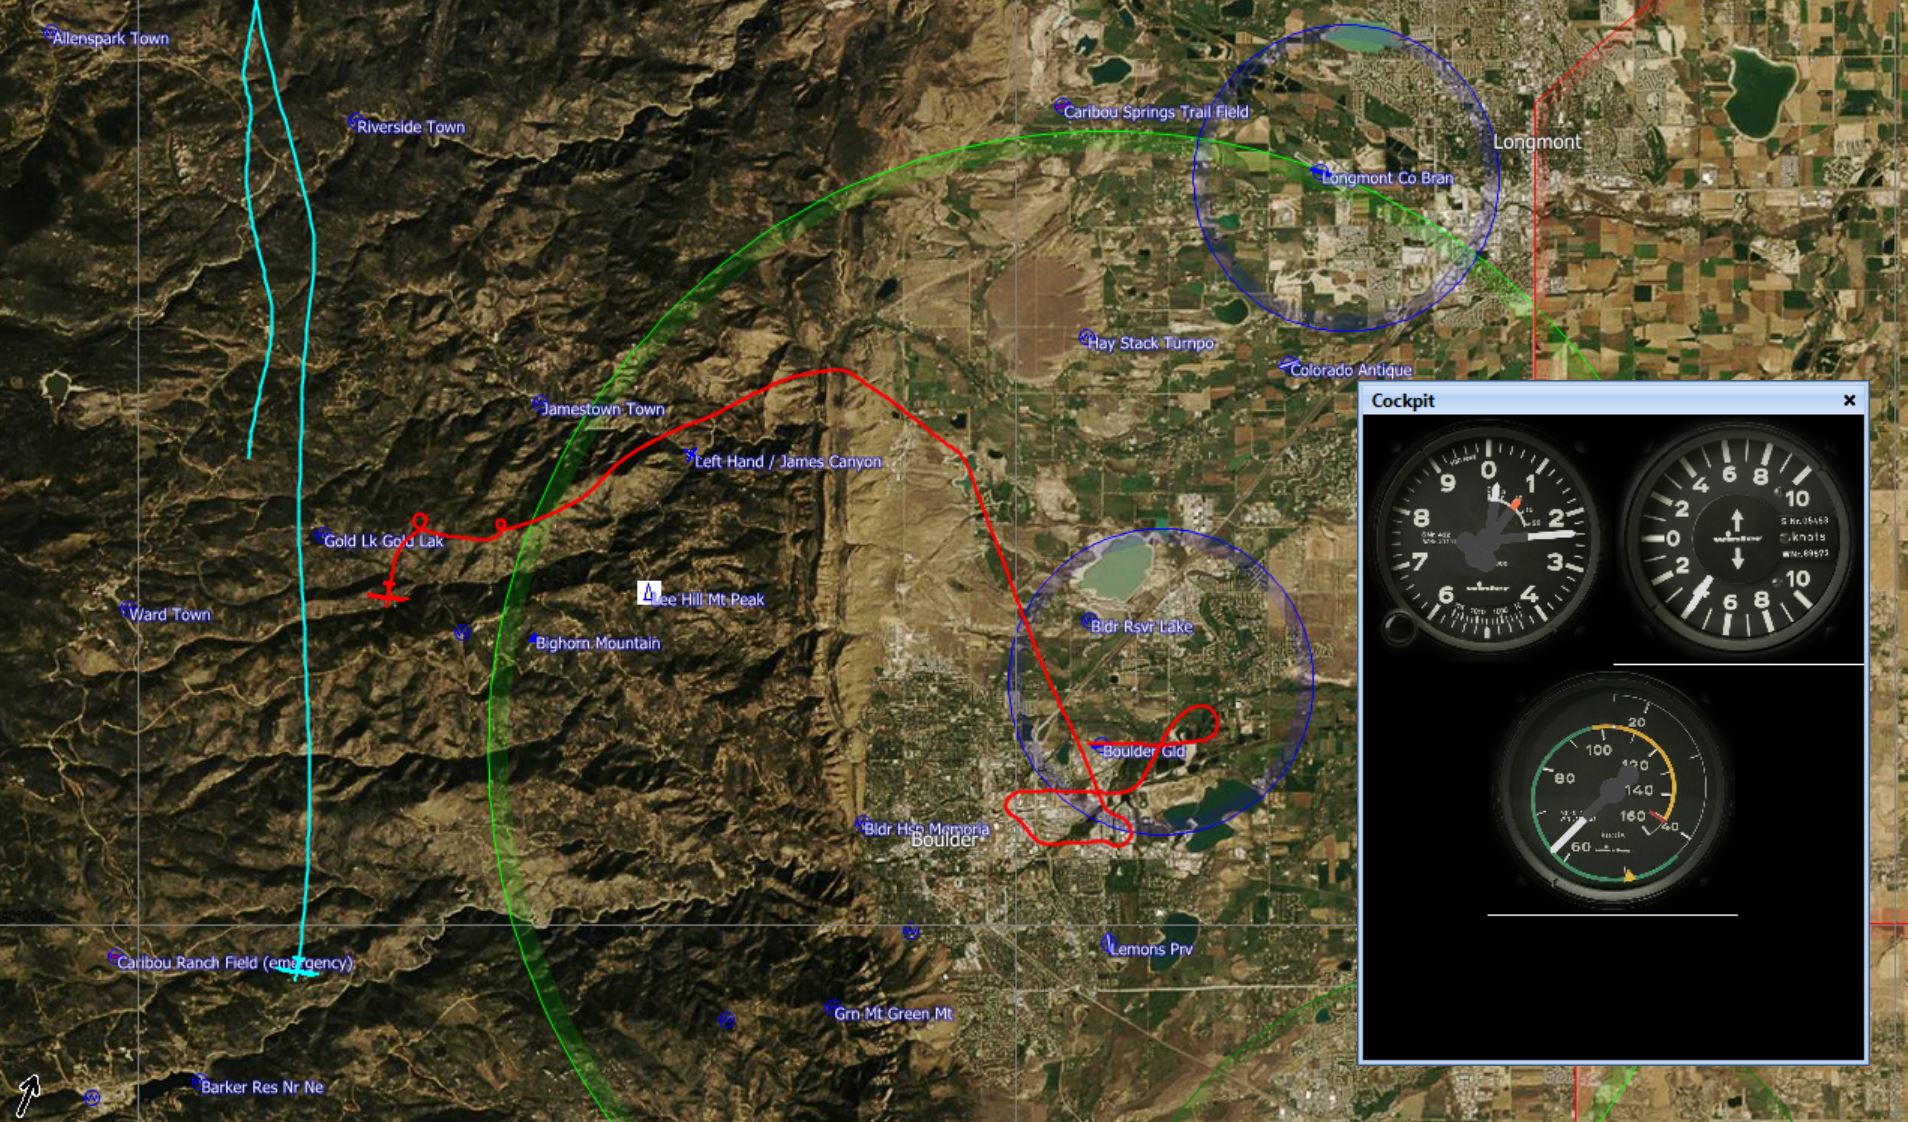
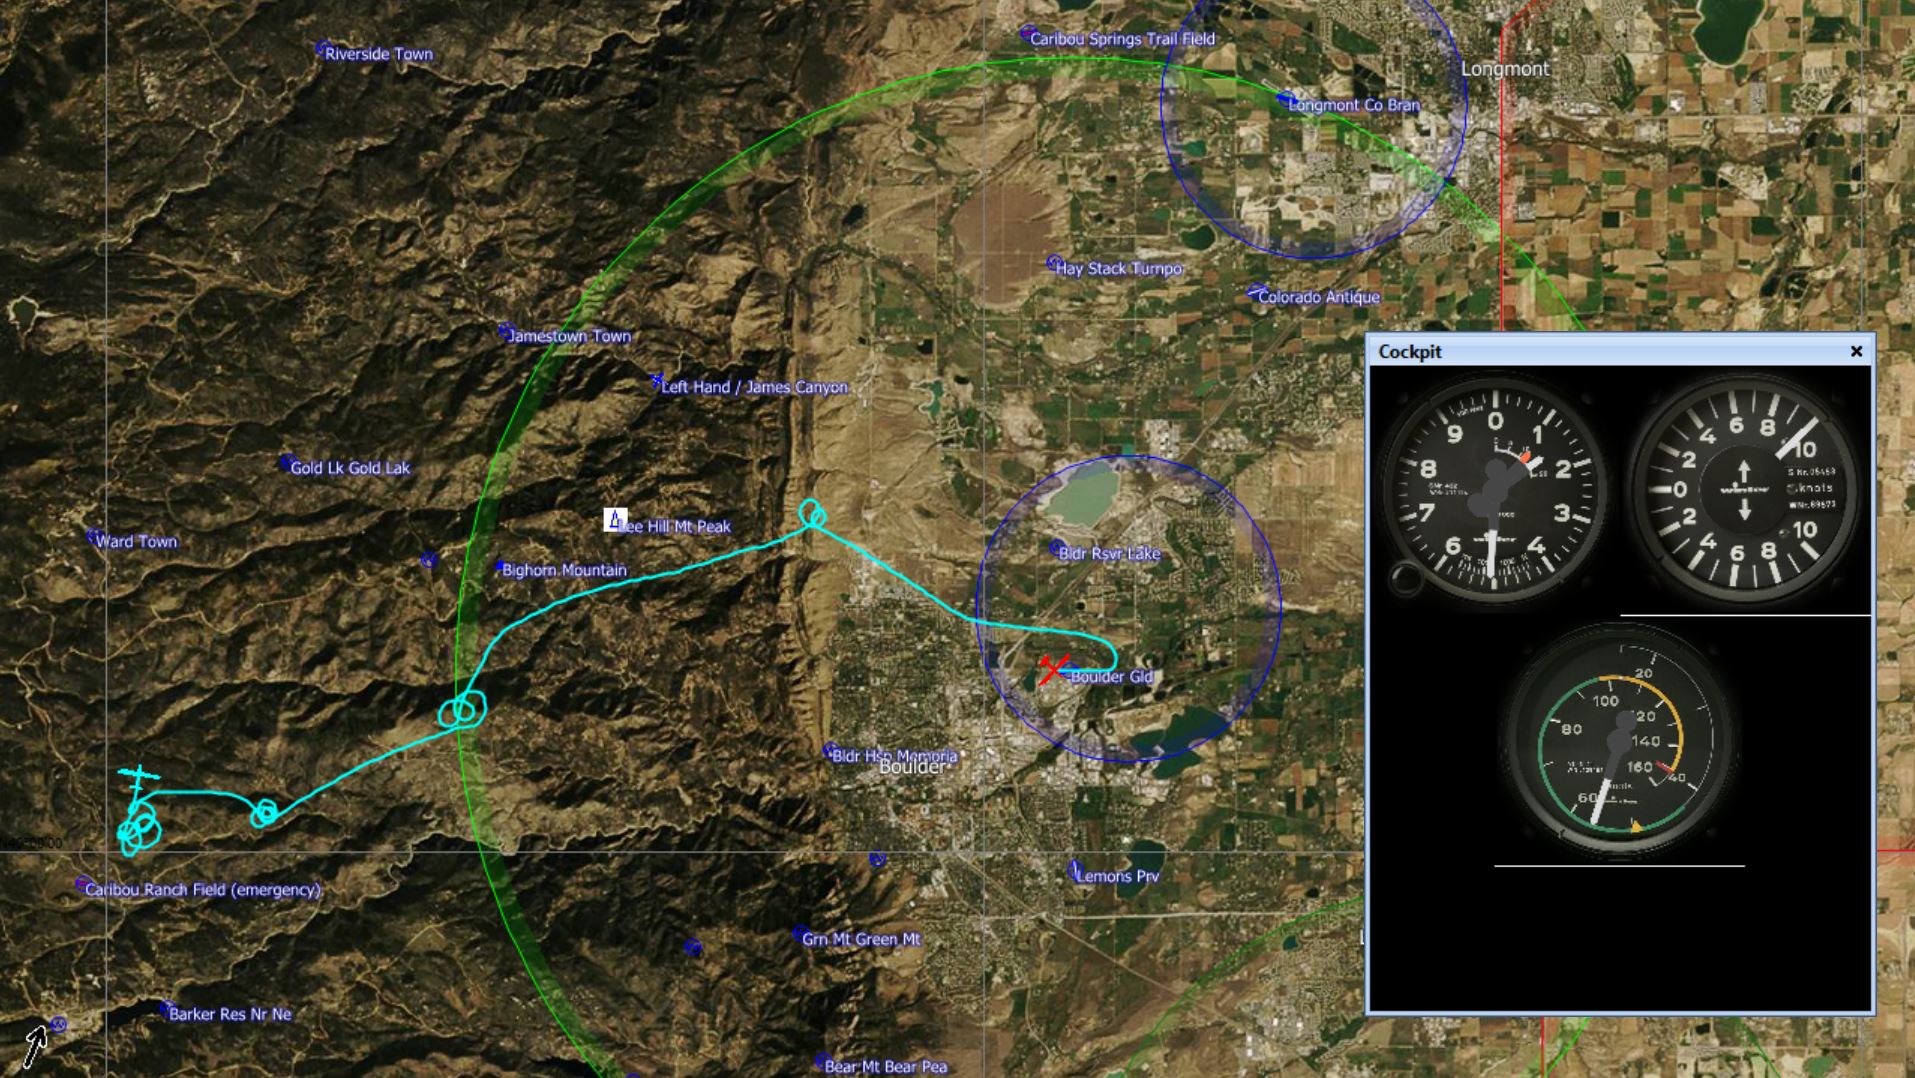
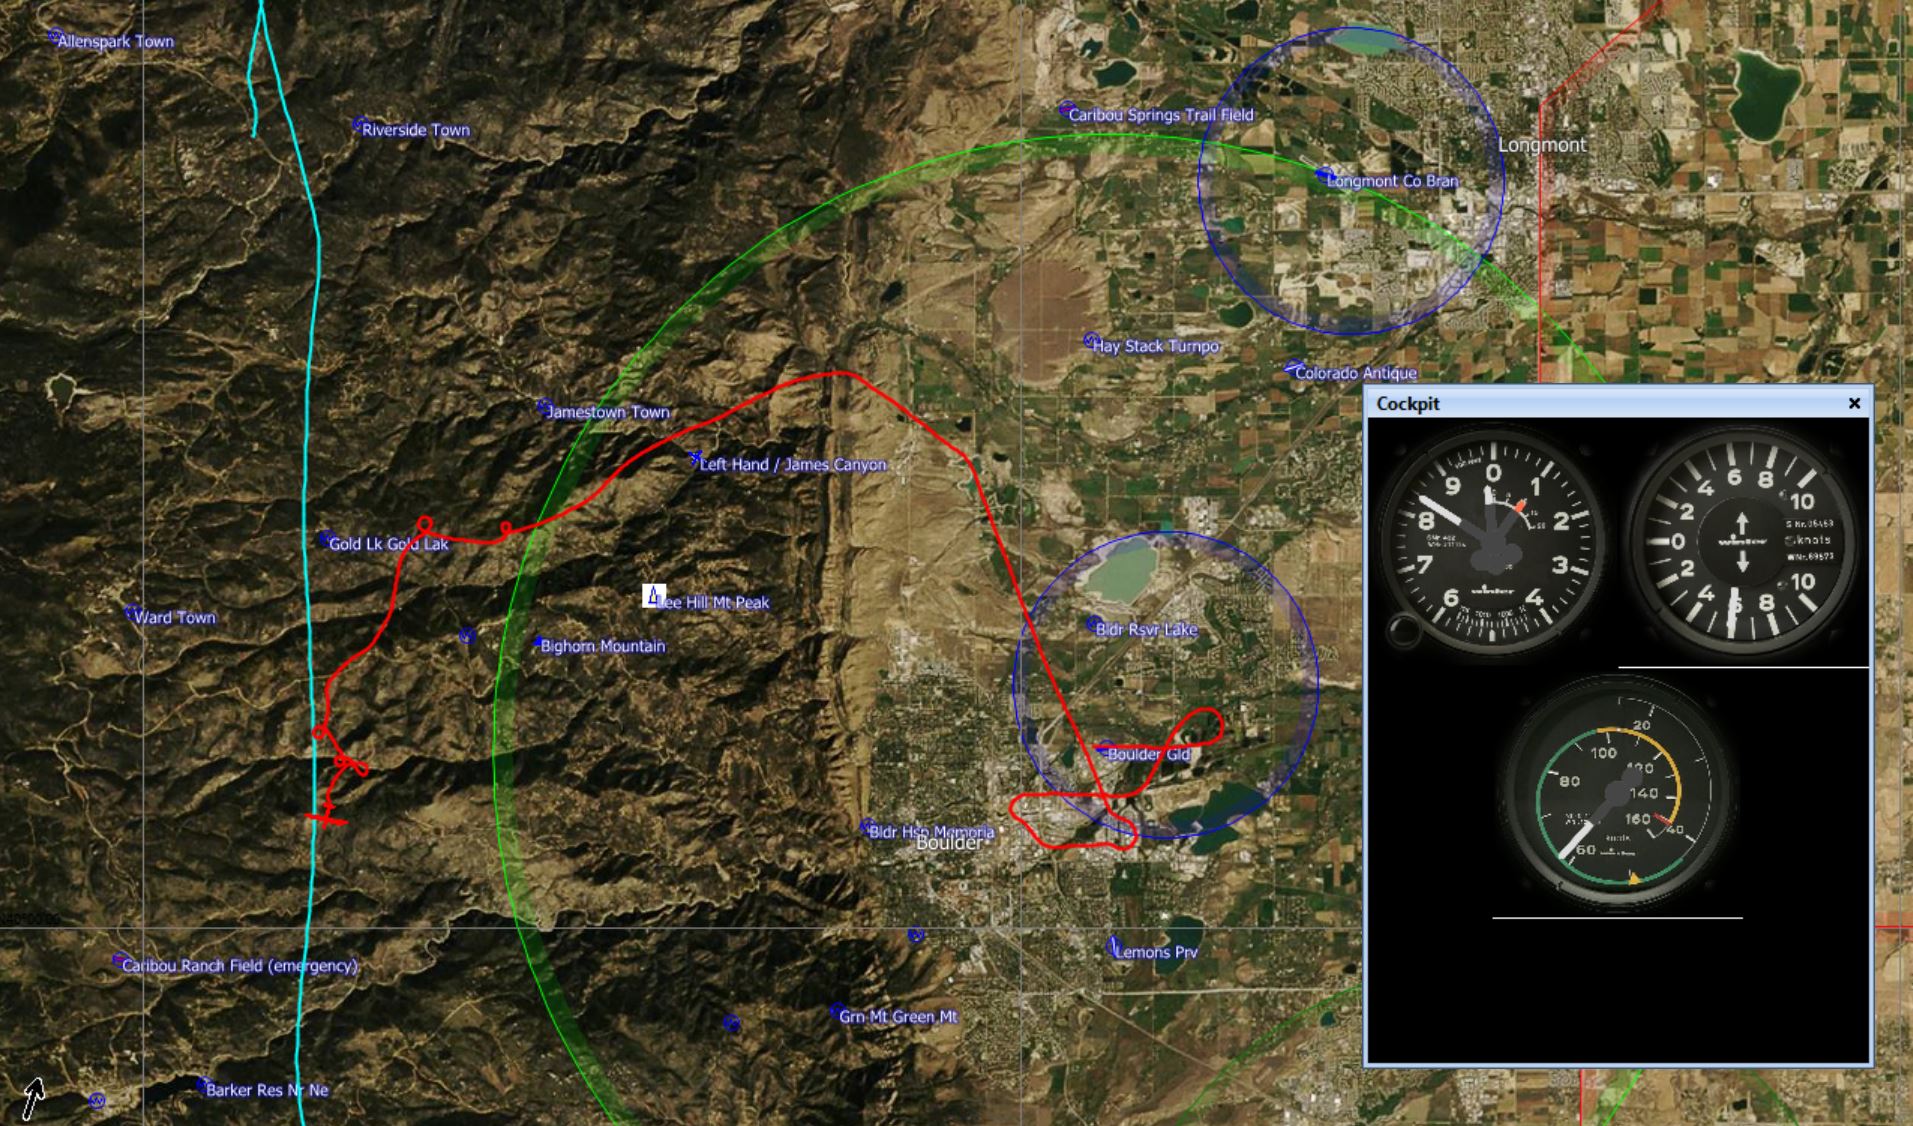
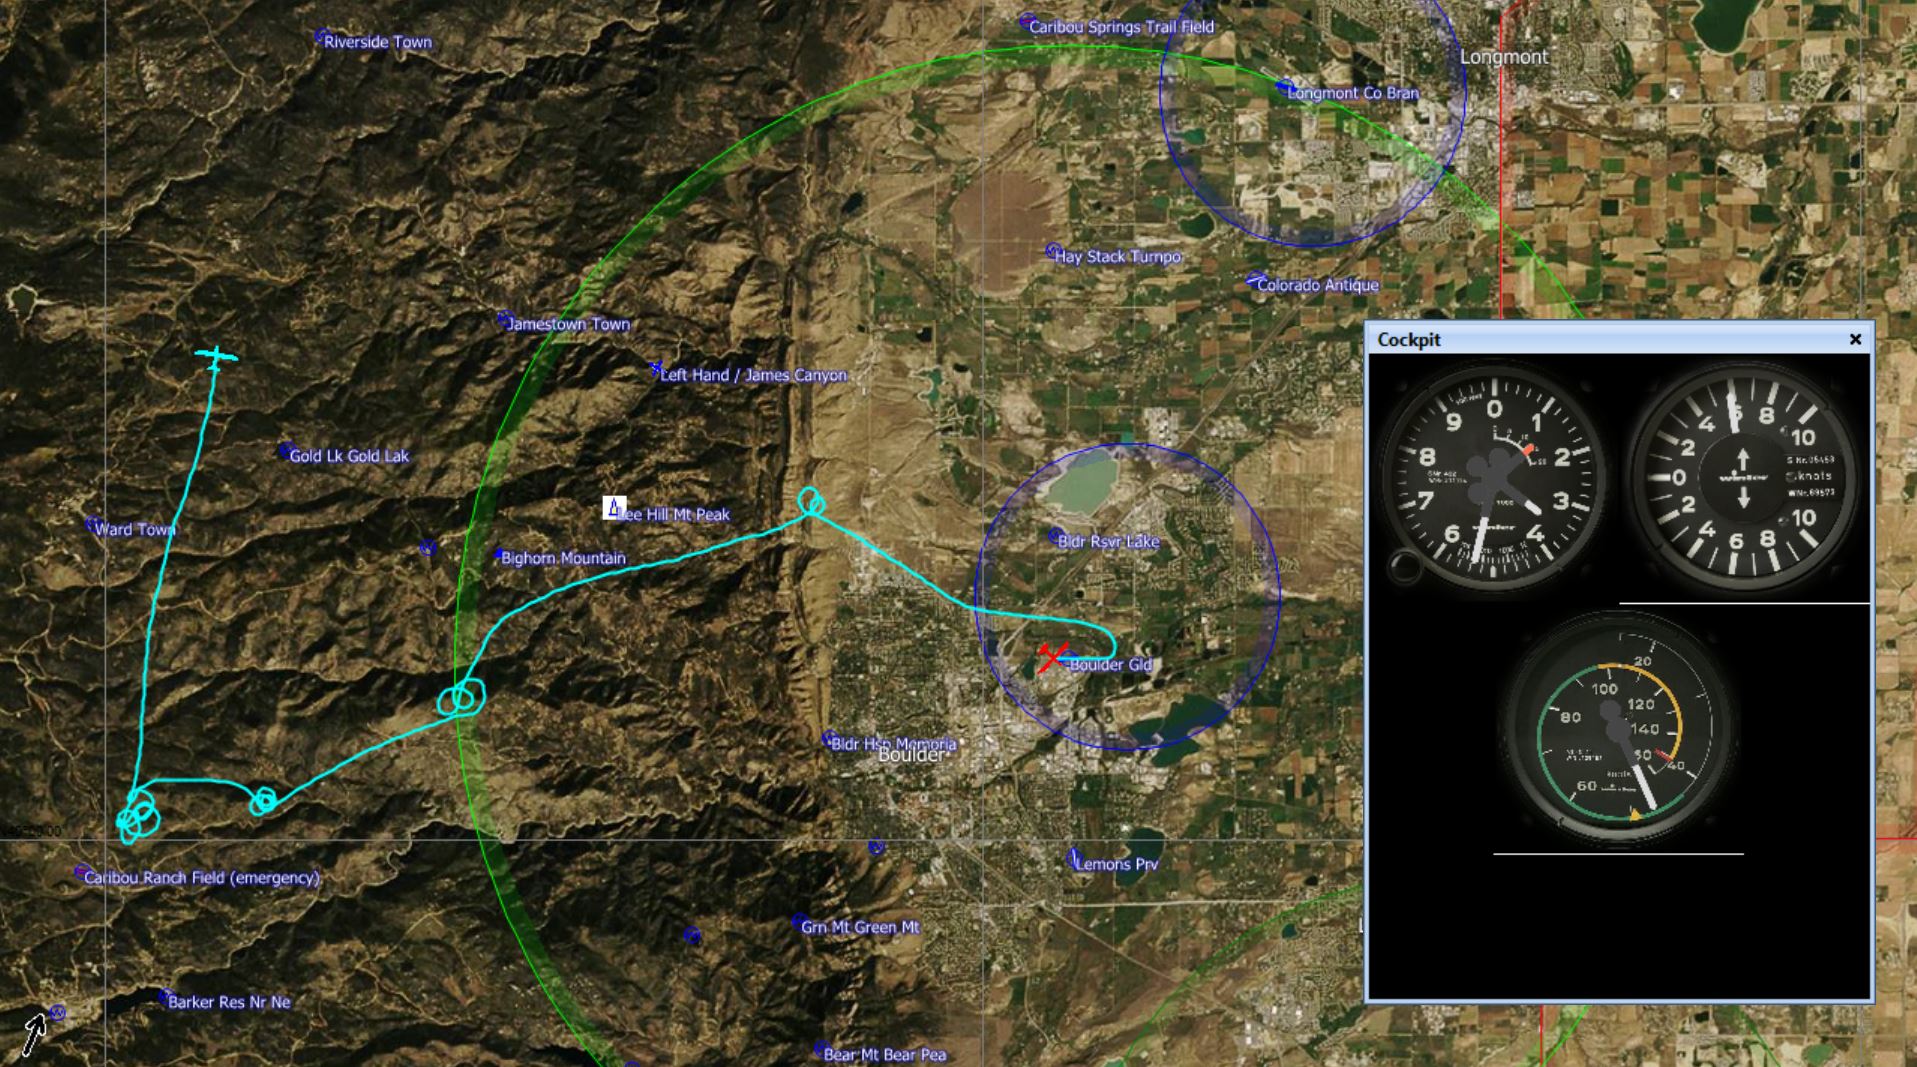
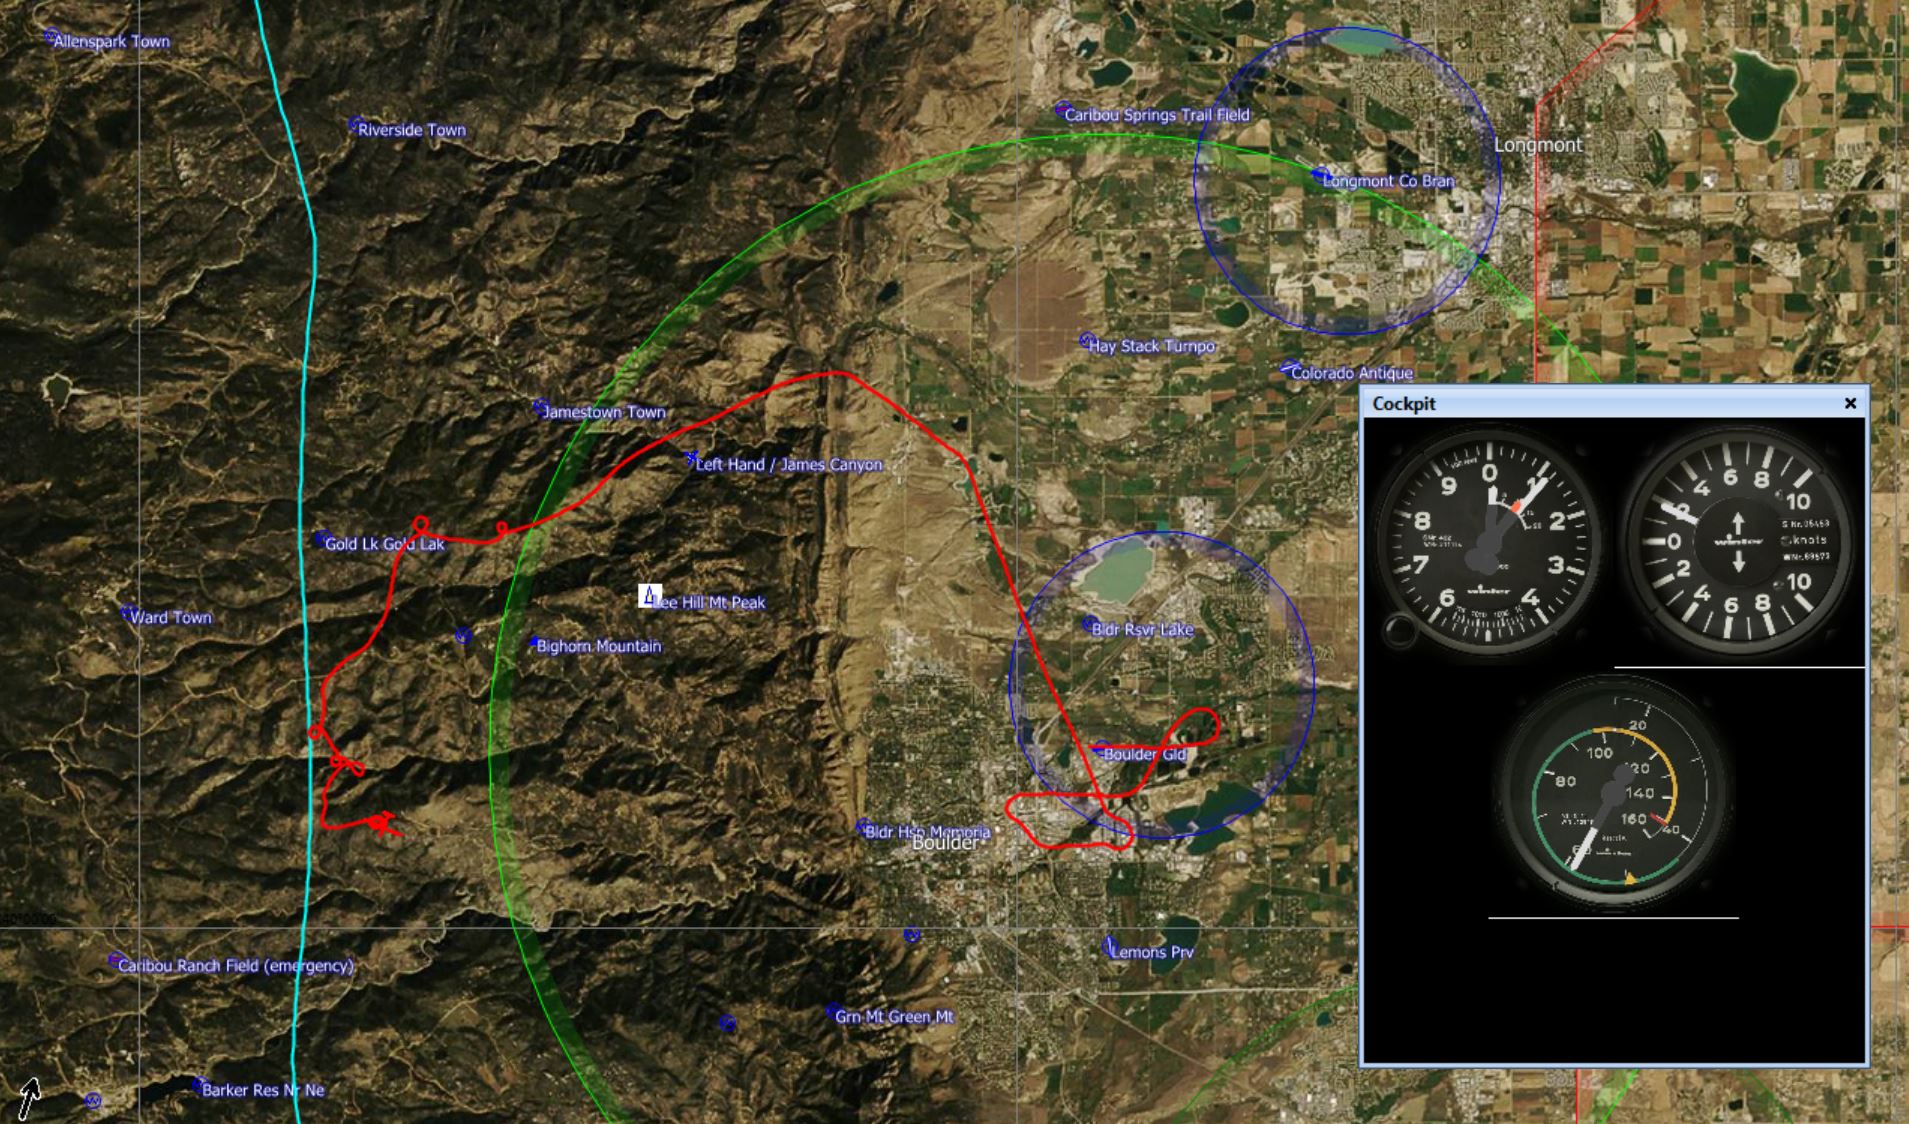
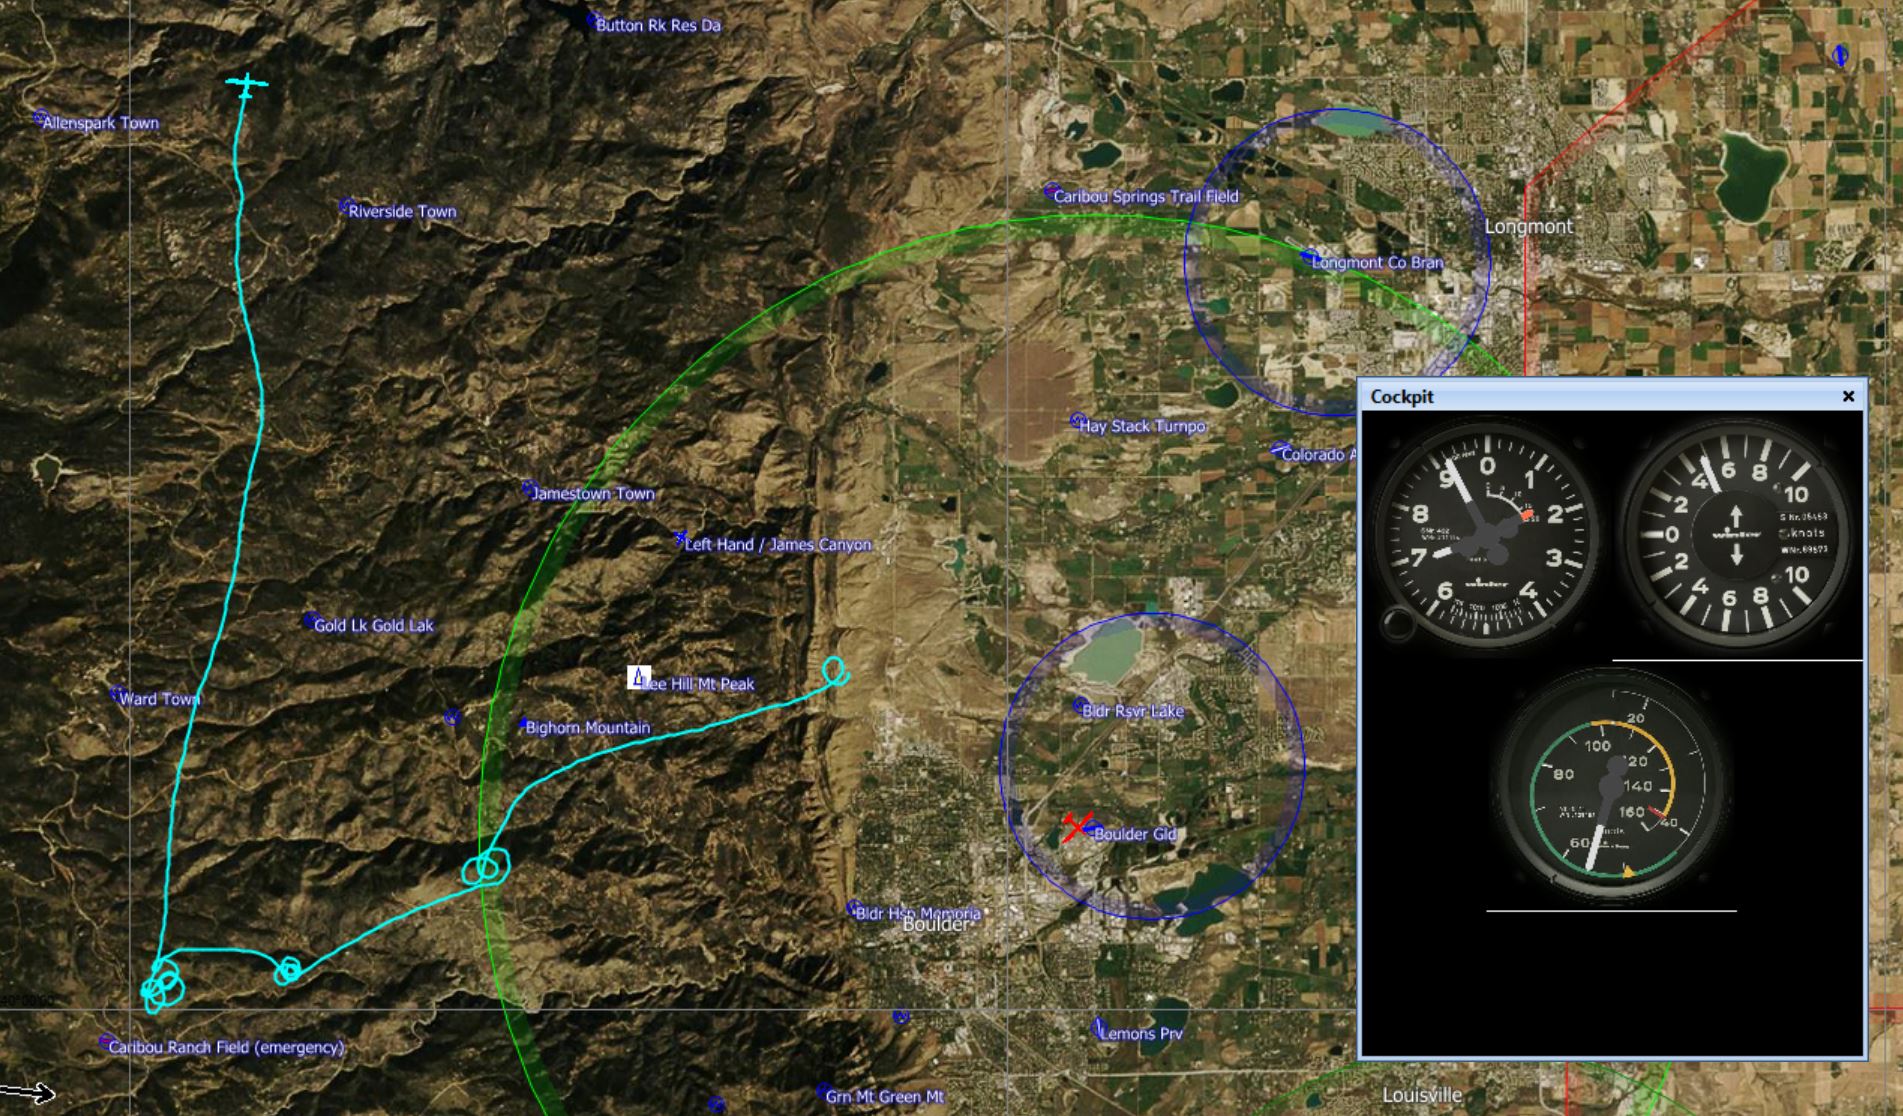
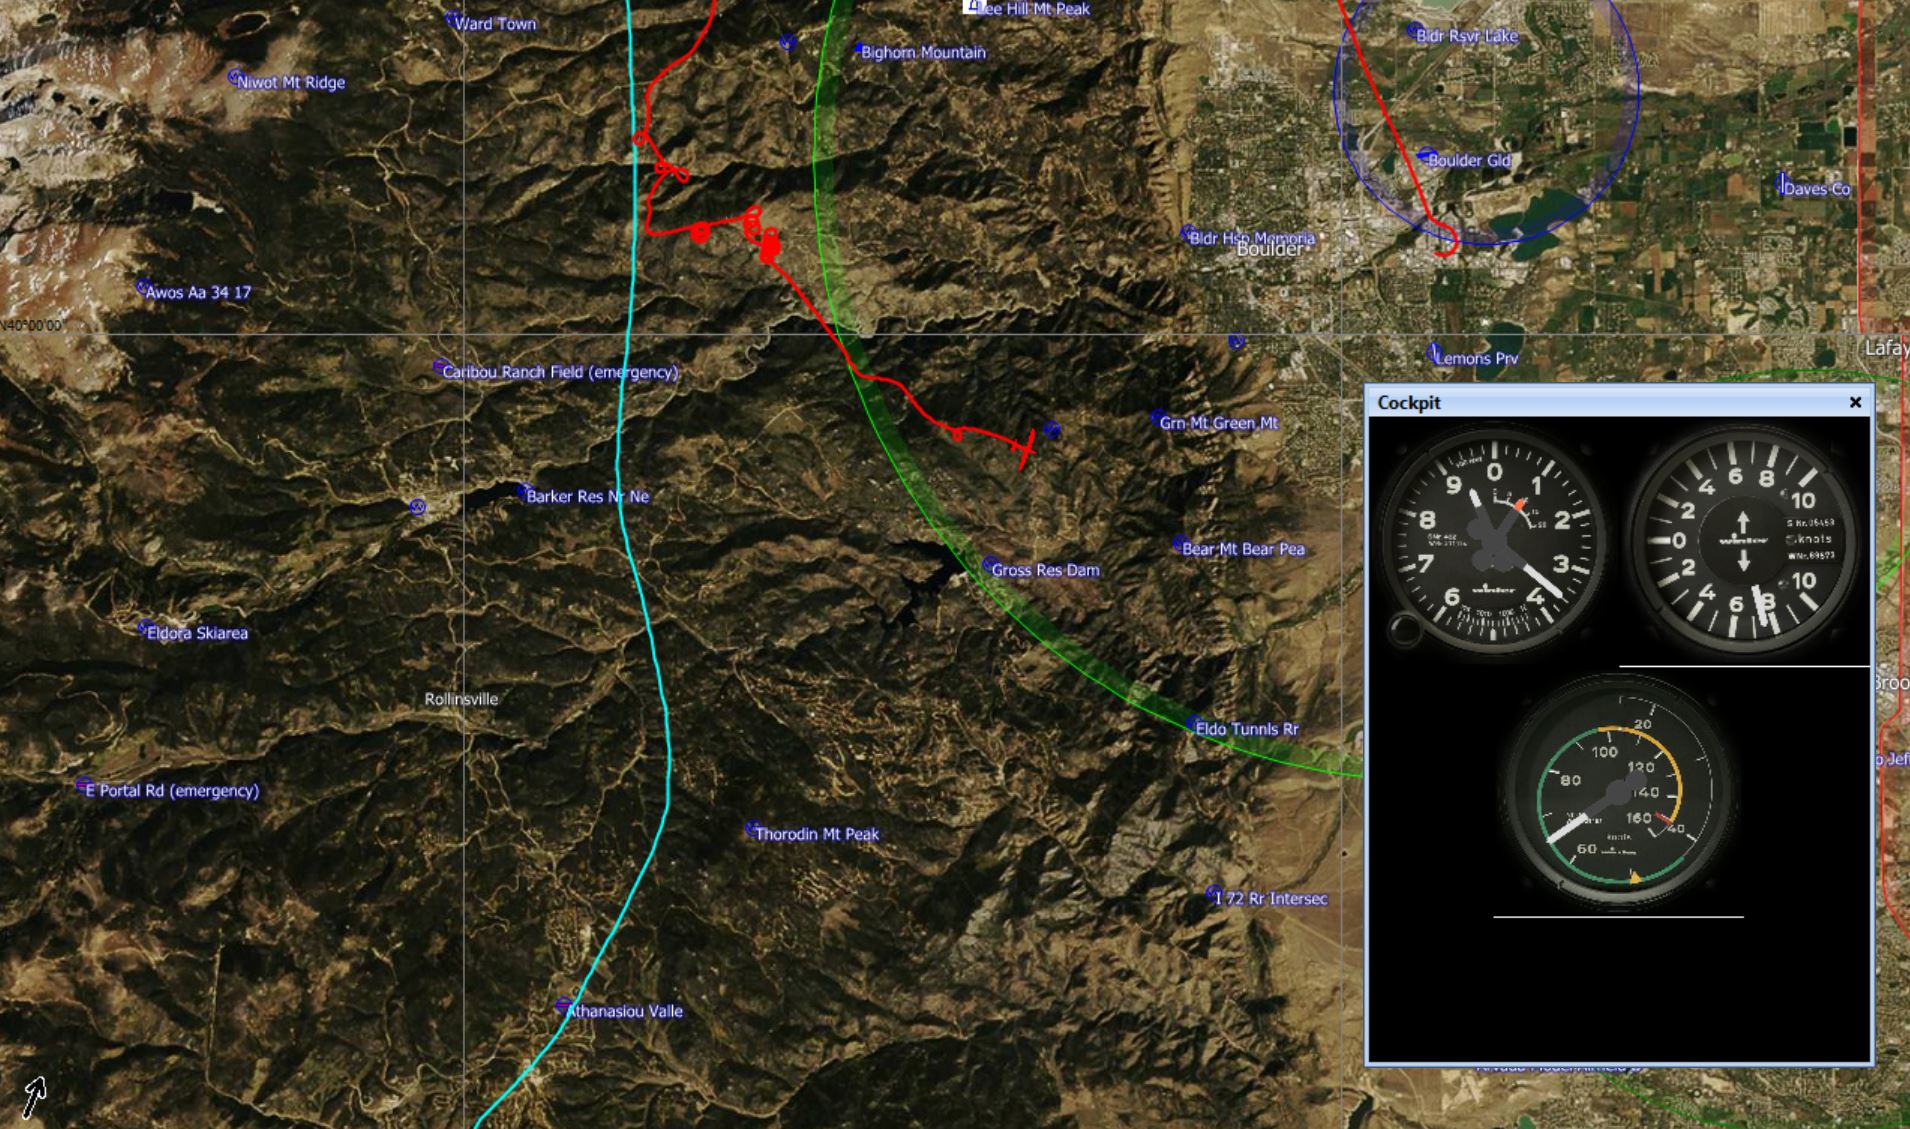
To find the answer I closely compared the early stage of CX’s flight path and of my own flight path to find out where CX was able to connect with the line, and why I missed it. CX’s flight trace is shown in light blue, and my flight trace, SG, is shown in red.
The following screenshots from SeeYou tell and illustrate the story.
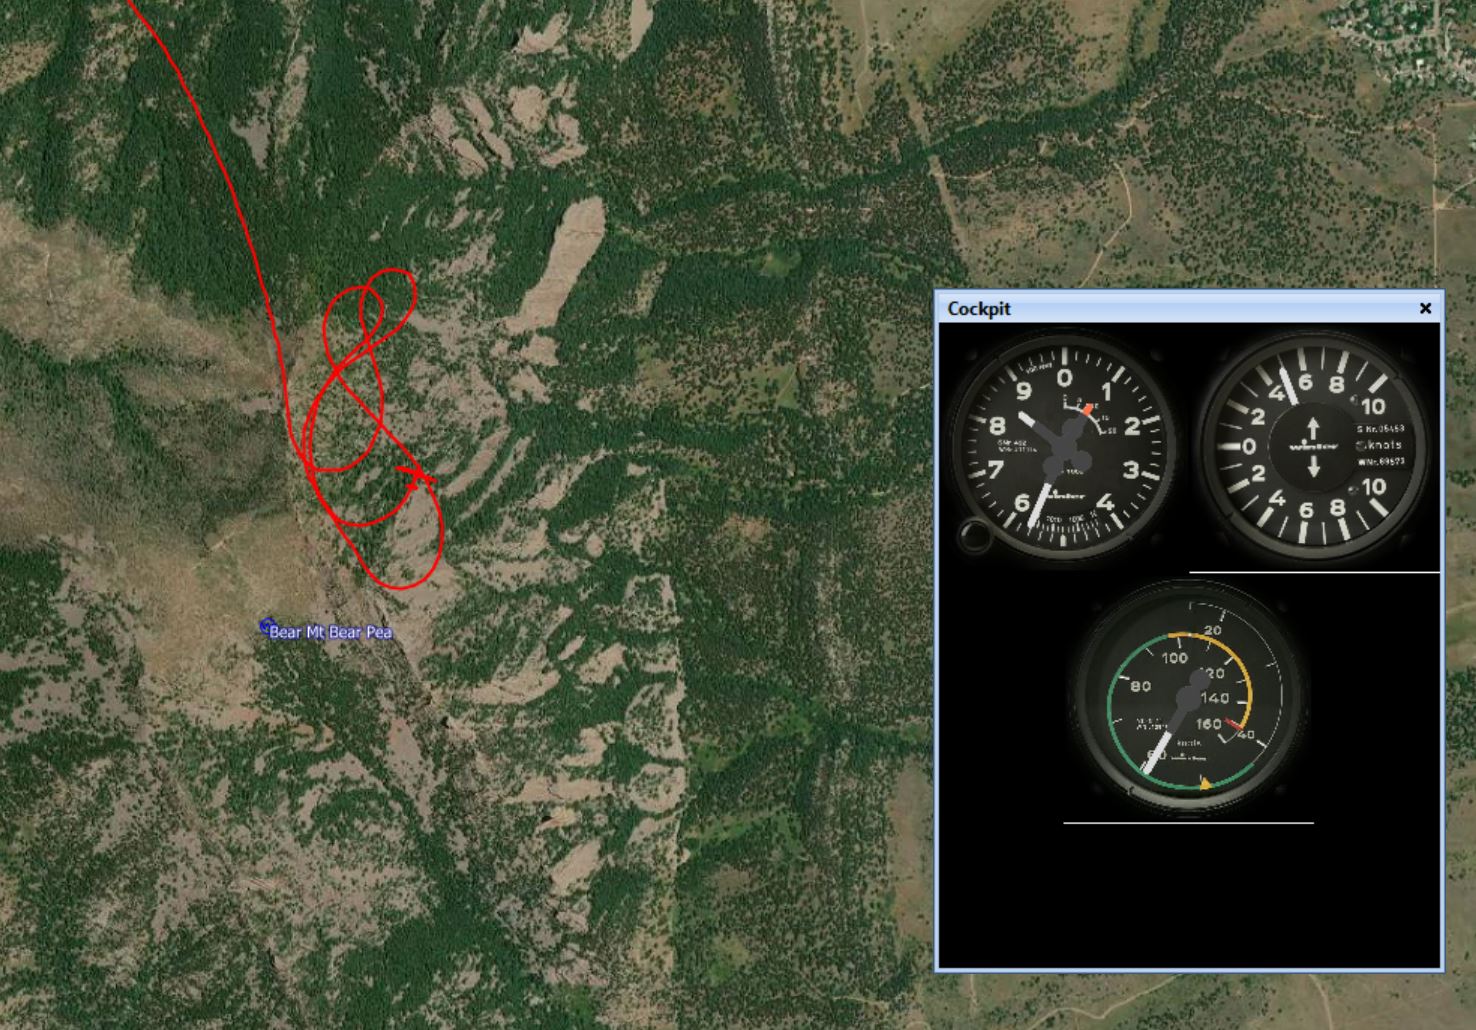
CX turned the engine off right on the inside of the 15km OLC ring, above Sugarloaf mountain, at 11,200 MSL.I released a little further north and just 300 ft lower at 10,900 MSL.CX immediately pushed west and tried to find lift just north of Barker Reservoir. CX was down to 10,200 MSL and just able to maintain altitude.I also pushed a little further west before I attempted my first climb. With the same result. I was also able to maintain altitude but unable to climb. At this point I was at 10,400 MSL.CX pushed further west and finds lift next to the Peak to Peak Highway. The first few turns are rough with a mix of strong lift and strong sink, but then the climb rate improves. Good lift after 3 turns and now back at 10,300 MSL.Instead of pushing another 1-2 miles further west while I still had just enough altitude to do it, I hesitated and went for the west side of a small rotor cloud to the south. This rotor did not work and this one decision probably cost me the connection with the convergence.After another 2 turns, CX has made it. Although he’s still only at 11,500 MSL, he is already confident that he can commence a straight flight along the line.I am only 2 miles NE of where CX found the connection with the convergence. But the air is rough with lots of gusts and no climb. I am down to 9,800 MSL and do not feel confident that I can push further west without additional safety margin.CX has clearly made it and is rapidly climbing in straight flight north, already up at 13,500 MSL.I am desperately trying to claw back a few hundred feet to make an attempt at getting further west. I’m back at 10,100 MSL but also 1 mile further east, and don’t consider my altitude sufficient.CX has climbed away in straight flight to 16,900 MSL and is now ready for a speed run at altitude.I’m working hard to maintain altitude but continue to shift east. The further east I get, the more altitude I need for a push westwards.Eventually I give up on the idea of connecting with the convergence line and aim for the Flatirons instead. After a patch of sink, I’m down to 9,300 MSL and it’s definitely game over for getting back west.The easterly flow is moving up along the slope of the flatirons. It’s pretty weak at about 6-8 kts but just sufficient to maintain altitude at ridge top level and say hi to the hikers on top of Bear Peak.
After this I continued my flight for a while thermaling over the lower foothills west of the Boulder airport. The thermals were wind-blown and inconsistent and didn’t reach higher than about 8,700 MSL where they were stopped by the wind shear layer between the lower easterly flow and the rapidly moving westerly wind aloft.
So what did I do wrong?
1- I underestimated from the outset how hard it would be to reach the convergence. In particular I did not appreciate that the strong westerly winds aloft would cap the thermal height such that I would not be able to gain the necessary altitude to head west.
2- Because of #1 I also did not have a clear plan for where to tow or how high. On tow I was flying in considerable sink as we approached the 15km ring. Had I released inside the ring, I would have released in strong sink. So I stayed on beyond the sink and released at the first sign of weak lift. That was a mistake because I was just a little too low to comfortably head straight west to get to the convergence. Had I continued on to about 12,000 feet, it would have most likely been sufficient.
3 – I might have had one chance to get far enough west. This was after my first climb off tow when I made it to 10,600 MSL 1 and one mile east of Gold Lake. Had I tried to push another mile west from there it might have just worked and I would have had just enough altitude to do it. Instead, I flew south from there, and at that point my chances to connect without taking undue risks were probably already over.
A very strong westerly wind aloft and the associated wind-shear is likely to cap the height of the thermals east of the convergence. The low thermal tops can make it impossible to get the necessary altitude to fly far enough west to reach the convergence (depending on the position of the line).
In conditions like these it is necessary to tow high enough to have the necessary altitude to fly west and connect with the convergence before running out of safety margin and having to turn back east. (Per launch you might have only one chance to get the line and very little time to connect (perhaps even less than a minute). Seize it when you see it. A few hundred feet of altitude can make all the difference.)
On OLC Speed League days in these type of conditions (when you can’t get high enough in thermals to penetrate west) there are two alternative strategies to connect with the convergence line and get a valid OLC start: 1) tow to about 12,000-13,000 just at the edge (but inside) of the 15km ring, release, and then head west; or 2) tow further west until you’re confident that you can reach the convergence, connect and gain enough altitude to come back out and dip into the 15km ring, and head back west (and connect again). It is important to consider these alternatives before takeoff and communicate with the tow pilot accordingly.
Post Scriptum
I received several comments via email about this post. Thanks to everyone who read it and took the time to reply. Most comments were about SG’s lack of an engine compared to CX. Here are a few excerpts about what commentators said.
“Big difference you don’t have an engine!”
“Never compare or try to fly with a motor glider!”
“Sometimes it is better to be safe and soar again another day. (The Discus doesn’t have a motor if you get in trouble.) I wonder how that affects personal minimums?”
“If there was sink all the way to just east of Gold Lake I think I would have difficulty deciding to push much toward the divide when off tow. I guess after thinking about it from the back seat, in sink conditions I think I ‘d want to get into some substantial lift before getting off back there.”
Again, thank you for your comments! Here’s what I would say in response:
In my opinion, the engine factor should not make a difference in a pilot’s judgement (after all you cannot rely on the engine starting when you need it and there are many examples when it doesn’t) but (the limited) empirical evidence suggest that it does influence a pilot’s behavior: a study of all gliding accidents in France over a period of three years showed that the fatality rate in motor glider accidents was almost 3 times higher than the fatality rate in pure glider accidents. The data set is small but it would suggest that pilots of motor gliders are more likely to take higher risks (e.g. fly low over unlandable terrain) assuming that the engine can bail them out if necessary. But when the engine does not start when really needed, an accident is often inevitable and more likely fatal. (BTW – if this is true, it is a classic examples of risk compensation theory – i.e. individuals tend to assume riskier behavior if you add a safety device; frequently cited examples are that motorists drive faster when driving a car with anti-lock brakes; bicyclists cycle faster when wearing a helmet; and skydivers take more risks as their equipment gets safer.)
I do not think that I should have pushed further west to connect from the altitude that I was at. I think I had an adequate safety margin where I was but my instincts told me not to push any further west and I firmly believe I made the right decision. I do not want to encourage myself or anyone else to take on undue risks.
I cannot speak for CX but here are a few considerations: In addition to having an engine, CX is a higher performance glider with flaps that enable higher speed penetration through sink, and, most important, the pilot is a lot more experienced than I am. In addition, CX found lift right next to Caribou Ranch, one of the few landable fields in the foothills. (For me it’s just an emergency field, i.e. I would never rely on it, but a much more experienced pilot will probably have no problem landing there.)
In hindsight, my main mistake on the flight was releasing too early and at the first sign of lift which turned out to be too inconsistent and narrow to climb in. While this decision did not put me in any danger whatsoever (I believe I always had plenty of altitude to come back safely), it ultimately did prevent me from pushing far enough west to reach the convergence line.
For the avoidance of doubt, I do not at all regret that I did not push further west with the altitude that was available to me. And I most certainly do not want to encourage anyone (myself or others) to take more risk!
Recently I did a lot of work to update my Boulder 250 sm way point files, including the creation of this Boulder 250 Soaring Map with Final Glide calculations for typical second generation glass ships that would work for our club’s Discus and DG 505.
Screenshot of a portion of the Boulder 250 Soaring Map. The map is interactive. You can show/hide the various different features such as airports, land-out fields, waypoint, 14ers, transitions, unlandable terrain, typical summer soaring conditions, and Final Glide altitudes required for Boulder. Instructions for use and a link to the map are here.
This past Saturday, I had a chance to test my final glide assumptions in real life.
It was a fun but challenging day for flying. A lenticular cloud shielded much of the area east of the Continental Divide from the sun all morning, causing the day to develop quite late, despite the unseasonally high surface temperatures. A cold front was forecast for the following day. In Colorado, pre-frontal weather is almost always associated with an unstable air mass and a risk of over-development once the sun starts to heat the ground. I expected that the combination of late sunshine and early OD would likely make for a relatively narrow soaring window. Skysight had projected this to be between approx. 1 PM and 4 PM (which turned out to be largely correct).
I launched at 1:20 PM after the first cumulus clouds appeared over the hills behind the Flatirons. For a long time the air was still on tow – the valley was still inverted. I towed right to the edge of the 15 km ring around Boulder and released in the first weak lift over Sugarloaf. (I later found out that I had released just a tiny bit too late to qualify for an OLC Speed League start so I should have “dipped back” into the 15km ring.) That lift disappeared quickly and so I headed further west to the nearest cloud, which was above the town of Nederland. I scratched around for almost half an hour until I found the first decent climb above the windward side of Niwot Ridge (the wind in this area blew at 10kt from the SE – ideal for the ridge).
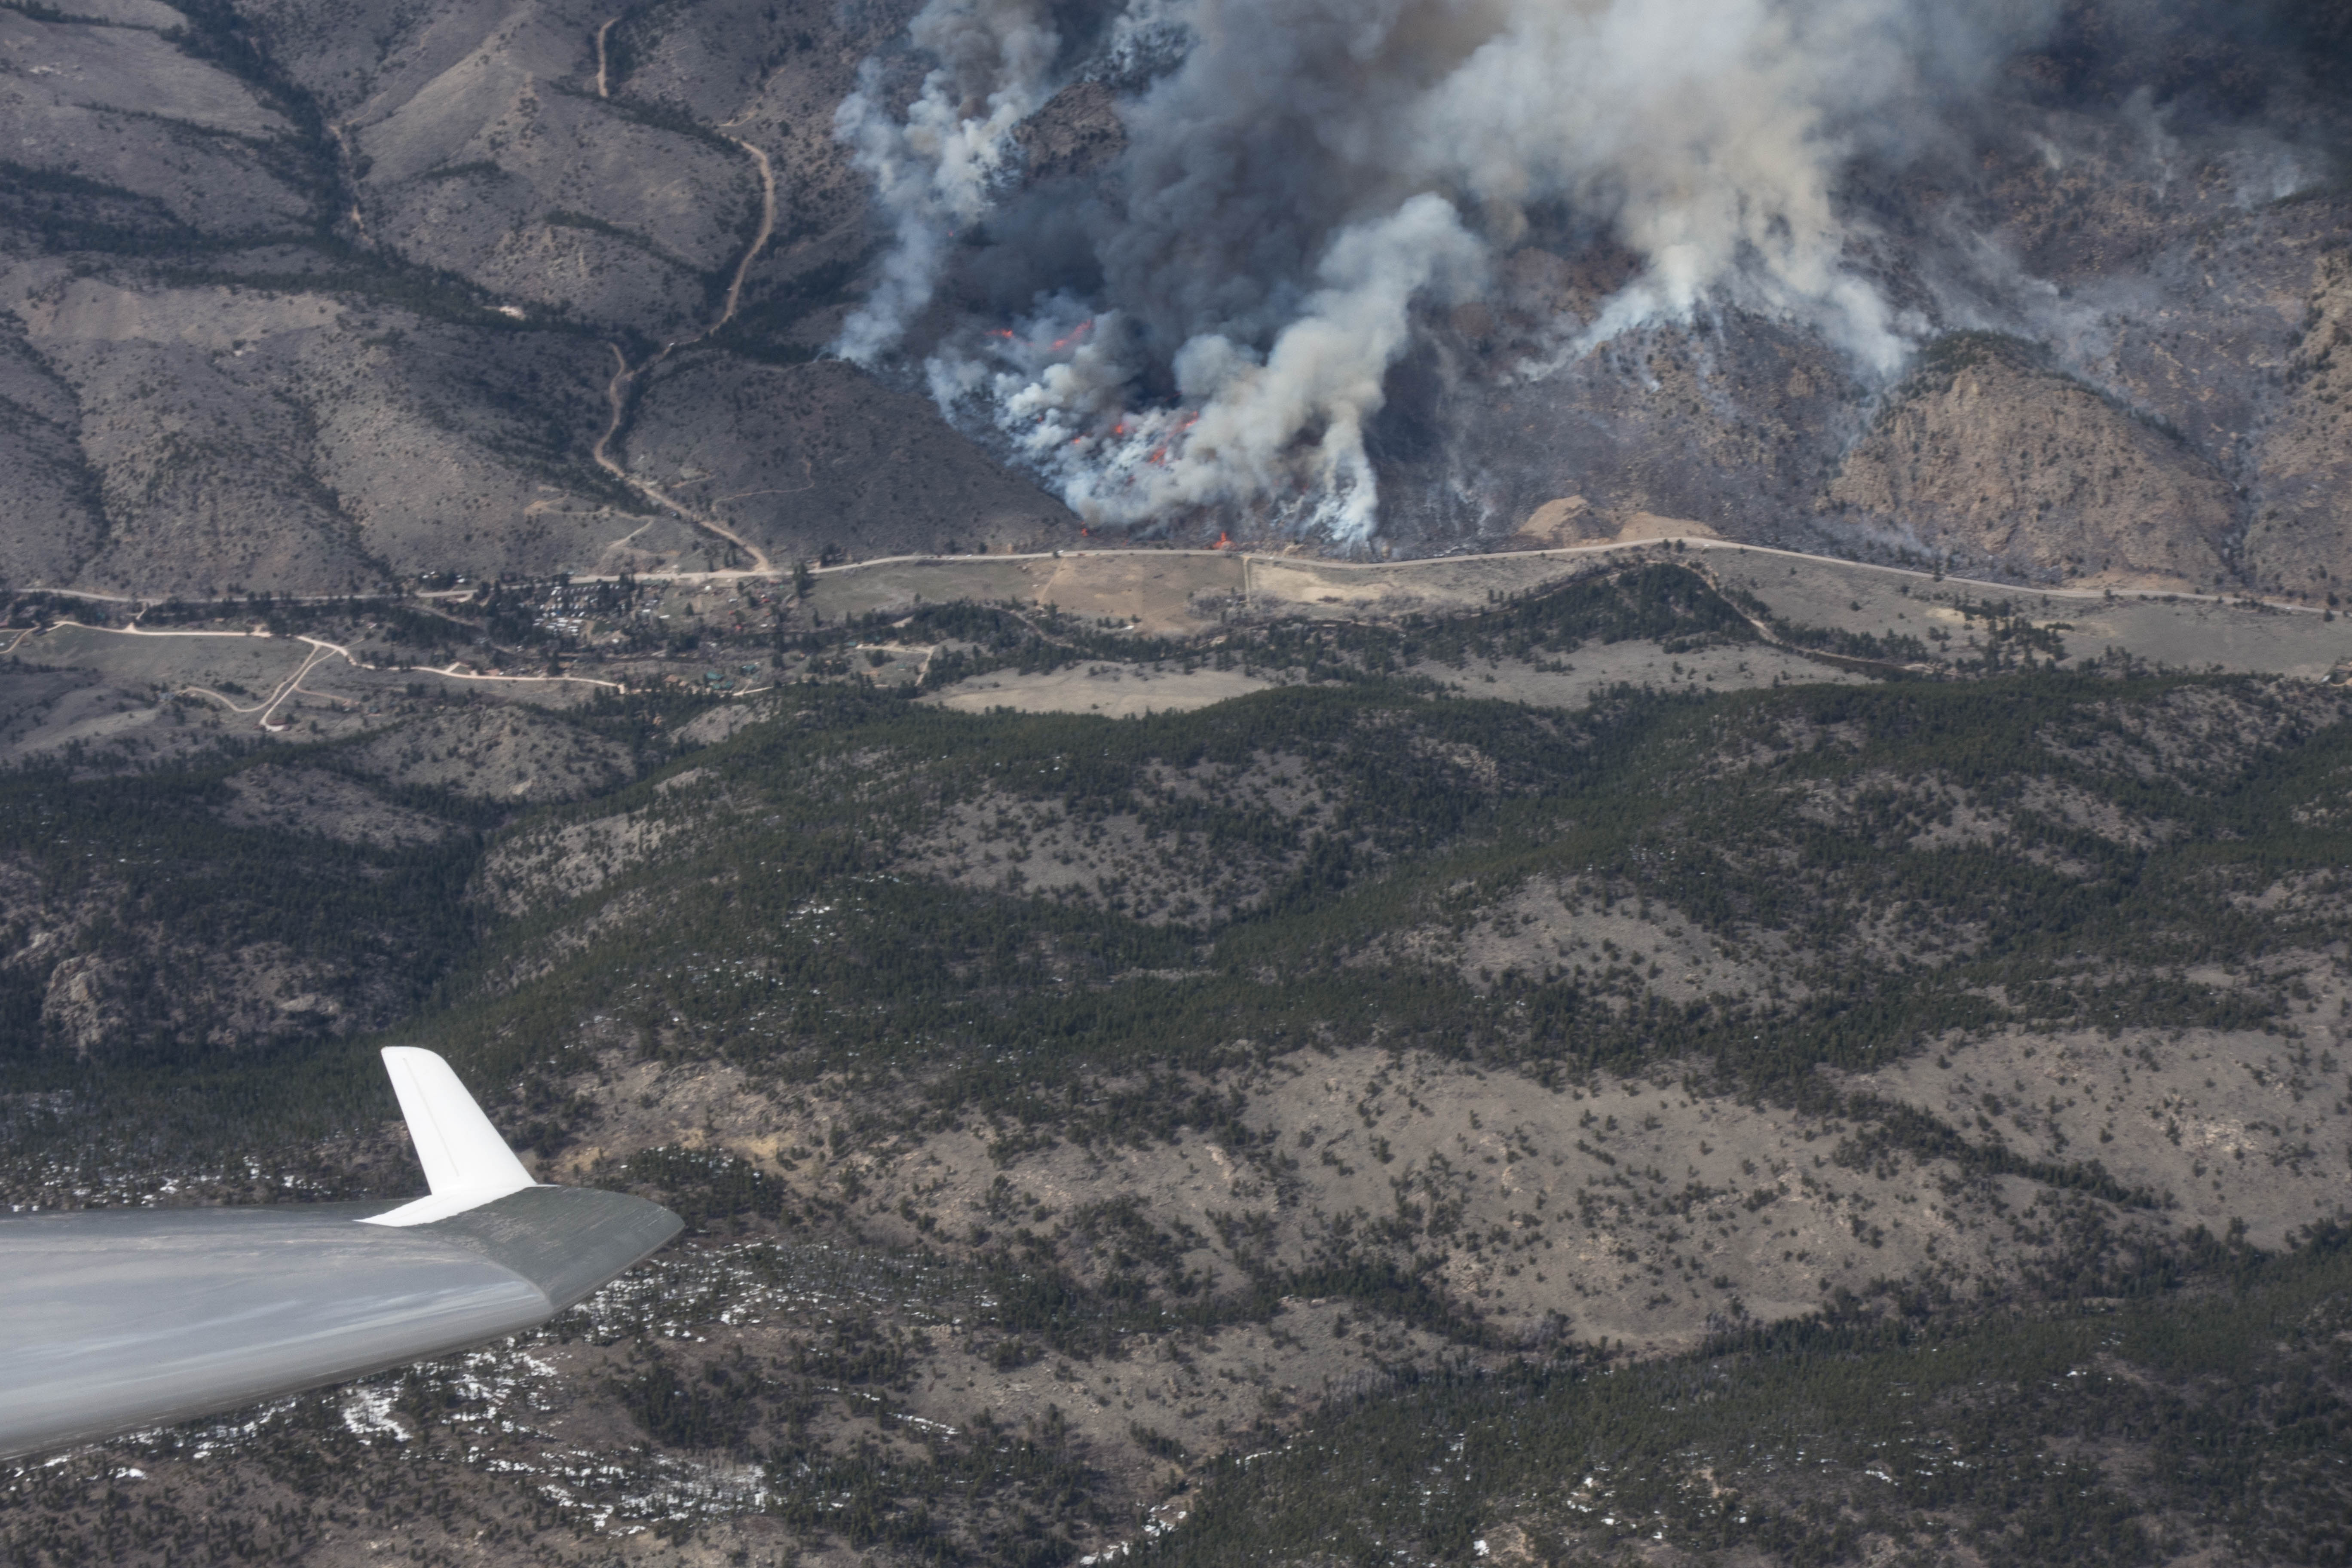
There I climbed to 16,500 and was able to connect with a convergence-induced cloud street heading NNE. Finally I could switch to cruise mode. The street took me more than 40 miles in straight flight past Lookout Mountain NE of Estes Park. A wildfire north of the hamlet of Rustic generated a lot of smoke drifting east.
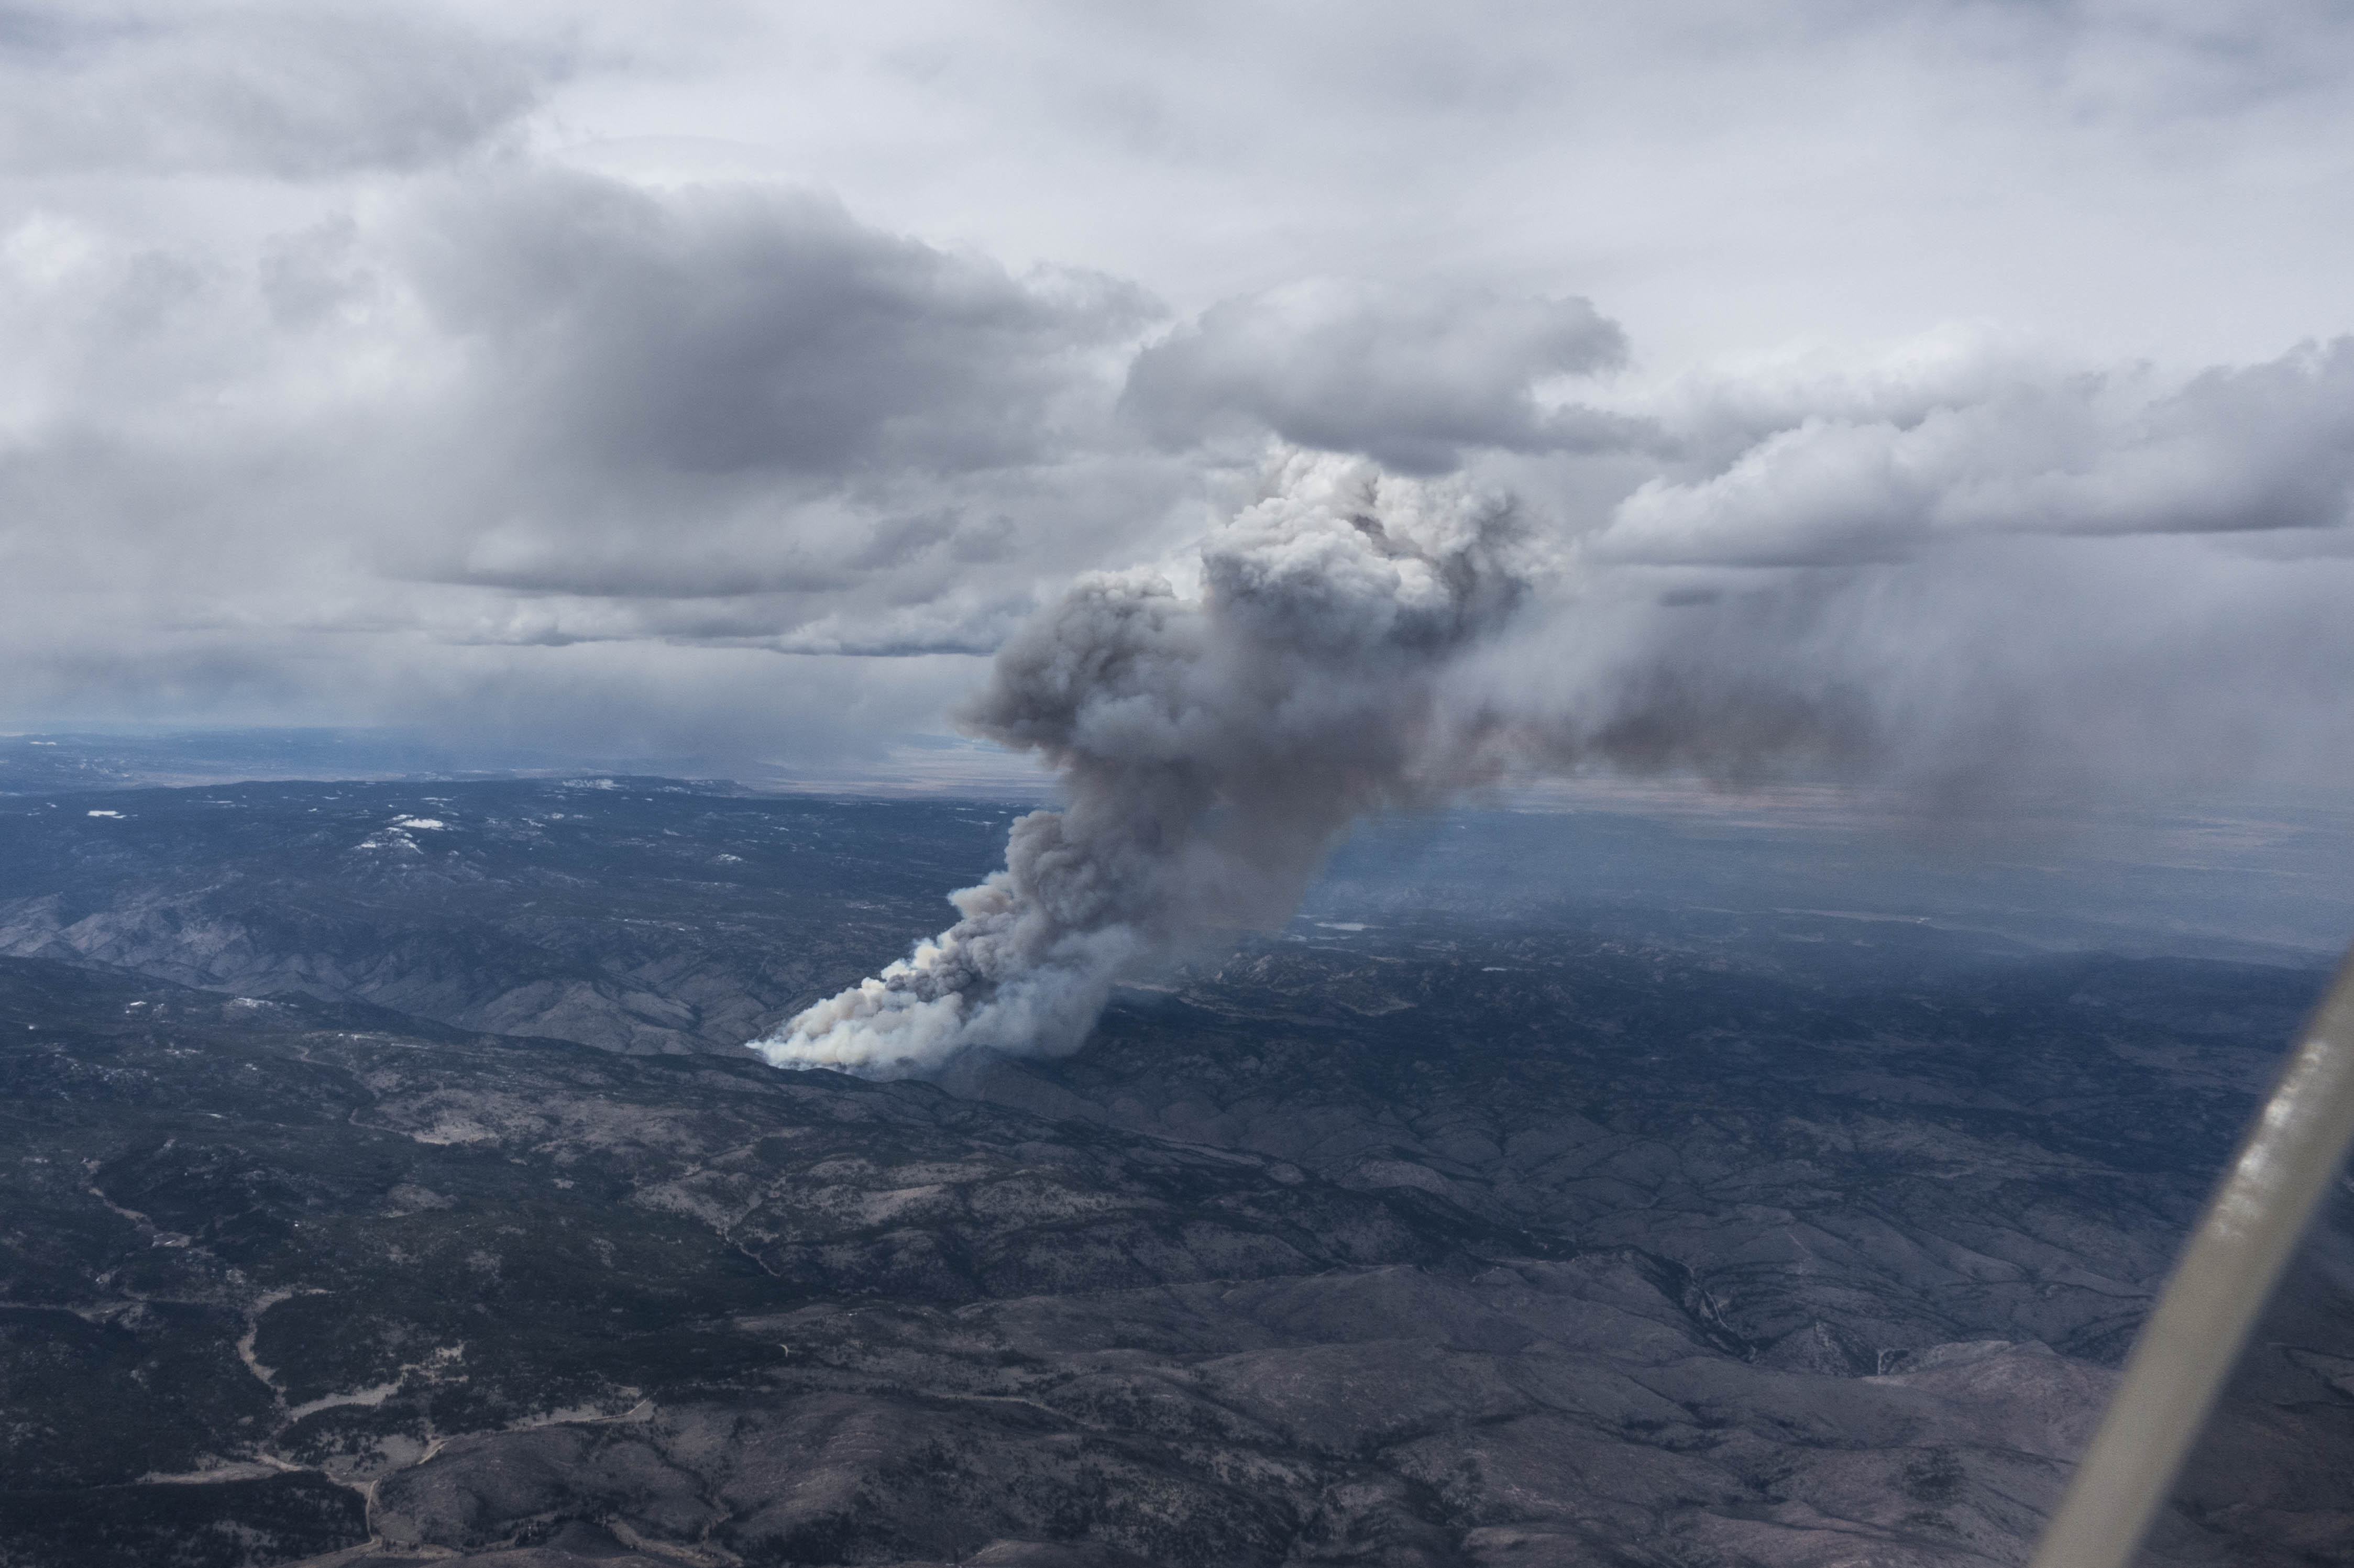
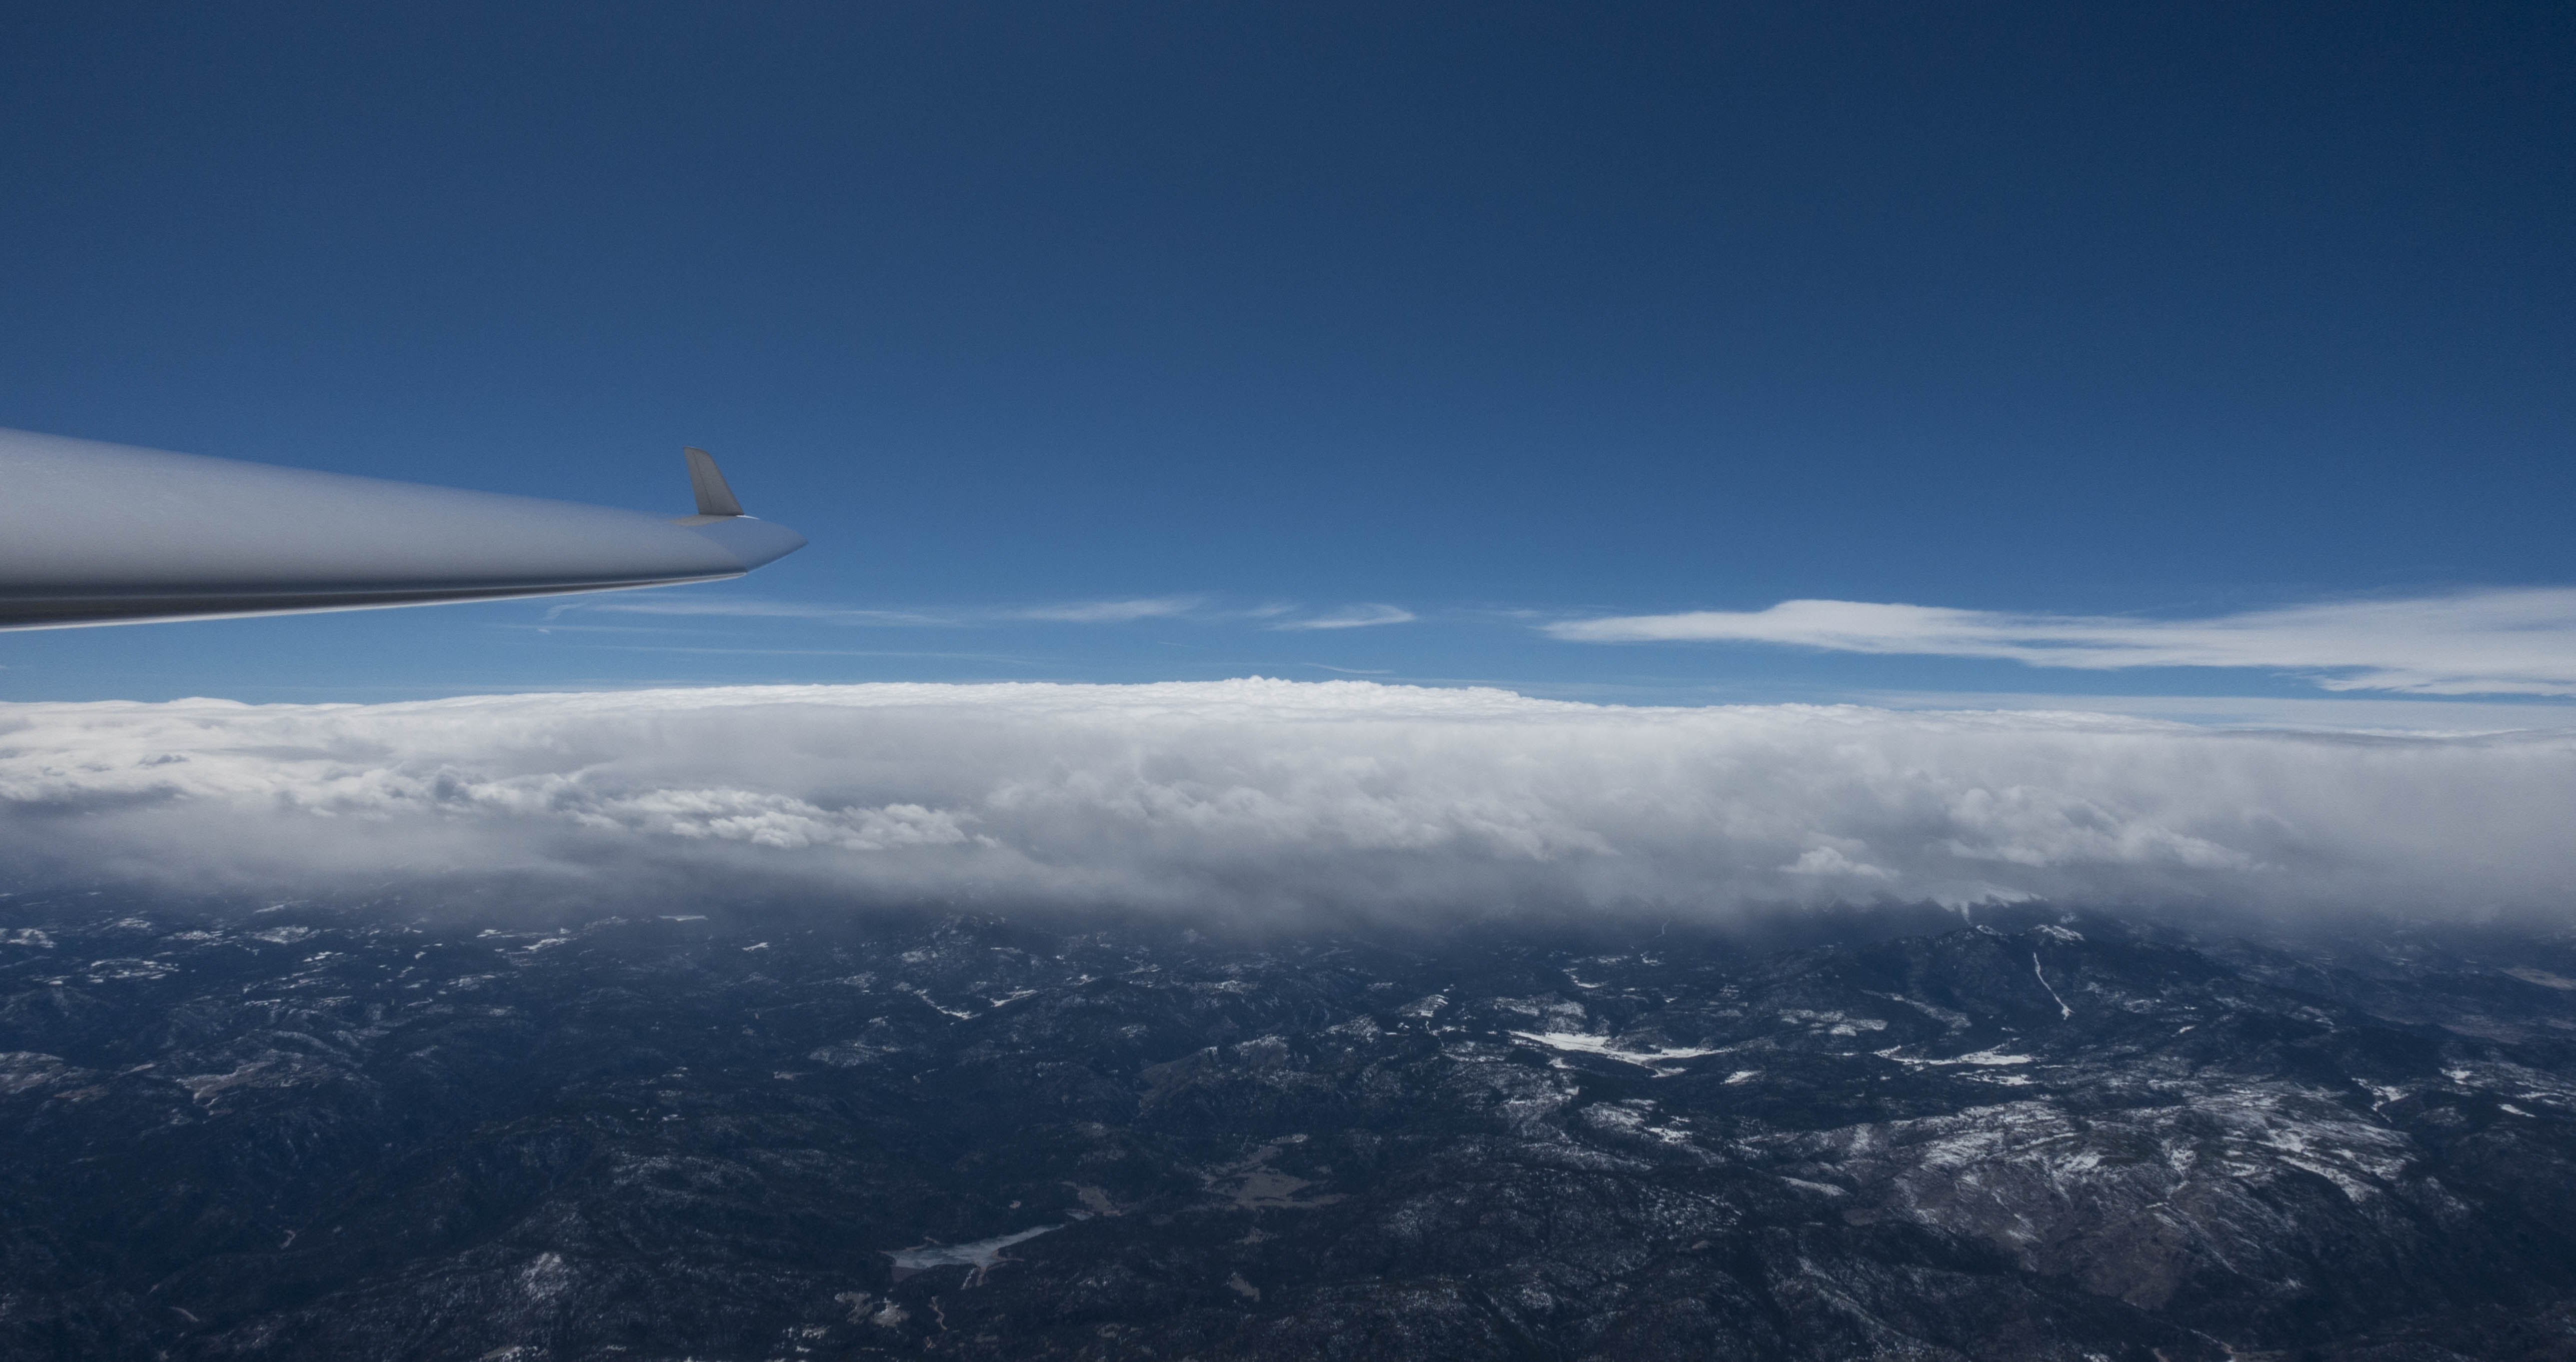
Wildfire with billowing smoke next to the hamlet of Rustic in Poudre Canyon 25 miles WNW of Fort Collins. The sky is already over-developed and rain is falling at the Wyoming border in the distance. (I took this photo on my second approach to this area. When I tried to pass the fire earlier, the convergence line ran right through the smoke and I could not find lift west of the fire.)
Unfortunately, the convergence line went right through the smoke. I did not want to fly into poor visibility and sought to make my way around the fire on the west side. The thermals in this area where weak and wind-blown with significant sink in the lee of Crown Point, one of the mountains along that stretch of the Continental Divide.
When I could not find a comfortable way to get past the fire without losing too much altitude, I reversed course and followed a cloud street back toward the Twin Sisters (S of Estes Park). The sky to the south was now fully overdeveloped and virga curtains ahead stopped my progress. I turned back again towards Poudre where the fire kept burning.
I made it all the way to Rustic on this second attempt, and was now finally able to get past the fire without risk of getting engulfed by smoke. However, the sky was now fully overcast in all directions with many virga to the south and some virga and rain further north. I wasn’t sure how long there would still be lift and so I prudently decided to head back to Boulder, 54 miles away.
Close-up of the fire. The hamlet of Rustic is at the bottom of the canyon, just above the winglet. My flight computer did not show any other aircraft in the area and I figured that had a TFR been called, I would certainly be well above it.
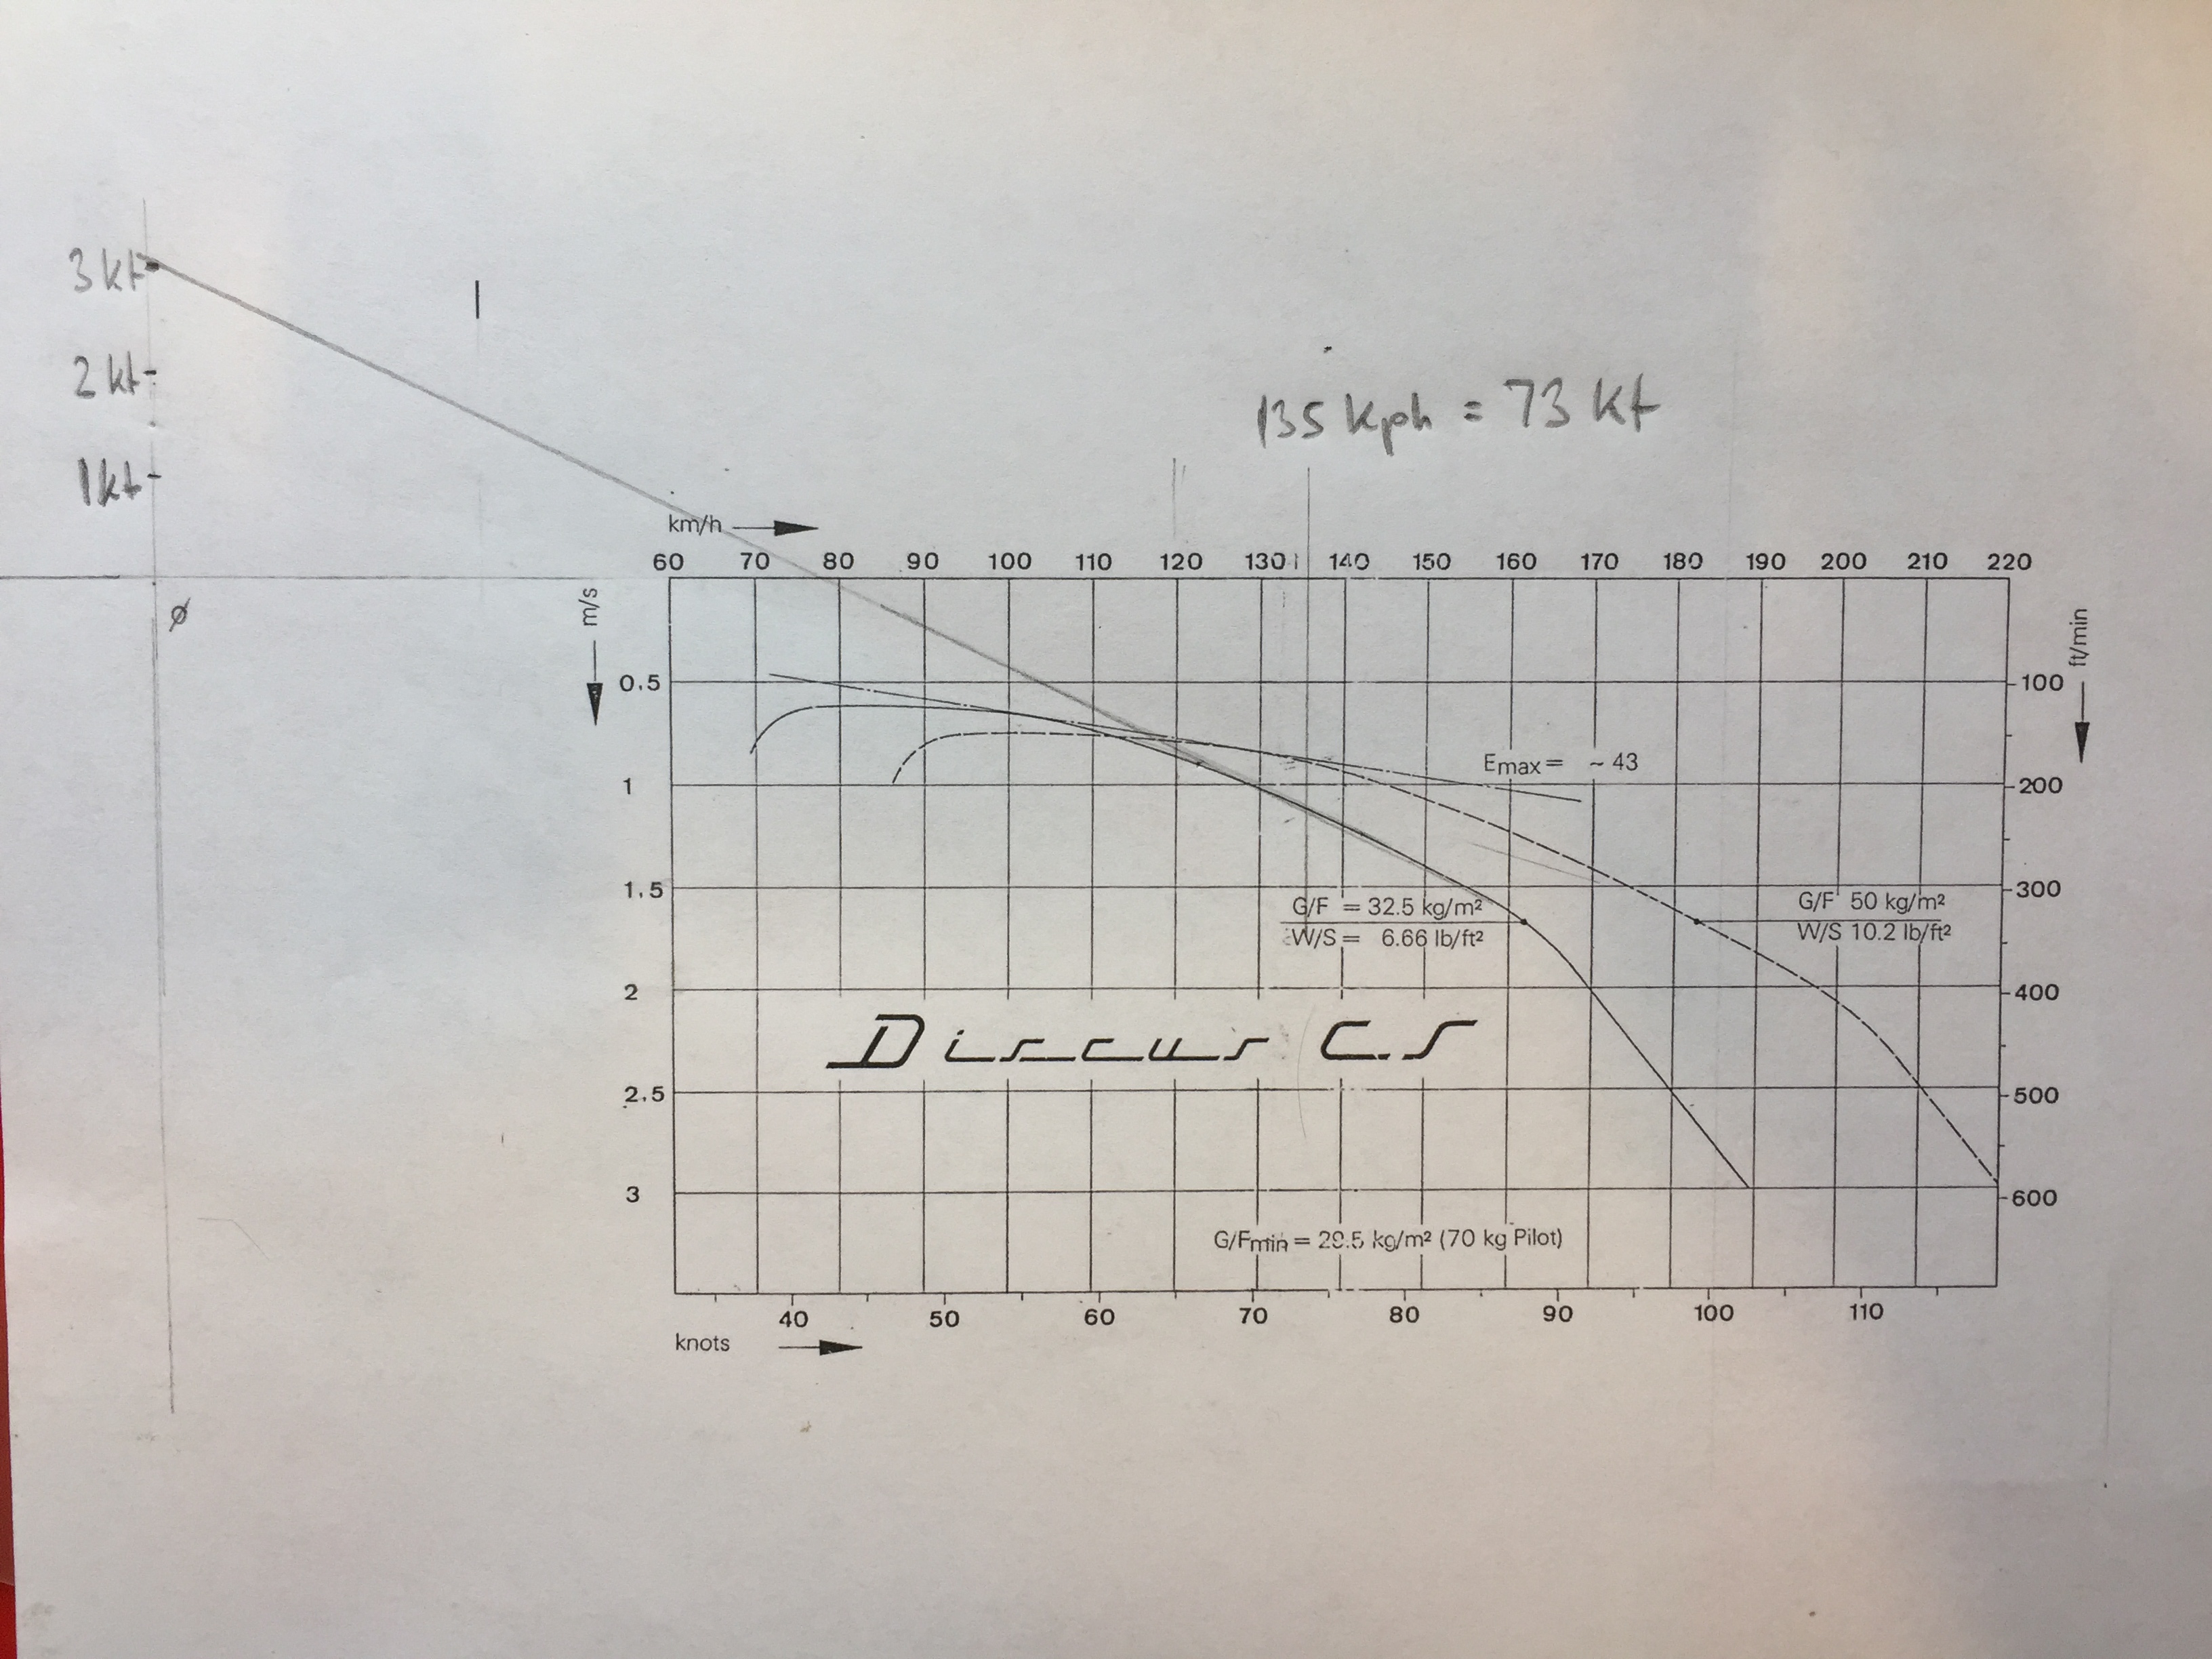
I was at 17,000 ft MSL above Rustic. From my work on the Boulder Soaring Map I knew that this was just the altitude I would need to get to Boulder airport and arrive there at 1,500 ft AGL, flying the Discus (without ballast) at 80 kts in still air (a glide ratio of 1:27). My flight computer, which was set to MC 3, suggested that I would arrive at 3,000 ft AGL, flying at around 70-75 kts.
Discus Polar. The optimum speed to fly with a 3kt McCready setting is approx. 70-75kts.
There was a westerly cross wind of about 10 kts, which would negatively impact the glide performance, so I figured that 80 kts would be too fast. I decided to fly just at a little over 70 kts, and see what would happen. There were several airport landing options along the way (you can also see them on the map below at the eastern edge.)
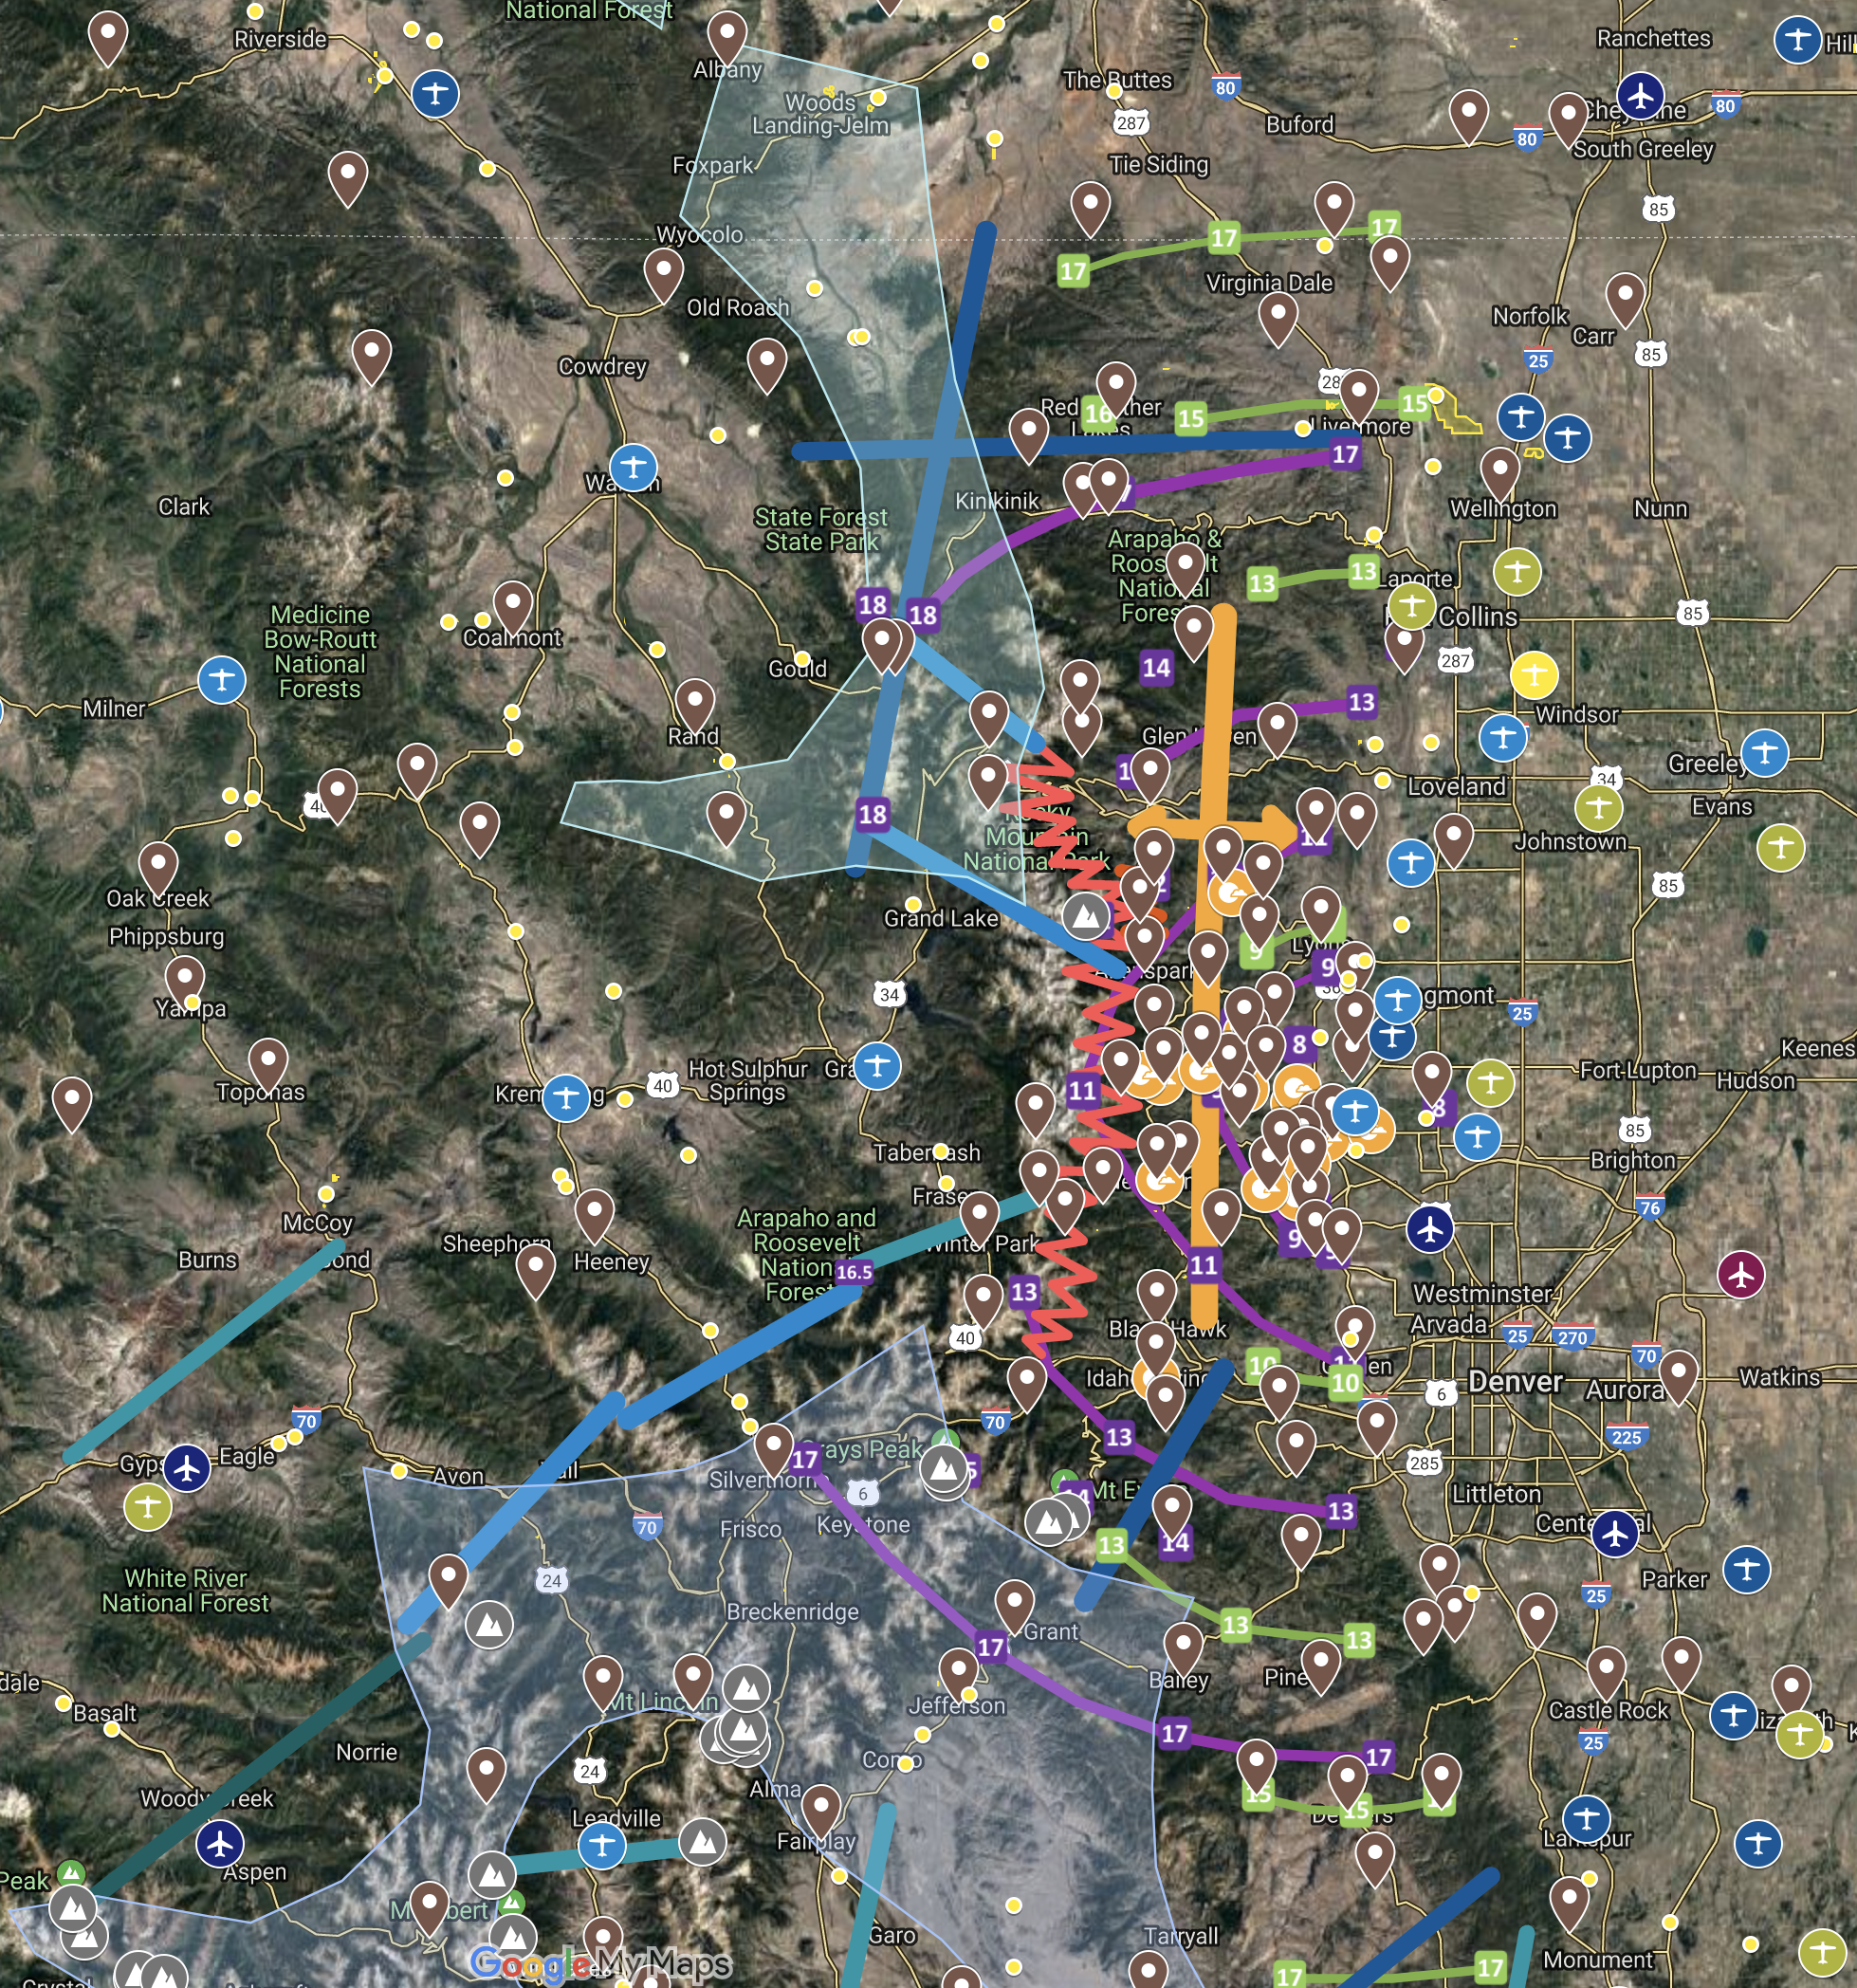
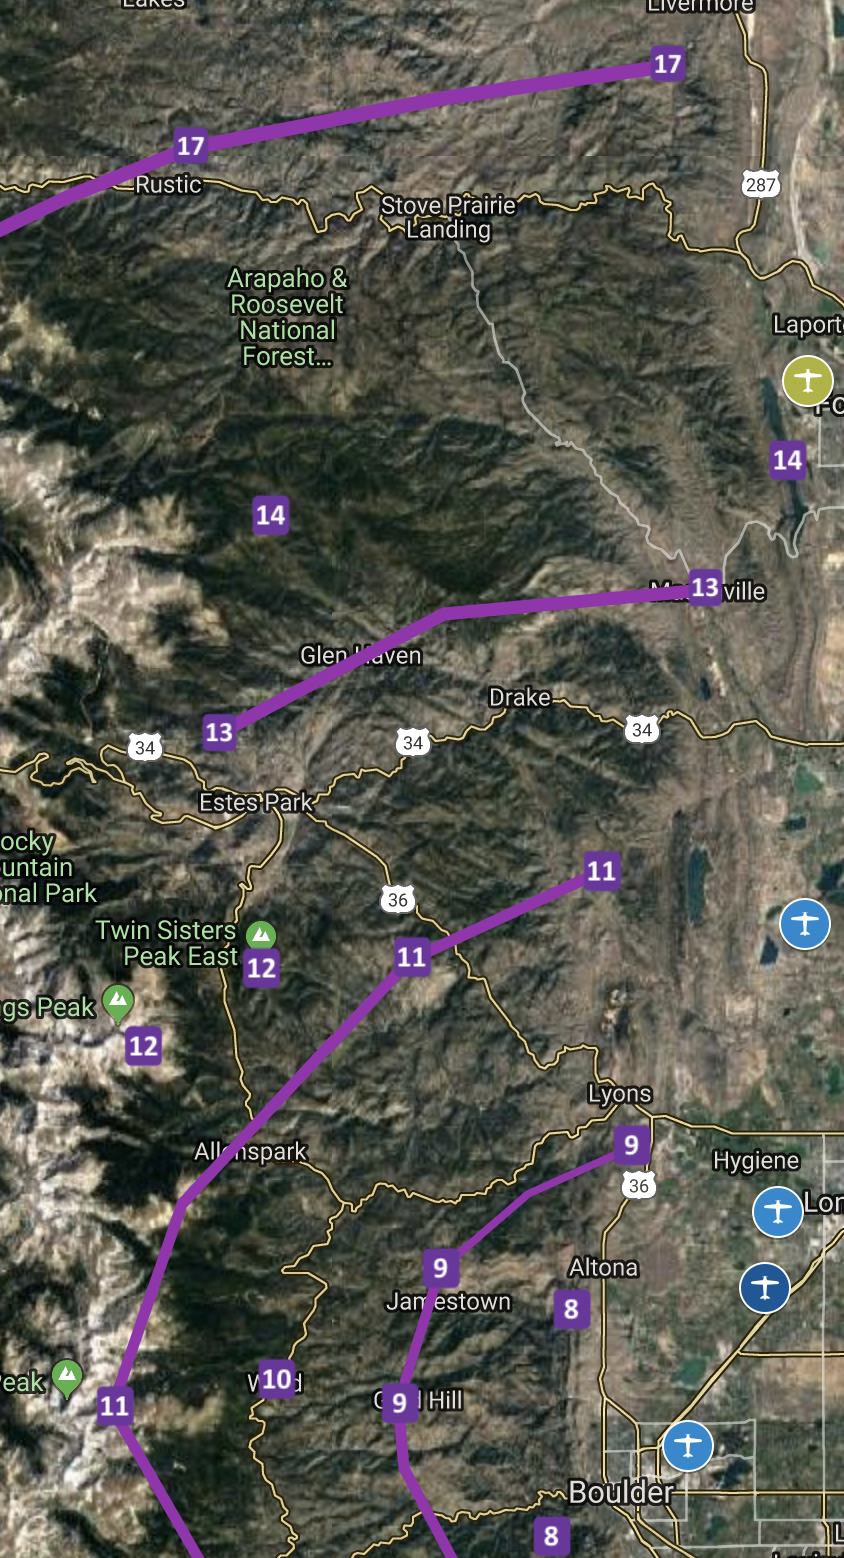
Excerpt from the Colorado Soaring Map showing purple Final Glide Rings around Boulder. You can see Rustic on the top left next to the number “17”, indicating that 17,000 ft MSL is required to commence a final glide, flying a Discus @ 80 kts dry in calm conditions and arrive at Boulder 1,500 ft AGL.
Things were going very well for the first 25 miles of the final glide. Instead of flying the most direct line I picked a path further east that connected several distinct clouds within the overcast layer. Pulling up a little into the wind whenever I crossed an area of lift I kept gaining several hundred feet on my arrival altitude even though my path represented a slight detour. When I crossed CO Rt 34 east of Drake, my flight computer predicted a very comfortable arrival at Boulder at 3,500 ft AGL.
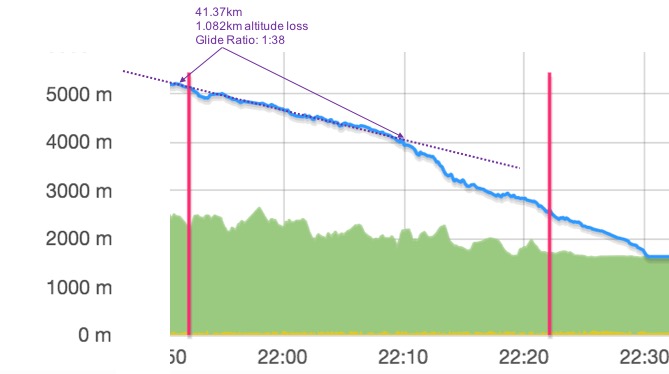
Final Glide Part 1: from Rustic to past CO Rt 34: Distance 41.37km, altitude lost 1,082m, effective glide ratio 1:38 at average ground sped of 140 kph = 76 kts
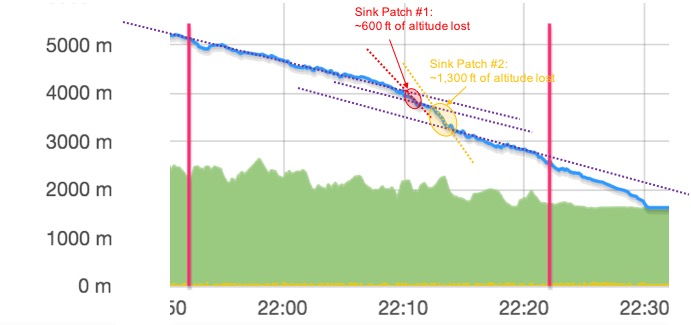
But just as I started to be very happy with my performance and secure in my final glide altitude (I later calculated that my effective glide ratio on this first part of the final glide was a remarkable 1:38 flown at an average ground speed of 76 kts), I hit two patches of sink in quick succession. The first one was relatively mild and lasted less than one minute. The second one came two minutes later as I was flying past Carter Lake, and was quite severe. The vario hit negative 10kts. I pushed the stick forward and accelerated to 100kts to get out of the predicament as soon as possible. Within 1 minute and 16 seconds I lost 396 meters (1,300 feet).
Two sink patches cost me 1,900 feet of altitude and approx. 1,500 feet against my normal projected glide path of 1:27.
When the sink subsided and I had the airspeed dialed back, my flight computer showed a predicted arrival altitude of only 2,000 ft AGL. Wow! I had just lost 1,500 ft against my arrival altitude within about two minutes and my safety margin was getting thin.
I tried to make out what had caused the sink but no obvious explanation came to mind. I was well clear of any virga lines, I had carefully avoided the lee of Blue Mountain (west of Carter Lake) and the sky looked almost homogeneously gray. For the first time I felt no longer 100% certain about arriving in Boulder at a safe altitude. I took a good look at Longmont airport to my left, which was definitely within easy glide range at this point.
I continued ahead and resolved that I would fly past Lyons and decide then whether or not to divert to Longmont. Fortunately the next stretch of air was better with minimal sink and some small patches of weak lift. I passed Lyons at 9,500 MSL and shortly thereafter my predicted arrival altitude in Boulder had climbed back up to 2,200 AGL.
Part 2 of my Final Glide between Carter Lake and Lyons. I covered 15km with a loss of 600m in altitude at an effective glide ratio of 1:25. My average ground speed on this stretch was 123kph, i.e. 66 kts: I was now trying to fly as close as possible to best glide speed to preserve every bit of altitude possible.
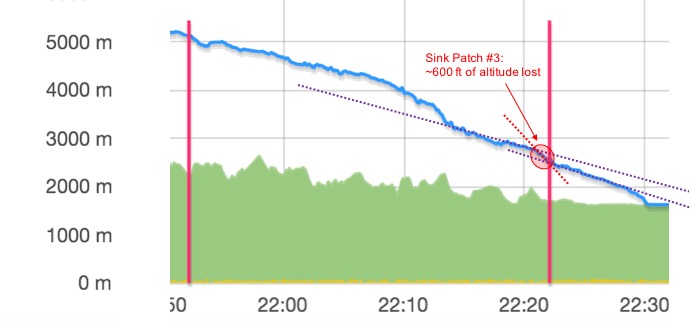
Just after I had decided that I had an adequate safety margin to continue on to Boulder, I hit another patch of sink near Altona with only 7 miles left to go. It wan’t as bad as the prior one, but another 600 feet of altitude were gone and my flight computer showed an arrival at 1,600 AGL.
Sink Patch #3 near Altona. Another 600ft of altitude gone. After this patch, my safety margin had been reduced to 600 ft above pattern altitude with another 7 miles to go.
Turning back to Longmont was no longer a sensible option for Longmont was now equidistant to Boulder and my way back would lead me through the same sink I had just crossed. I made some additional contingency plans: if I would find lift I would stop to re-gain a few hundred feet. If I were to lose another 800 ft against my flight path, I would enter the pattern from the north instead of the usual entry mid-field from the south. In the worst case, I would land in a field west of Boulder Reservoir. This final glide was definitely more exciting than I had expected!
Fortunately, the remaining part of the glide was uneventful without unexpected sink or lift and I did in fact arrive at 1,600 ft AGL; i.e. with plenty of altitude and time to examine the wind socks and traffic, and to fly a normal high pattern to glider Runway 26.
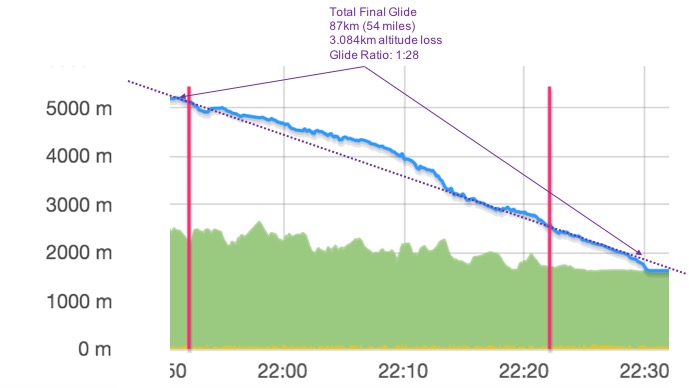
Final Glide from Rustic to Boulder.
Overall, the final glide was 54 miles long (this includes a 5 mile deviation from the straight course), flown in 35.5 minutes at an average ground speed of 79 kts and with an effective glide ratio of 1:28. (Calculated over the most direct route the glide ratio was 1:26). The three patches of sink made the last 10 miles quite a bit more exciting than I had expected even though I ultimately arrived at a safe height of 1,600 AGL.
The glide performance of the Discus seems to be right in line with the glide polar and the final glide rings on the Boulder Soaring Map work. But: the caveat that glide calculations only work if if the air is still is definitely true. It’s also good to remember that we only like to go soaring when the air is not still!
Even on final glide it is critical to continue to examine the clouds and the terrain and to somewhat deviate from the straight line if appropriate. This way I achieved a glide ratio of 1:38 on the first half of my final glide. This allowed me to build up a significant safety margin which ultimately turned out to be necessary to counter the patches of sink during the second half of the glide.
A patch of heavy sink can very quickly eat away a significant safety margin. The glide path looks very different after losing 1,500 feet in two minutes.
Having acceptable landing options available as a contingency is absolutely critical on final glide. Knowing that Longmont was always easily accessible made me perfectly comfortable until I hit the second patch of sink near Altona, when suddenly Longmont was no longer an option. On any final glide the ultimate stretch after passing the last good land-out option will always be the most critical one.
If I’m not racing, I’ll revert back to planning to arrive higher and go past the airport before coming back to the pattern. The extra excitement in the last few minutes is not necessary. 🙂
On OLC speed league days I need to pay closer attention to my release point on tow and dip back into the 15km ring if necessary to ensure my flight counts. (It ultimately did not matter this past Saturday because three other club members had qualifying flights with a better performance.)
Soaring is a complex sport. Many different skills are required to become proficient. Every instructor will tell you that the best way to develop these skills is to fly a lot. Unquestionably this is true.
Unfortunately, flying a lot isn’t always easy, especially for beginners. Unlike experienced pilots, who are able to soar on almost any day of the thermal season, inexperienced pilots often need near-perfect conditions to fly, stay up, and practice. If the conditions aren’t great (e.g. the thermals are relatively weak, wind-blown, narrow, inconsistent, further away from the airfield, etc.), their flights are often short, and thus their soaring practice remains limited. This can be frustrating, and, considering the number of tows involved, it is also expensive.
Unfortunately, many new soaring pilots give up at this stage. In fact, the statistics from my club, the Soaring Society of Boulder, show that new members who fly less than five hours in their first year have a more than 50% likelihood of quitting their new hobby before their second season even starts. That’s a real shame if you think of all the time and money that they have already put into their basic training. But also consider this: those who fly more than 5 hours in their first year have an 80% probability of continuing with the sport! So what can new pilots do to cross the five hour hurdle?
Fortunately, there is a simple, effective, and inexpensive way to supplement the basic flight training and quickly develop many of the key skills that are needed as a soaring pilot. It is called Condor, a remarkably realistic simulator for soaring flight. If you already have a PC with a decent graphics card, all you need is the software, a suitable joystick, and preferably rudder pedals, and you are set. All of that can be had for the cost of a few tows – see details at the bottom of this post. I promise it is the best investment any aspiring soaring pilot can make!
To avoid any misconception: Condor alone is not a substitute for real-life flight training. But I have absolutely no doubt, that it has saved me dozens of real tows and dramatically accelerated my learning curve as a soaring pilot.
Below are some examples of how Condor can help you quickly develop your skills. These skills will allow you to become more proficient more quickly, you will be less dependent on perfect days, and you will have the opportunity to gain more real glider time and experience sooner, and at lower costs.
Foundational Skills
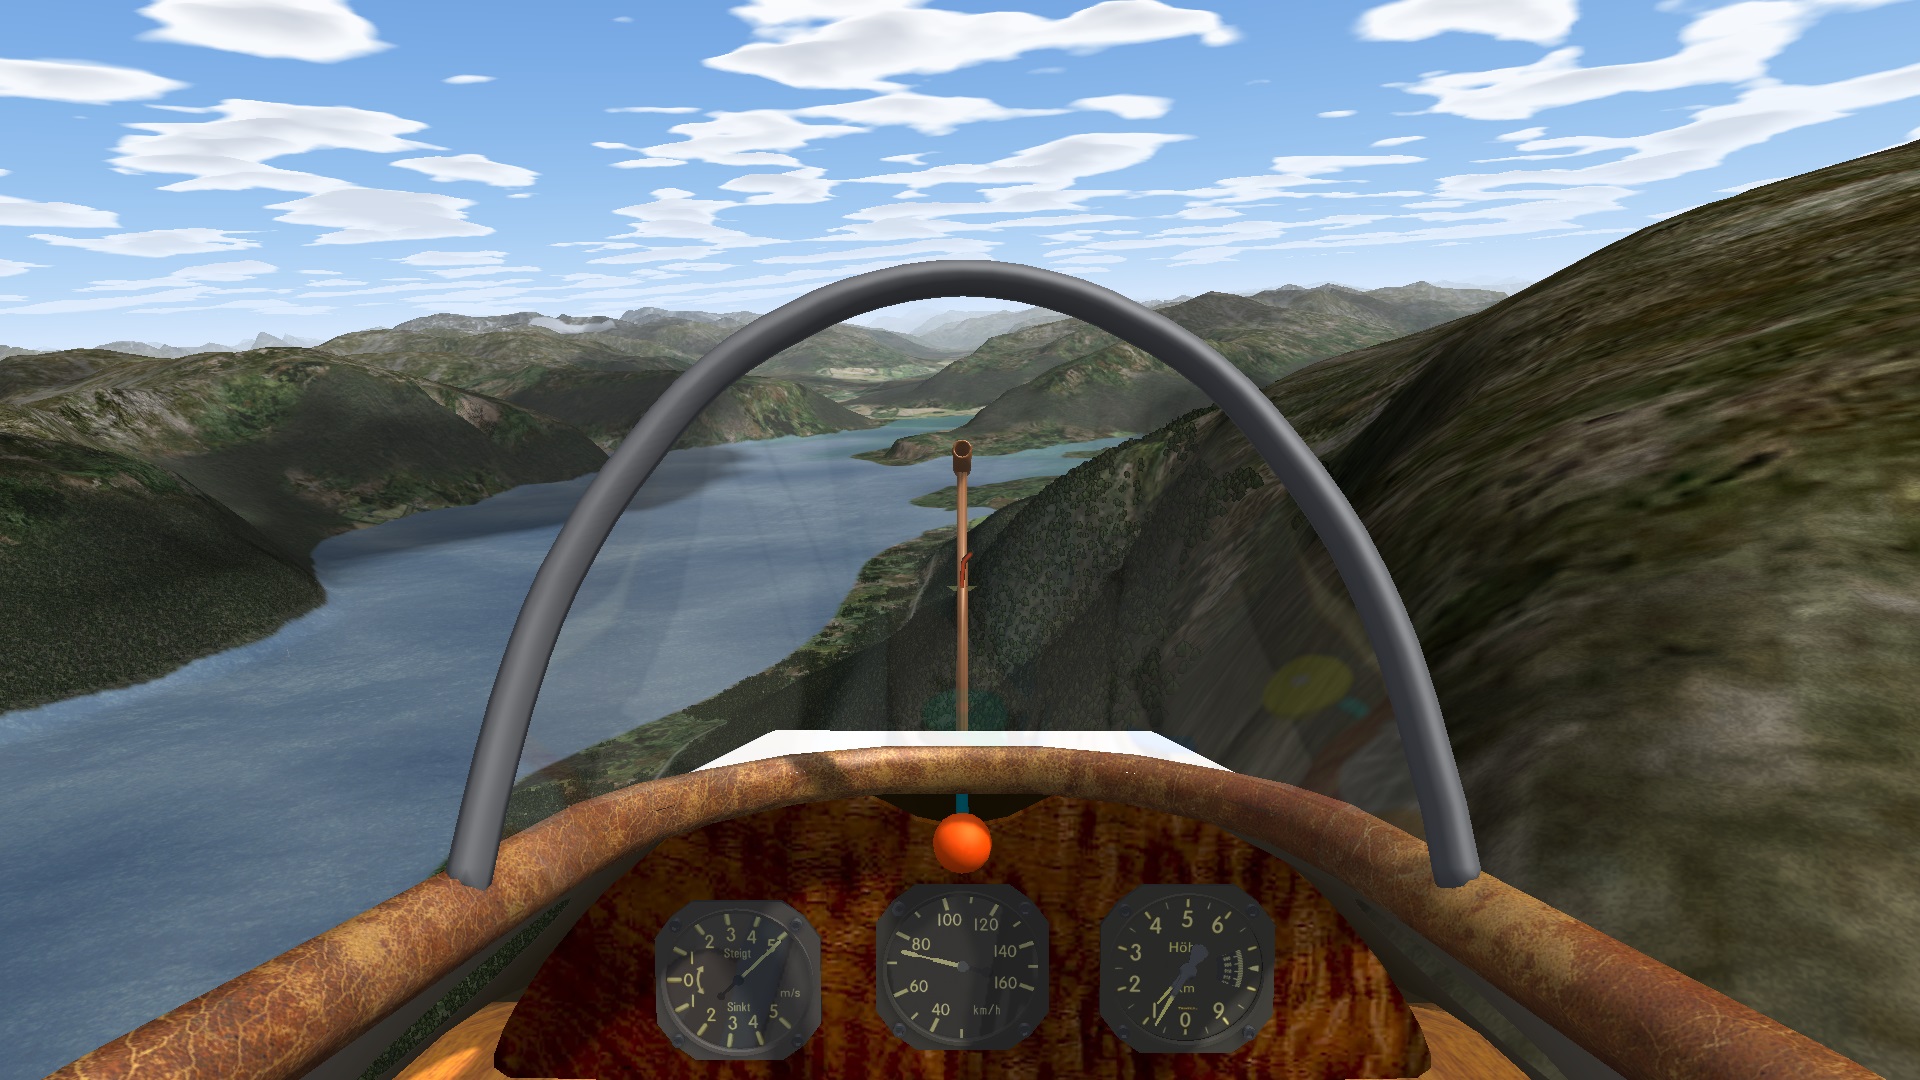
1) Thermalling – The thermals in Condor are very realistic. Condor will teach you where to find the best lift, how to center the lift, and how to fly consistent circles with constant airspeed and a constant bank angle. These skills translate perfectly to the real world. I am completely confident that anyone who can center thermals in Condor can do the same in real life. Of all the foundational skills (beyond taking off and landing safely), this one is by far the most crucial if you want to be able to stay up and go places. Condor also lets you set the average width of thermals, the level of turbulence, and the upper level wind speed so you can practice thermalling in more difficult conditions as you get better at it.
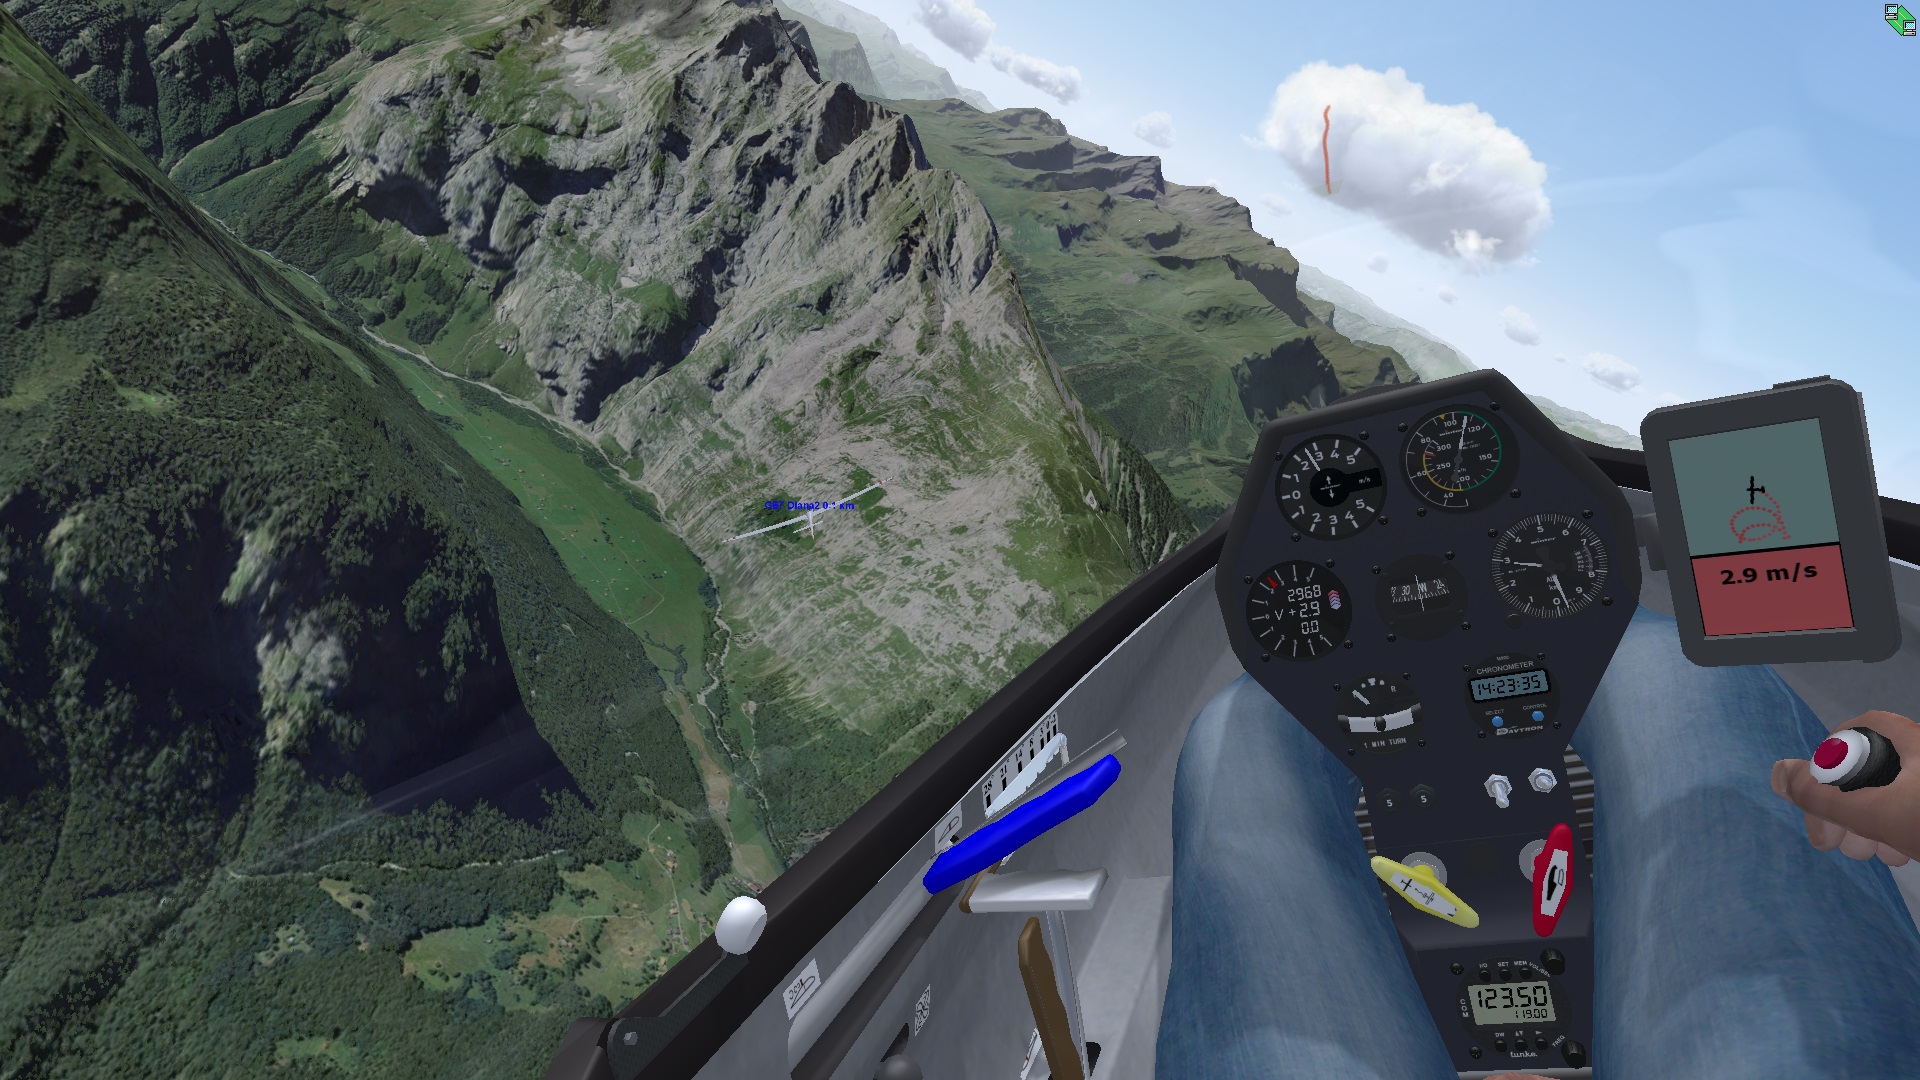
Thermalling with another glider during a multiplayer online race in the Alps. I’m flying a Diana 2 (note the side stick). The Condor flight computer shows the thermalling assistant and the average climb rate during the last turn.
2) Ridge Soaring – Many soaring sites don’t have good ridges for soaring flight. Condor allows you to practice ridge running in various wind conditions and experience the effect of lee side turbulence and sink without putting your life at risk. Real-life ridge soaring is less predictable and your first ridge flights should always be with an instructor but it will be instantly familiar to you once you master it in Condor.
Running along the ridge of Mount Nebo near the airport of Nephi in Utah in 15kt westerly winds. The glider is a JS1.
3) Wave Soaring – Since the release of version 2, Condor also does a reasonable job at modeling wave lift although it is not as realistic yet as thermal and ridge flying. (Especially rotor turbulence below the wave bars is not modeled well, and the interaction between thermals and wave is also not very realistic. Condor’s lenticular clouds also always form at 5000m, which is obviously not a realistic assumption.) However, mastering wave flying in Condor will still be of help when you first experience it in real life; e.g. the geographic relationship of the wave trigger and the position of the wave lift is well done and you will have learned the necessary flying techniques to stay in wave lift.
Climbing above 18,000 feet (5,489 m) in wave lift next to a thin lenticular cloud. The flight is in Slovenia, which is the default scenery in the Condor software package (the company that makes Condor is based there). The glider is a Duo Discus, which also comes standard. (Note that the position of the clouds below the wave seems random like on a typical thermal day. In reality you would expect lines of rotor clouds instead, roughly parallel to the wave bars.)
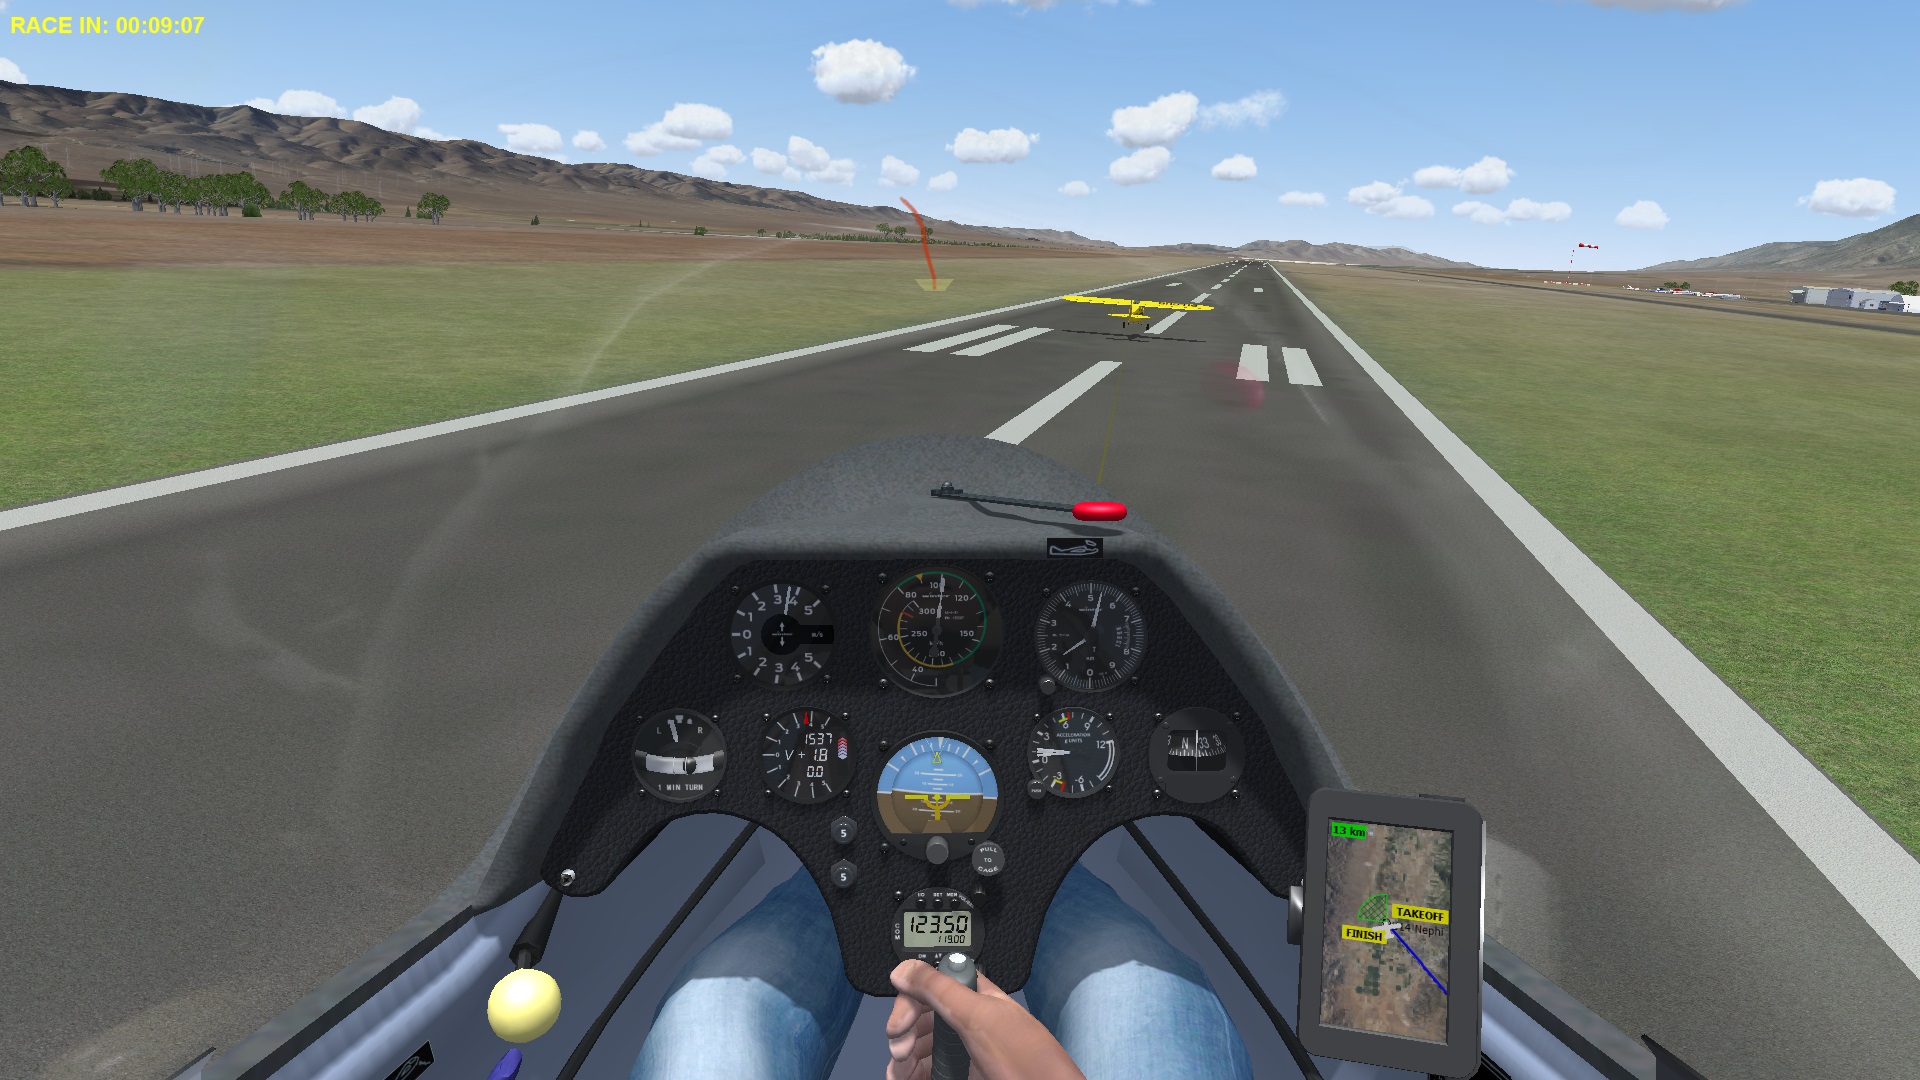
4) Take-Offs and Landings – these skills are actually harder to master in Condor than in real life. If you can follow the tow plane and box the wake in Condor you will likely have little trouble doing the same in a real glider. Landing in Condor is also a bit more tricky. A key benefit of Condor is that you can practice things that you wouldn’t do in real life such as taking off and landing in extreme conditions. One day you may find yourself in a situation where you have no choice but to put your glider down in a 25 kt crosswind or quartering tailwind. It’s definitely helpful having practiced this on the simulator. You can also do these maneuvers over and over again without incurring any additional cost.
Aerotow takeoff in Nephi in an ASK 21 behind a Super Cub with 27 kts cross-wind. You can see the glider drift immediately to the right of the center line despite the crab angle. The maximum demonstrated cross-wind component for the ASK 21 is 8 kts. So you definitely would not do this in real life. But it’s fun to practice it in Condor.
Advanced Skills
One great thing about Condor is that it was originally developed for glider racing. That means, the learning doesn’t stop with the basics. In fact, there are a lot of advanced skills that you can readily practice in Condor that are difficult to practice in real life.
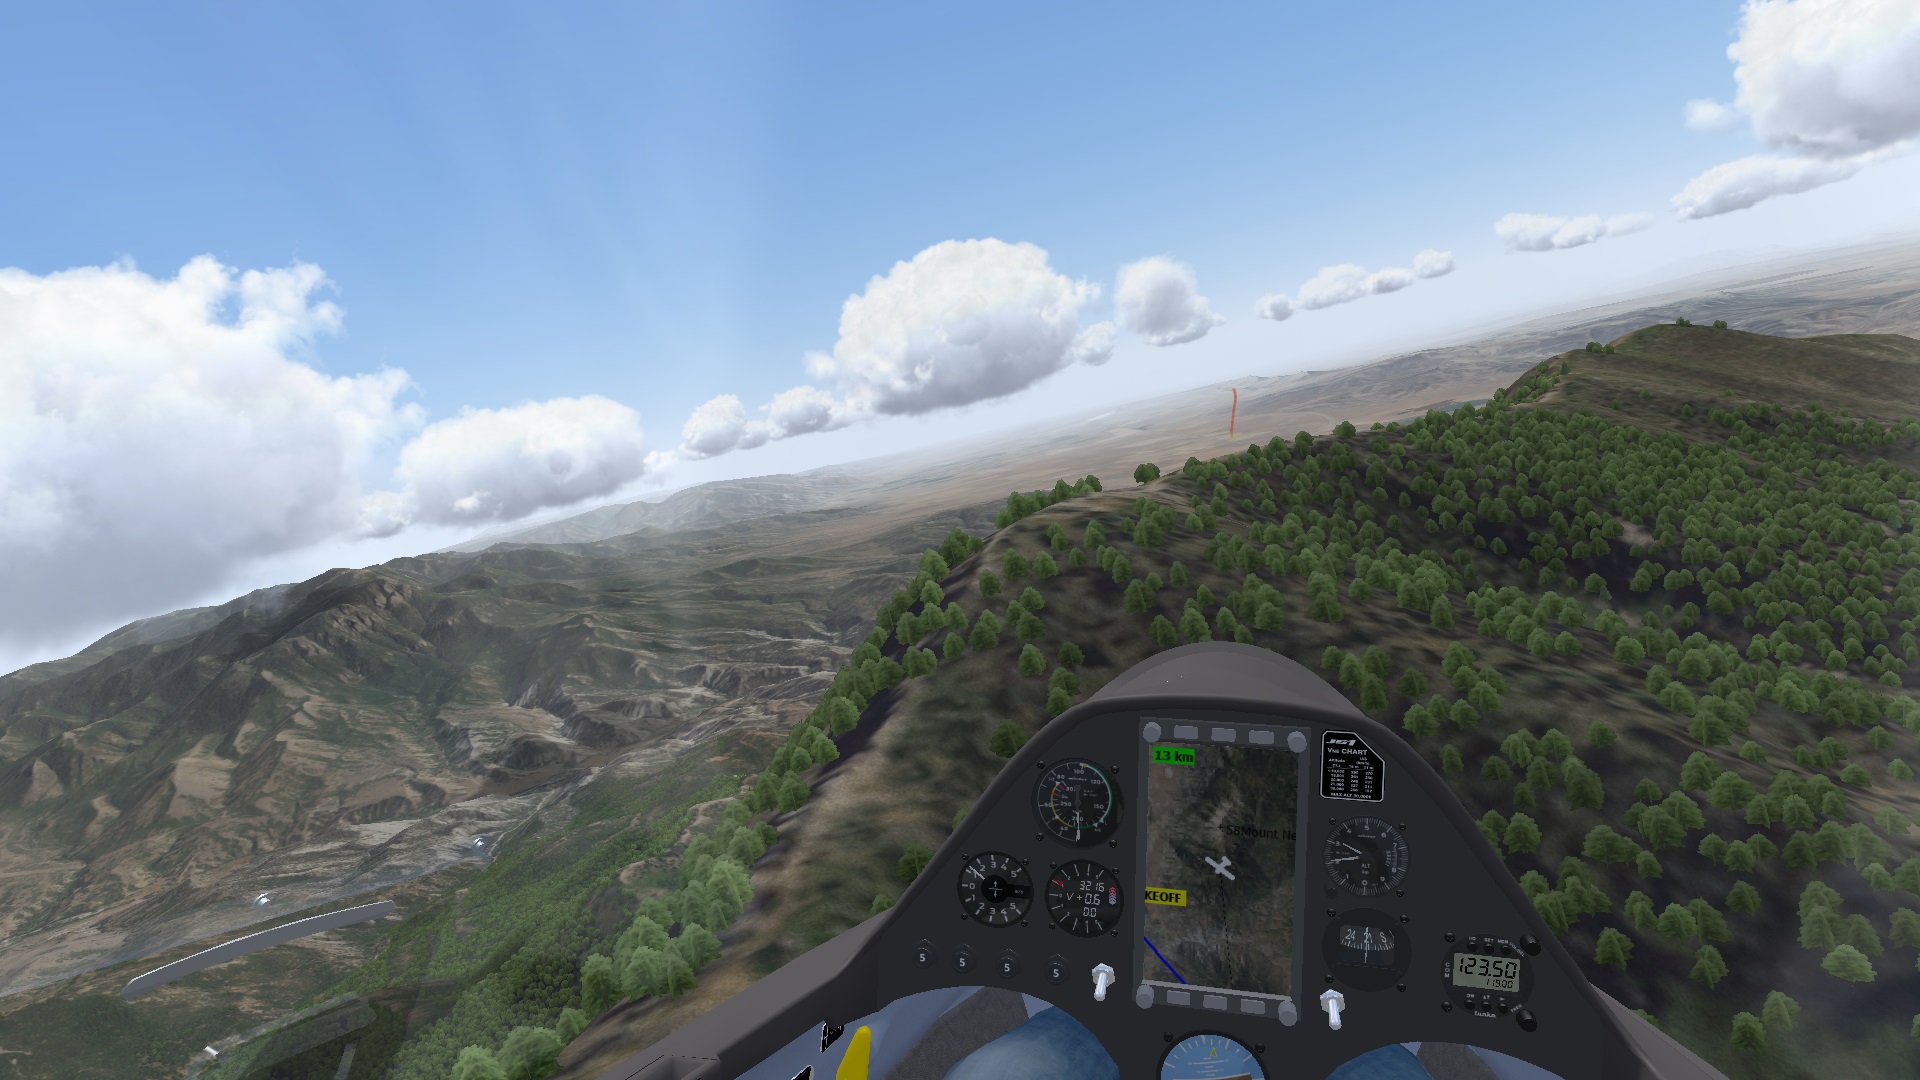
1) Using a Flight Computer. As you progress and get interested in cross country soaring, you will want to become proficient in the use of a flight computer. Condor has one built-in, which is easy to use, and a great tool for online racing helping you with navigation around the task, speed-to-fly calculations, and final glide. But, even more important, Condor gives you the opportunity to directly connect your real life flight computer with Condor (e.g. an Oudie). This way you can practice flying particular tasks using your own real-life flight computer. I have found this to be a huge benefit. Flight computers tend to be pretty complex and the last thing you want to do is stare at a screen when you sit in the cockpit of a real glider, trying to understand what it’s telling you, while you really ought to pay attention to what’s going on outside the cockpit. Not only will you not be able to use the flight computer to your benefit, you are also a safety hazard to yourself and anyone around. Practicing this in Condor is a great way of becoming proficient without the risks.
Condor has an easy-to-use built-in flight computer which is optimized for FAI racing tasks. The picture doesn’t show Condor’s flight computer but my personal real-life Oudie flight computer connected to Condor and setup for a Turn Area Task (aka Assigned Area Task) in the Nephi scenery. Turn Area Tasks are not yet supported by Condor – I think this is planned for a future update. My task on the Oudie is based on the 3rd day at the Nephi Sports Class Nationals in 2018. Minimum time is 4:00 hours. The plane is heading towards the start cylinder. I’ve sampled some thermals and set MC to 8 kts because the day seems very strong. Most of the navigation boxes are not displaying useful information until I leave the start cylinder and get underway. (If you are interested in using an Oudie for Turn Area Tasks, there is a great tutorial here.)
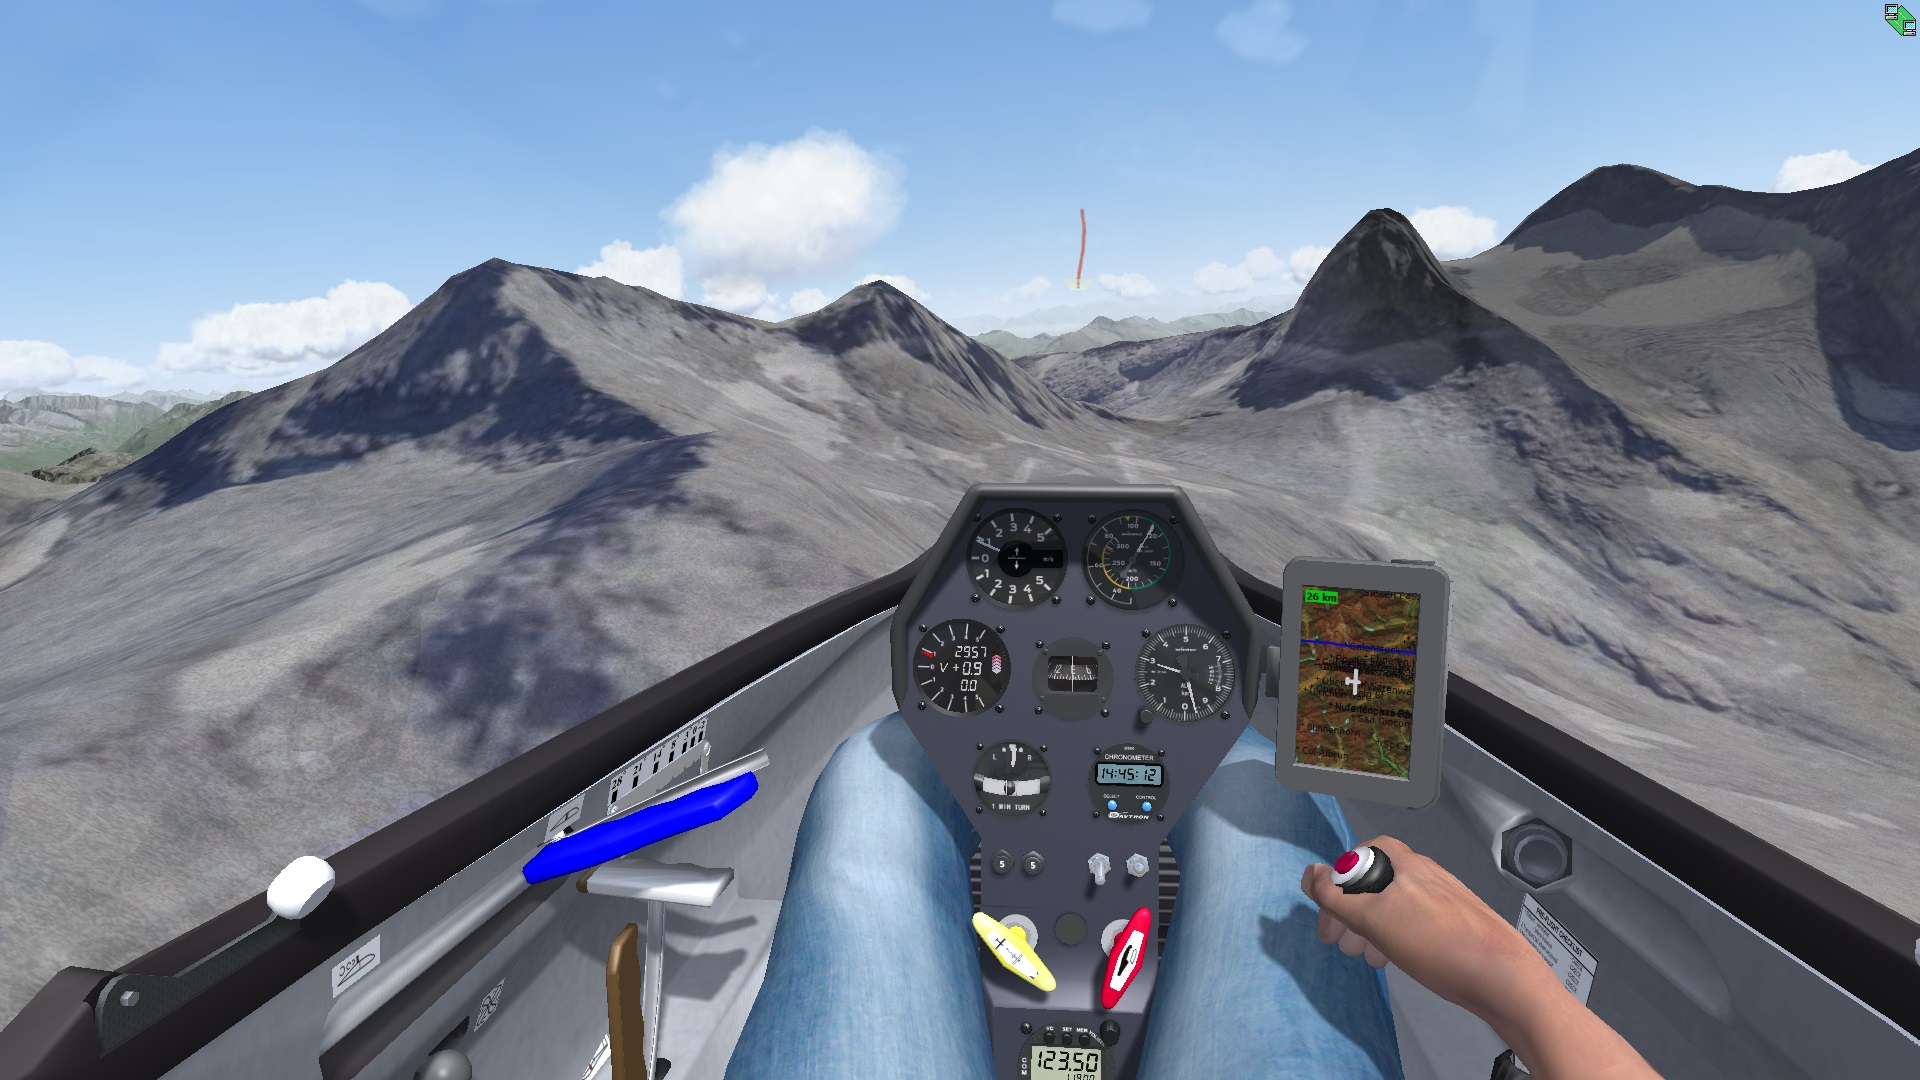
2) Terrain Transitions. Condor was built to fly cross country. One of the trickiest aspects of XC flying are terrain transitions, especially upwind in mountainous regions. You’ll learn how much extra height you need to cross a mountain pass when flying into the wind, and you’ll figure out where and how to best gain that height.
Approaching a tricky terrain transition across the pass straight ahead. The wind is from the southwest and the vario shows a modest climb rate of 1 m/s (2 kts). I’m counting on additional ridge lift from the slopes to the left before sliding over the pass and into the next valley beyond. There is likely some sink in the lee of the steep mountain to the right of the canopy before getting to the ridge that I have to cross and I need to gain some more altitude quickly. I probably have another 10-15 seconds or so to decide whether I can make it or if I should turn away to the right, come back to the ridge, and try to climb higher before shooting over the pass. This is definitely a very tricky situation of the variety “do not attempt this in real life”. But it is very educational in learning to judge the relationship between terrain and wind, and the glider’s energy in form of height and airspeed.
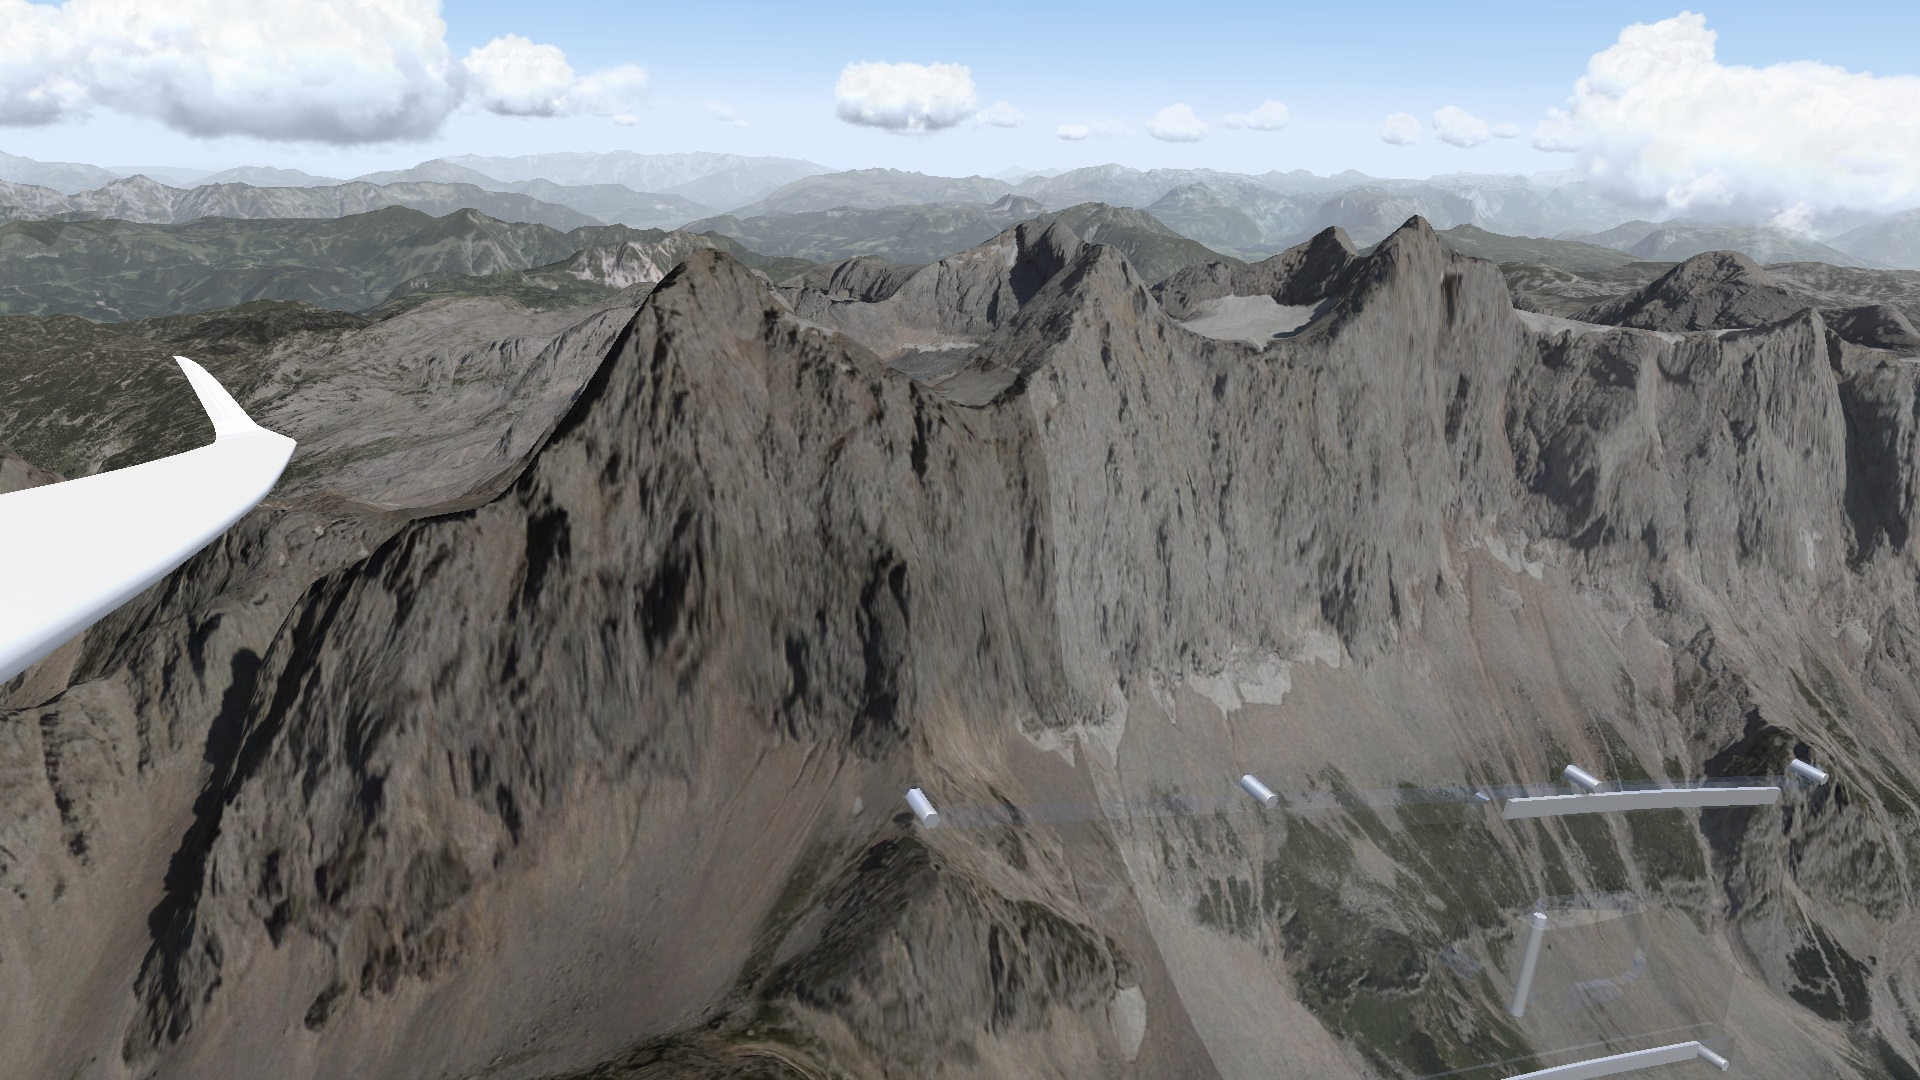
3) New Terrain. Condor has a very committed user community. Several talented members put in many hours developing photo-realistic sceneries for many of the world’s best soaring areas. Many of these can be downloaded for free (consider a small donation to the creator) at the Condor Club fan site. E.g., you can fly in the Alps, in New Zealand, the Andes, the Atlas, the Pyrenees, etc. I have recently practiced in the excellent Nephi scenery in preparation for a real life soaring camp in Nephi, UT this summer. Being familiar with the terrain is obviously hugely beneficial before you fly at a new location.
This is an image of the Dachstein mountain near the airfield of Niederoeblarn in Austria where I first learned to fly gliders. It’s taken from a similar perspective as the cover picture on my blog ChessInTheAir.com. In Condor I am flying an LS8neo whereas in the real image the glider is an LS4b.
4) Flying in Different Gliders, with and without ballast. Condor is realistically simulating many different gliders from frequently used school gliders (e.g. ASK 21) to the latest and most expensive racing machines (e.g. Ventus 3, JS1, JS3, ASG 29, Antares, etc.) The Schweitzer 1-26 is also supported as well as several other historic gliders. A number of gliders comes standard with the software package, others are available for an extra fee. You can experience the different handling characteristics of different ships with and without water ballast, and with different CG positions. Obviously you can also practice flying with flaps if you select a flapped ship.
Outside of Condor it is unlikely that you will get the chance to fly an open-cockpit Grunau Baby in ridge lift along steep Norwegian Fjords. It’s fun to try out the completely different flight characteristics of different gliders.
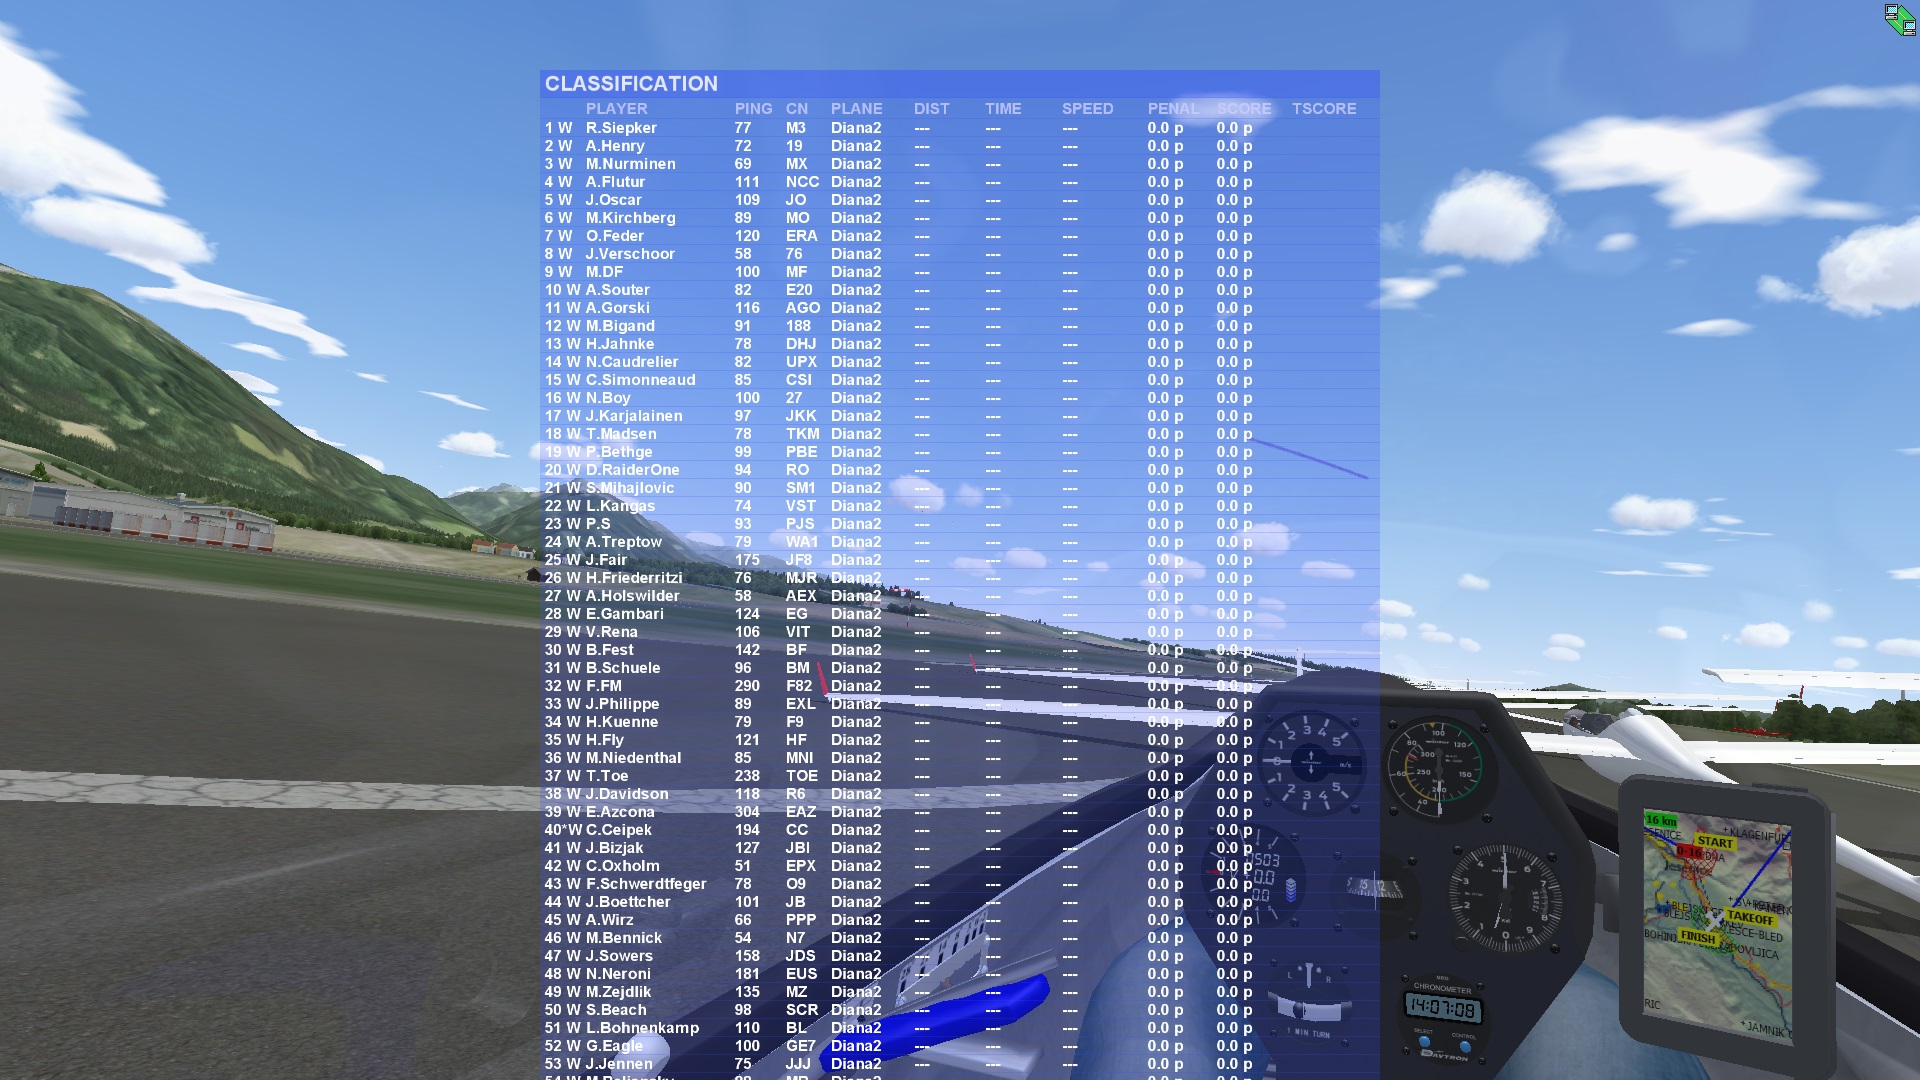
5) Glider Racing. Perhaps the coolest thing about Condor is live multi-player racing against the world’s best Condor racing pilots. Many of them are experienced racing pilots in real life and you can test your skills in live competitions. After a flight you can compare your flight trace against the traces of those that were faster and see where you lost precious minutes on task. You also experience flying in big gaggles – there are many races with 30, 40, 50 or even more other gliders, all of which you can see live on your the screen. Most scoring is based on the 1000 pt format used for real glider races, and some races are scored based on the Grand Prix format with regatta starts. Races can be high adrenaline events and a lot of fun.
Here I’m on the grid waiting to be aerotowed during a multiplayer online race. You can display/hide a directory of the other competitors with a key stroke. This was one of the first online races following the release of Condor 2 and the Diana 2 was the only 15m class glider supported at that time. In the meantime you can also fly a Ventus 3, a JS3, or a DG 800 in 15m configuration.
Limitations of Condor
As I tried to point out, Condor is a fantastic tool to help anyone (from beginner to advanced pilot) hone their skills and become better at real soaring. It is remarkably realistic and almost all the skills learned with Condor translate directly into the real world. That said, it is of course a simulator, and as such it has certain limitations that are useful to contemplate and understand.
1) There are no g-forces. Obviously. You are sitting in your chair in front of the computer and you can’t feel lift and sink. So you have to hone these skills in real life. There is no substitute.
2) Condor does a great job at modeling thermals, ridge lift, and – to a lesser degree – wave lift. However, it does not model some other real-life weather phenomena such as weather fronts, convergence lines, or sea-breeze fronts. This is an obvious limitation, especially when using Condor as a training tool for new soaring areas, where some of these phenomena are typical.
3) There are no weather hazards. With Condor you are in control of the weather settings and can select (before each flight), how strong the wind will blow (and with what variability), how strong the thermals will be, where the inversion layer is (and therefore the cloud base; or if the day is blue), if there is is wave and how strong, etc. But there are no thunderstorms, squall lines, tornados, or hurricanes. The wind always blows from the same direction and you don’t have to worry that it might die on you. There’s also no precipitation, i.e., no snow, hail, or even rain. Condor weather is always soaring weather. The greatest wind strength at the surface is 50 kph (just under 27 kts). (Higher up in wave, it can be twice that.) Unpredictable and hazardous weather is obviously something you need to really think about and plan for in real life. Condor won’t teach you that aspect of soaring.
4) There are no airspace restrictions and you don’t learn radio etiquette. Condor gives you the opportunity to set up penalty zones and thereby simulate airspace but in general, you can fly anywhere and there are no TFRs. You can chat with other pilots online but you won’t learn proper radio communications.
5) Some of the controls are obviously different from a real glider unless you build your own cockpit with authentic input devices for flap handle, spoiler handle, gear retraction handle, break handle, release knob, etc. (Some clubs have actually done that but it really isn’t necessary.) You will want to use a mix of keys on your keyboard and joystick buttons for those functions. I urge everyone to at least use a good joystick and rudder pedals even though Condor will work without them. But if you want to use it as a training tool for real gliders, you must operate the main flight controls in a realistic way so you develop the muscle memory to react appropriately.
6) Your life is not at risk. This is not just a big advantage but it is also a limitation. There is no doubt that you are likely to take more risks in Condor than you should ever take in real life (a case in point is the screenshot of the mountain pass earlier in this post). You can also see this in online racing: almost at every multiplayer race, one or more of the competitors end their flights in a crash (which in many cases would be fatal in real life). Condor is very tempting in this regard: to gain precious seconds you might scratch over mountain passes with a few feet to spare; you might fly between clouds in close proximity to mountains, you might fly in extremely dense gaggles, etc. I remind myself each time when I assume a risk in Condor that I would not be willing to take in real life. The last thing I want to do is teach myself hazardous habits.
These limitations are real. You should understand them but they should in no way deter you from using Condor not just as a game, but as a tool to practice various flying techniques in preparation for real soaring.
What do you need to fly in Condor?
At the minimum you need the software and a computer that can run it. You find the system requirements here.
In my experience an excellent set up looks like this:
A computer with a good-sized screen and a fast graphics card that supports Condor in high resolution. You can get all the training effects on a smaller screen, and with a barely adequate graphics card, but the experience is obviously much better if you have a nice computer. Condor requires Windows but it can also run on a Mac booted up as a Windows machine. E.g., I run Condor on an Apple iMac running Windows through Bootcamp. There are some geeks that run Condor with multiple computer screens. (If you want to fly in different sceneries (landscapes), you will also want an external hard drive because photo-realistic sceneries take up a lot of storage space – some are larger than 50 GB and you may want 10 or 20 different ones. You can either install Condor and all the sceneries directly on the external drive (the easiest solution) or you can install Condor on your main harddrive and only the sceneries on the external drive. A tool called “Condor Updater” now installs the sceneries for you, which has made this process much easier.
A joystick with force feedback. The best one is most likely the Microsoft Sidewinder Force Feedback 2. For a long time I used a a Saitek AV8R joystick without force feedback but after reading the glowing recommendations from the Condor user community for the MS Sidewinder, I switched and I can attest that the experience is incomparable and hugely improved. The MS Sidewinder acts and feels just like a real glider stick. The forces depend on airspeed and attitude, and the stick will even indicate the buffeting in a stall just like a real glider. The MS Sidewinder has been long out of production but you should be able to get a used one on eBay. They are very sturdy and well built. I highly recommend it. Whatever joystick you use, Condor allows you to easily program any of the buttons and levers to your desired functions.
Rudder pedals. There are multiple ones available and probably any of them will work well. I use T-Rudder MKIV pedals from KBSim, which are heavy and sturdy and work very well. But less expensive ones will definitely do as well.
A head tracking device such as the TrackIR 5, which is what I use myself. This is not essential but it does make a very big difference. It basically allows you to move your head to control what you see on the screen. If you want to look out over the left wingtip, you simply turn your head a little to the left as you would in real life and the screen will move just as you move your head. If you don’t have a head tracker you can alter the view by moving your mouse with one hand while you fly the ship with the other hand, or you can use the head-switch on the joystick. But neither is easy to do, especially if you also want to change flap settings or control the spoilers at the same time. Using a head tracker is much easier and more intuitive. For online racing, using a head tracker is almost essential unless you don’t mind colliding with other gliders in dense gaggles or along ridge lines. (There’s one thing to be aware of when using a head tracker: it will not work if there is sunlight coming in from behind where you are sitting when you look at your computer. The sun will confuse the tracker and the screen will jump all over the place. So think about where you will use Condor before you decide to buy this item.) Since last spring, Condor also supports virtual reality devices such as Oculus Rift, which make a head tracker unnecessary. (I have recently tested this with an Oculus Quest. The 3-D image of a VR headset definitely takes the realism to another level. The first impression is absolutely amazing and it really looks and feels as if you’re in the real cockpit. However, I’m still not ready to switch to a VR headset just yet. They are heavy and somewhat uncomfortable and I’m not too keen to stare at a computer screen just a few centimeters in front of my eyes for several hours at a time. Also, the resolution did not meet my expectations (not sure if this was due to the graphics card in my iMac or the Quest itself). Anyway, I decided to keep my excellent head-tracker setup and take advantage of the fantastic big screen of my iMac.
Condor has a built-in flight computer that is easy to use and specifically designed for Condor. It will help you with navigation, thermal centering and teach you all you need to know about MC speed-to-fly, final glide, arrival altitude, etc. If you also have a real-life flight computer that you want to practice with using Condor, check if it can receive GPS data through a COM interface. Most should be able to do it. Note, however, that the Oudie IGC does not allow this because it only accepts GPS data from it’s own built-in GPS. The Oudie 2 and Oudie 1 will work just fine. If you have an Oudie 1 or 2 you will also need a dedicated cable to connect the Oudie with your computer. I have no experience using other flight computers with Condor but you typically can find what you need on the Condor user forum.
Finally, you will want to use earphones with Condor, unless you live alone. Any ear phones will do as long as only you can hear them. I promise that a beeping vario from your computer would annoy everyone around you in no time.
You may already have several of the things needed. But even if the only thing you have is a computer, you can get all you need for about $100-400. Cumulus Soaring even sells the essential components in various bundles priced between $117 and $380 if you don’t want to follow my hardware recommendations or go to the trouble of making your own choices. The price tag may sound high, but, as I mentioned earlier, you should look at this as an investment. It will ultimately safe you a lot of money in tow fees and you will become more proficient much faster.
Now, unless you are already an expert and master all the skills listed, go and get Condor. You won’t regret it.
(Disclosure: this article reflects my own personal opinion and is not unduly influenced by anyone else. In particular, I have no relationships with, no financial interest in, and receive no benefits from the sale of Condor, Cumulus Soaring, Amazon, eBay, or any of the recommended hardware or software products. )
P.S.: if you would like to learn more about how Condor can be formally used as a tool for flight training, I recommend you check out the series of articles by Scott Manley, CFI-G, that have appeared in Soaring magazine monthly since June 2018. Scott provides flight instruction at a distance year-round using Condor and Skype to glider rating candidates across the United States. He is also a frequent speaker on this topic at SSA conventions and in other forums. You can contact Scott at smanley@wisc.edu or via his website gliderCFI.com.
Yesterday was a glorious day for wave soaring along the Colorado Front Range. But first I had to get there. Almost every wave flight in Boulder begins with a climb in the wave’s rotor… which is always a piece of work and not for anyone who’s just out for a pleasure cruise.
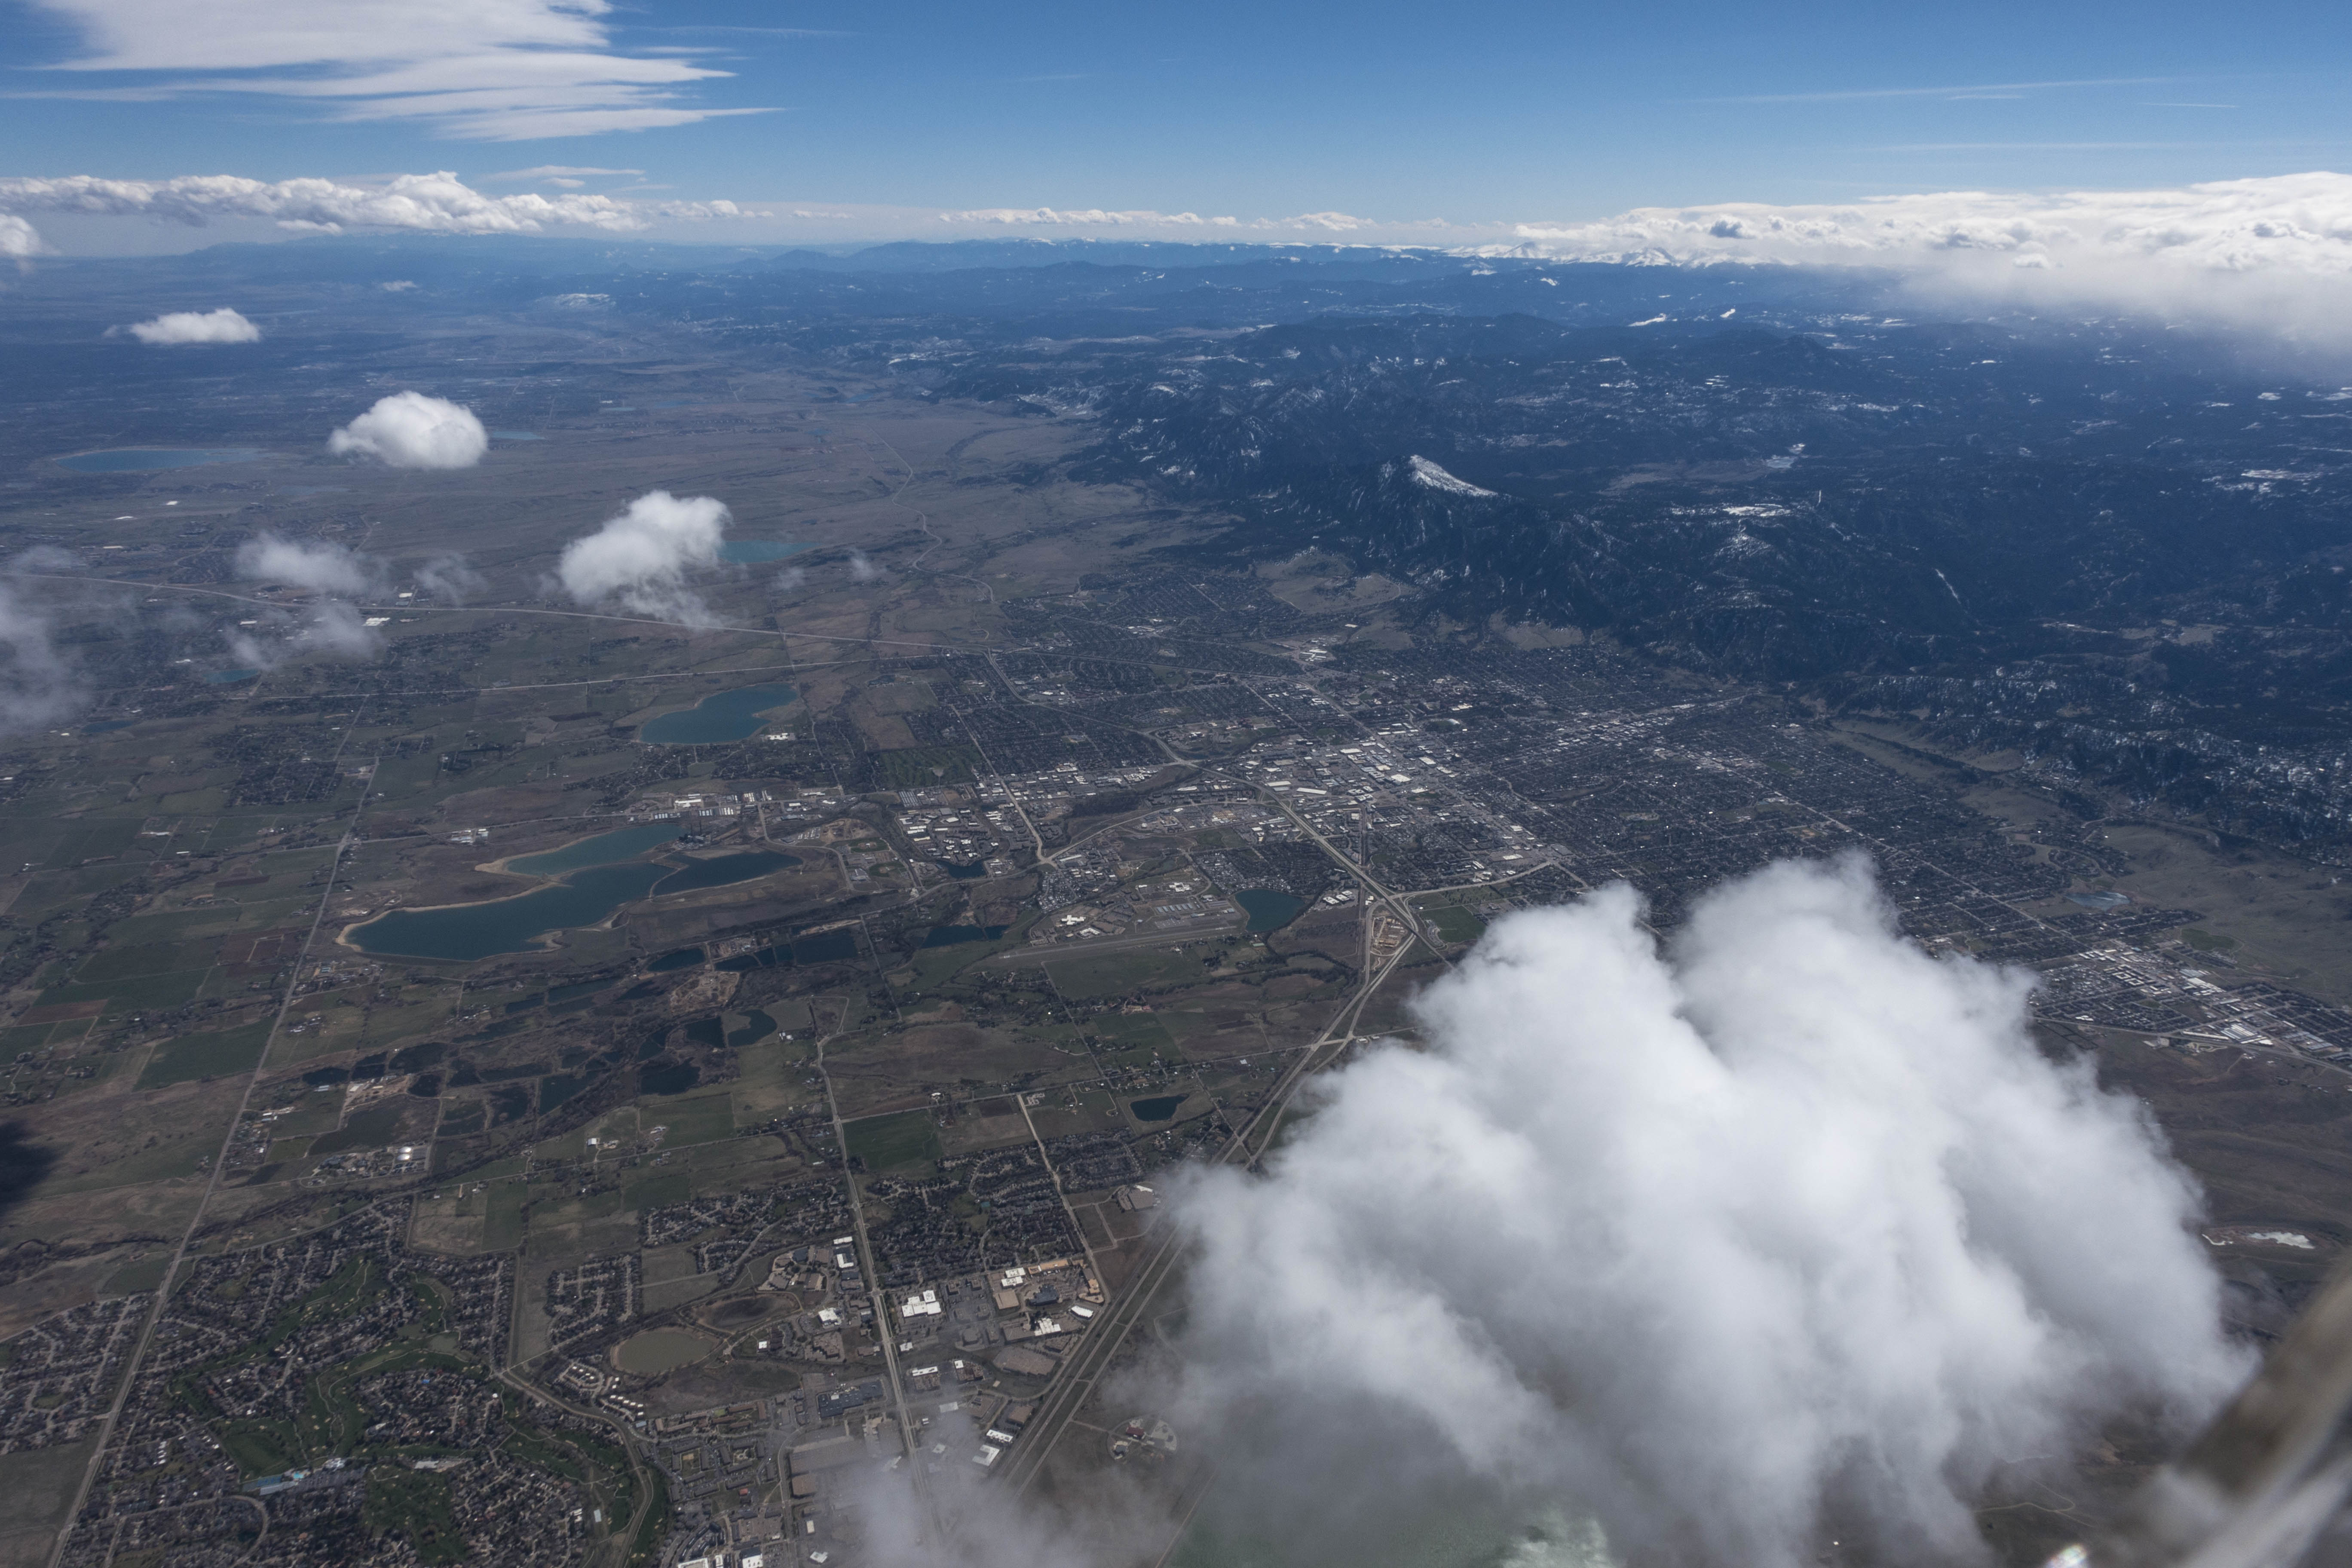
Boulder, CO from the wave at 17,500 ft MSL with rotor clouds below.
As I climbed behind the tow plane – we had barely reached 1,700 AGL ft – all of a sudden, the tow plane shot straight up into the sky. From my glider cockpit’s perspective it looked like I had instantly dropped down to the low tow position. But I did’t try to correct it for I knew what was about to happen. And sure enough: two seconds later I felt a huge bump from below and my high tow position was restored on it’s own without any control inputs.
A long line of cap clouds tops the Colorado Front Range. The cap cloud is a typical sign of wave conditions. The cap clouds dissolve in the lee of the mountains as the air warms up as it gets pushed down along the lee slopes, opening a “Foehn Gap” to the next line of clouds downwind (not visible here). The small clouds below are rotor clouds.
After a quick look to the right I pulled the release. Two turns later I had already climbed 1,500 feet off tow. What an elevator ride! The oxygen system started peeping, confirming my rocket-like ascent. Why hadn’t I put the cannula on before taking off? When I reached for it I noticed the extent of my mistake: when I closed the canopy before taking off, I had trapped the cannula’s tube between the canopy and the fuselage. There was no way to get it out. Bummer! You really can’t go on a wave flight without oxygen. So, just a few minutes into the flight and on a fast track up into the wave I was left with nothing else to do but to put the gear back down and pull the spoilers out. Three minutes later I was back on the ground. I grabbed a new cannula, and took another tow…
A close-up shot of the cap cloud. The fuzzy area below the cloud is blowing snow due to the strong surface winds directly above the mountain range. The air flowing over the mountains gets squeezed between the inversion above and the mountains below, thus accelerating the wind speed at the tops of the ridge line. The wind would have made back-country skiing really unpleasant.
I asked the tow pilot to take me to the same spot where I released in anticipation of another rocket climb. However, this time, climbing off tow wasn’t nearly as easy. I hit some big sink and dropped down to 2,000 AGL. Time to pay attention! This close to the ground, strong lift and strong sink were in very close proximity to one another. The vario flipped back and forth between max climb and max sink indications, and I had to bank about 50 degrees to get a positive average climb rate. To make matters more challenging, the position of lift and sink changed constantly. After some experimenting, I eventually found a reasonable spot to climb in. The higher I got, the more consistent the lift became and my climb rate improved.
On my first leg north. Below the rotor cloud on the right is Carter Lake.
At about 14,000 MSL I got into weak laminar lift and was able to relax. I pointed the nose into the wind, noticed that I was barely moving forward relative to the ground. Occasionally I looked back over my shoulder to watch the developing rotor clouds behind the plane. More than one glider pilot before me got “swallowed” up by the clouds as their glider drifted backwards. I knew I had to be careful so this would not happen to me. Gradually I gained another 3,000 feet and the rotor clouds were finally below me. The hard part was over and it was finally time to cover some ground!
Another view of the Continental Divide northwest of Carter Lake. The Twin Sisters and Mount Meeker / Longs Peak can be made out right of center underneath the cap clouds. The town of Estes Park is in the distance on the right edge of the picture.
With the wind blowing at about 30-40 kts I knew I had to fly fast if I wanted to get anywhere for a significant portion of my airspeed would be used up just to avoid drifting off with the wind.
Unlike on some of my prior wave flights, there was no continuous line of rotor clouds. However, many smaller, individual clouds were sprinkled about the sky below. There were enough of them and in sufficiently regular intervals to easily work out the area where the best lift was likely to be.
Nice view out into the prairie to the East after my first northerly turn. The suburbs below the rotor clouds belong to the city of Loveland.
And so the surfing could start. Depending on the strength of lift I would adjust my airspeed. But unlike flying in thermal lift, where you pull up when the lift increases and you push down when the lift decreases, I would basically do the opposite: In strong lift I would push and fly faster to avoid getting close to Class A airspace. In weaker lift, I would pull back a little, to avoid dropping lower and possible getting back into the rotor zone. The sweet spot was clearly between 16,500 and 17,999 feet. High enough to stay clear of the rapidly developing rotor clouds and the associated turbulence below, and low enough to avoid busting into forbidden territory.
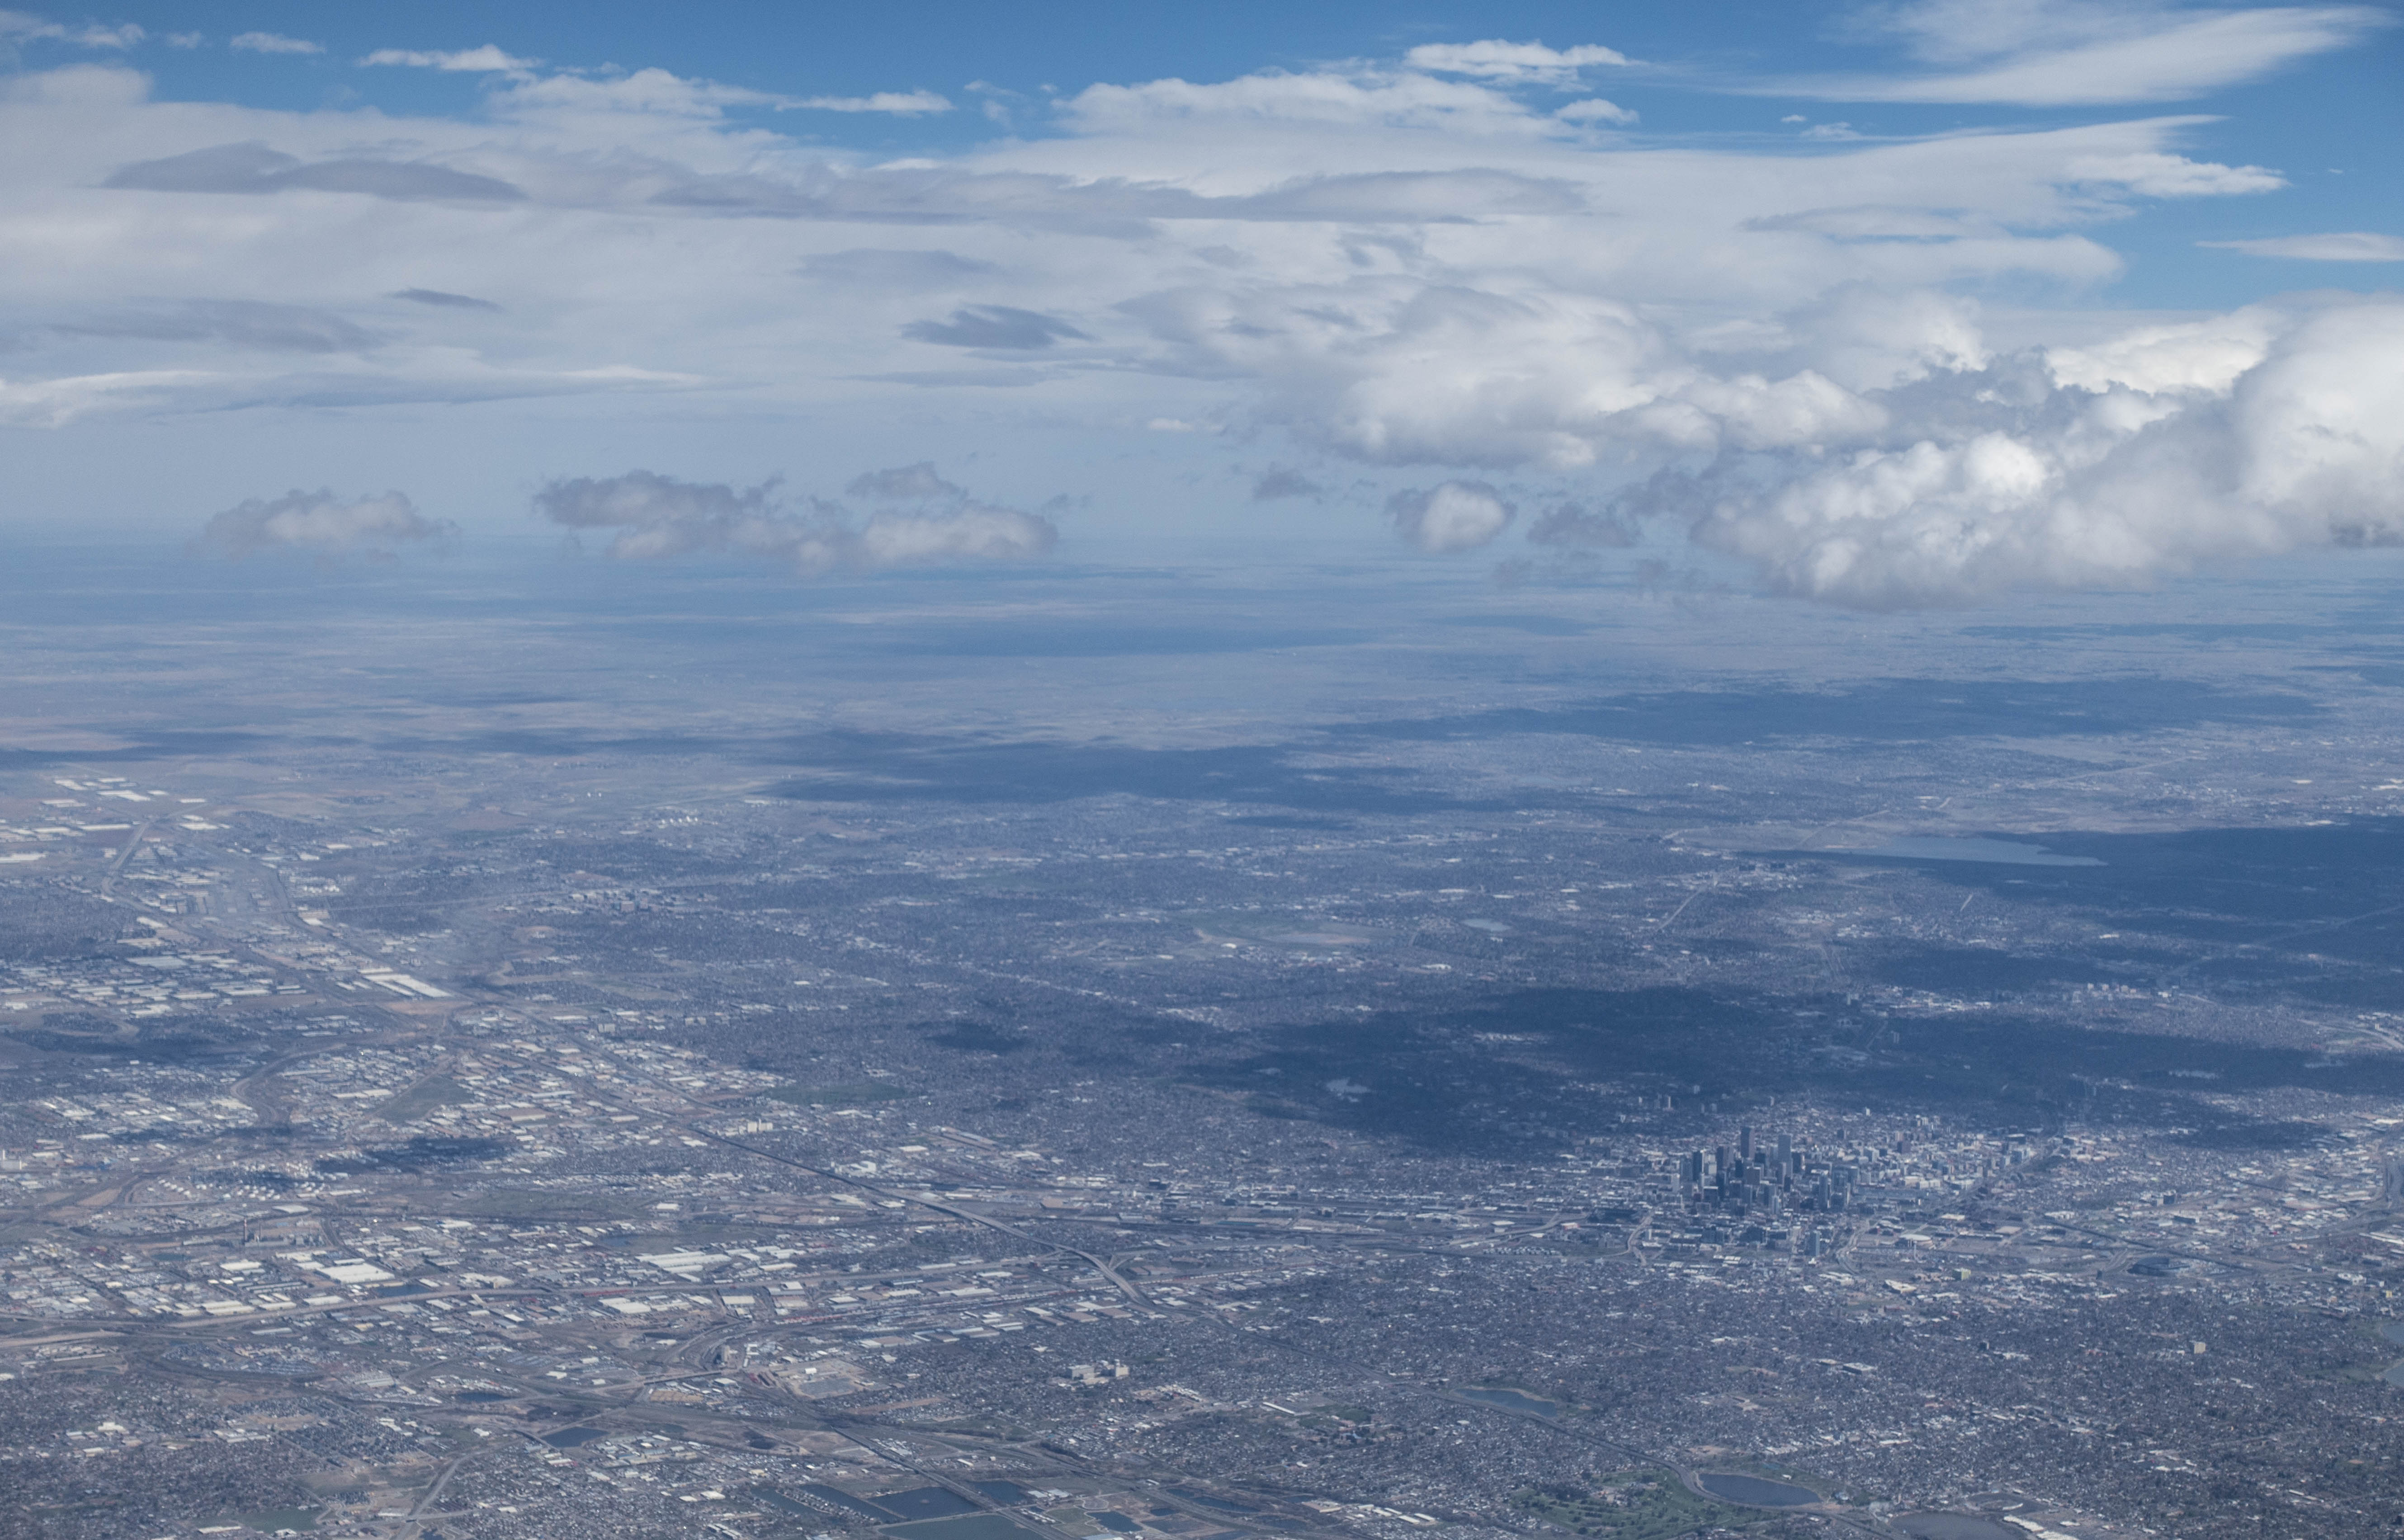
Downtown Denver on my second leg, heading south.
For the next hour and a half I flew up and down the front range between CO Rt 34 in the North and I-70 in the South. The strength of the lift varied between 2 and 10 kts.
In exactly 1 hours and 30 minutes I covered 275km, that’s an average ground speed of 183 kph or 114 mph or 99 kts. I stayed between 16,300 and 17,800 feet for the entire time. Except for reversing directions at the northern and southern turn points I made not a single turn. My indicated airspeed was between 80 and 100 kts most of the time, only occasionally dropping a little lower – mainly to open the window and take pictures.
The cap cloud stayed with me for the duration of the entire flight as a constant reminder that the wave continued to work. This picture is from my third leg, heading north again.
I had not remembered the exact VnE of the Discus at this altitude, and so I decided to err on the conservative side, keeping my indicated airspeed below 105 kts at all times. This meant that on several occasions I had to pull the spoilers to prevent the ship from climbing above 18,000 feet. (I have since checked the operating handbook and my actual VnE at this altitude would have been 124 kts.)
There was a lot of commercial air traffic in and out of Denver International at my altitude. It was very comforting to know that the ship is equipped with a transponder and ADSB out so ATC was aware of my position and heading at all times. The screen of the S100 showed me the other aircraft in the sky, usually well before I could spot them myself. The color coding was very useful as well, so I could see whether to look for other traffic above or below.
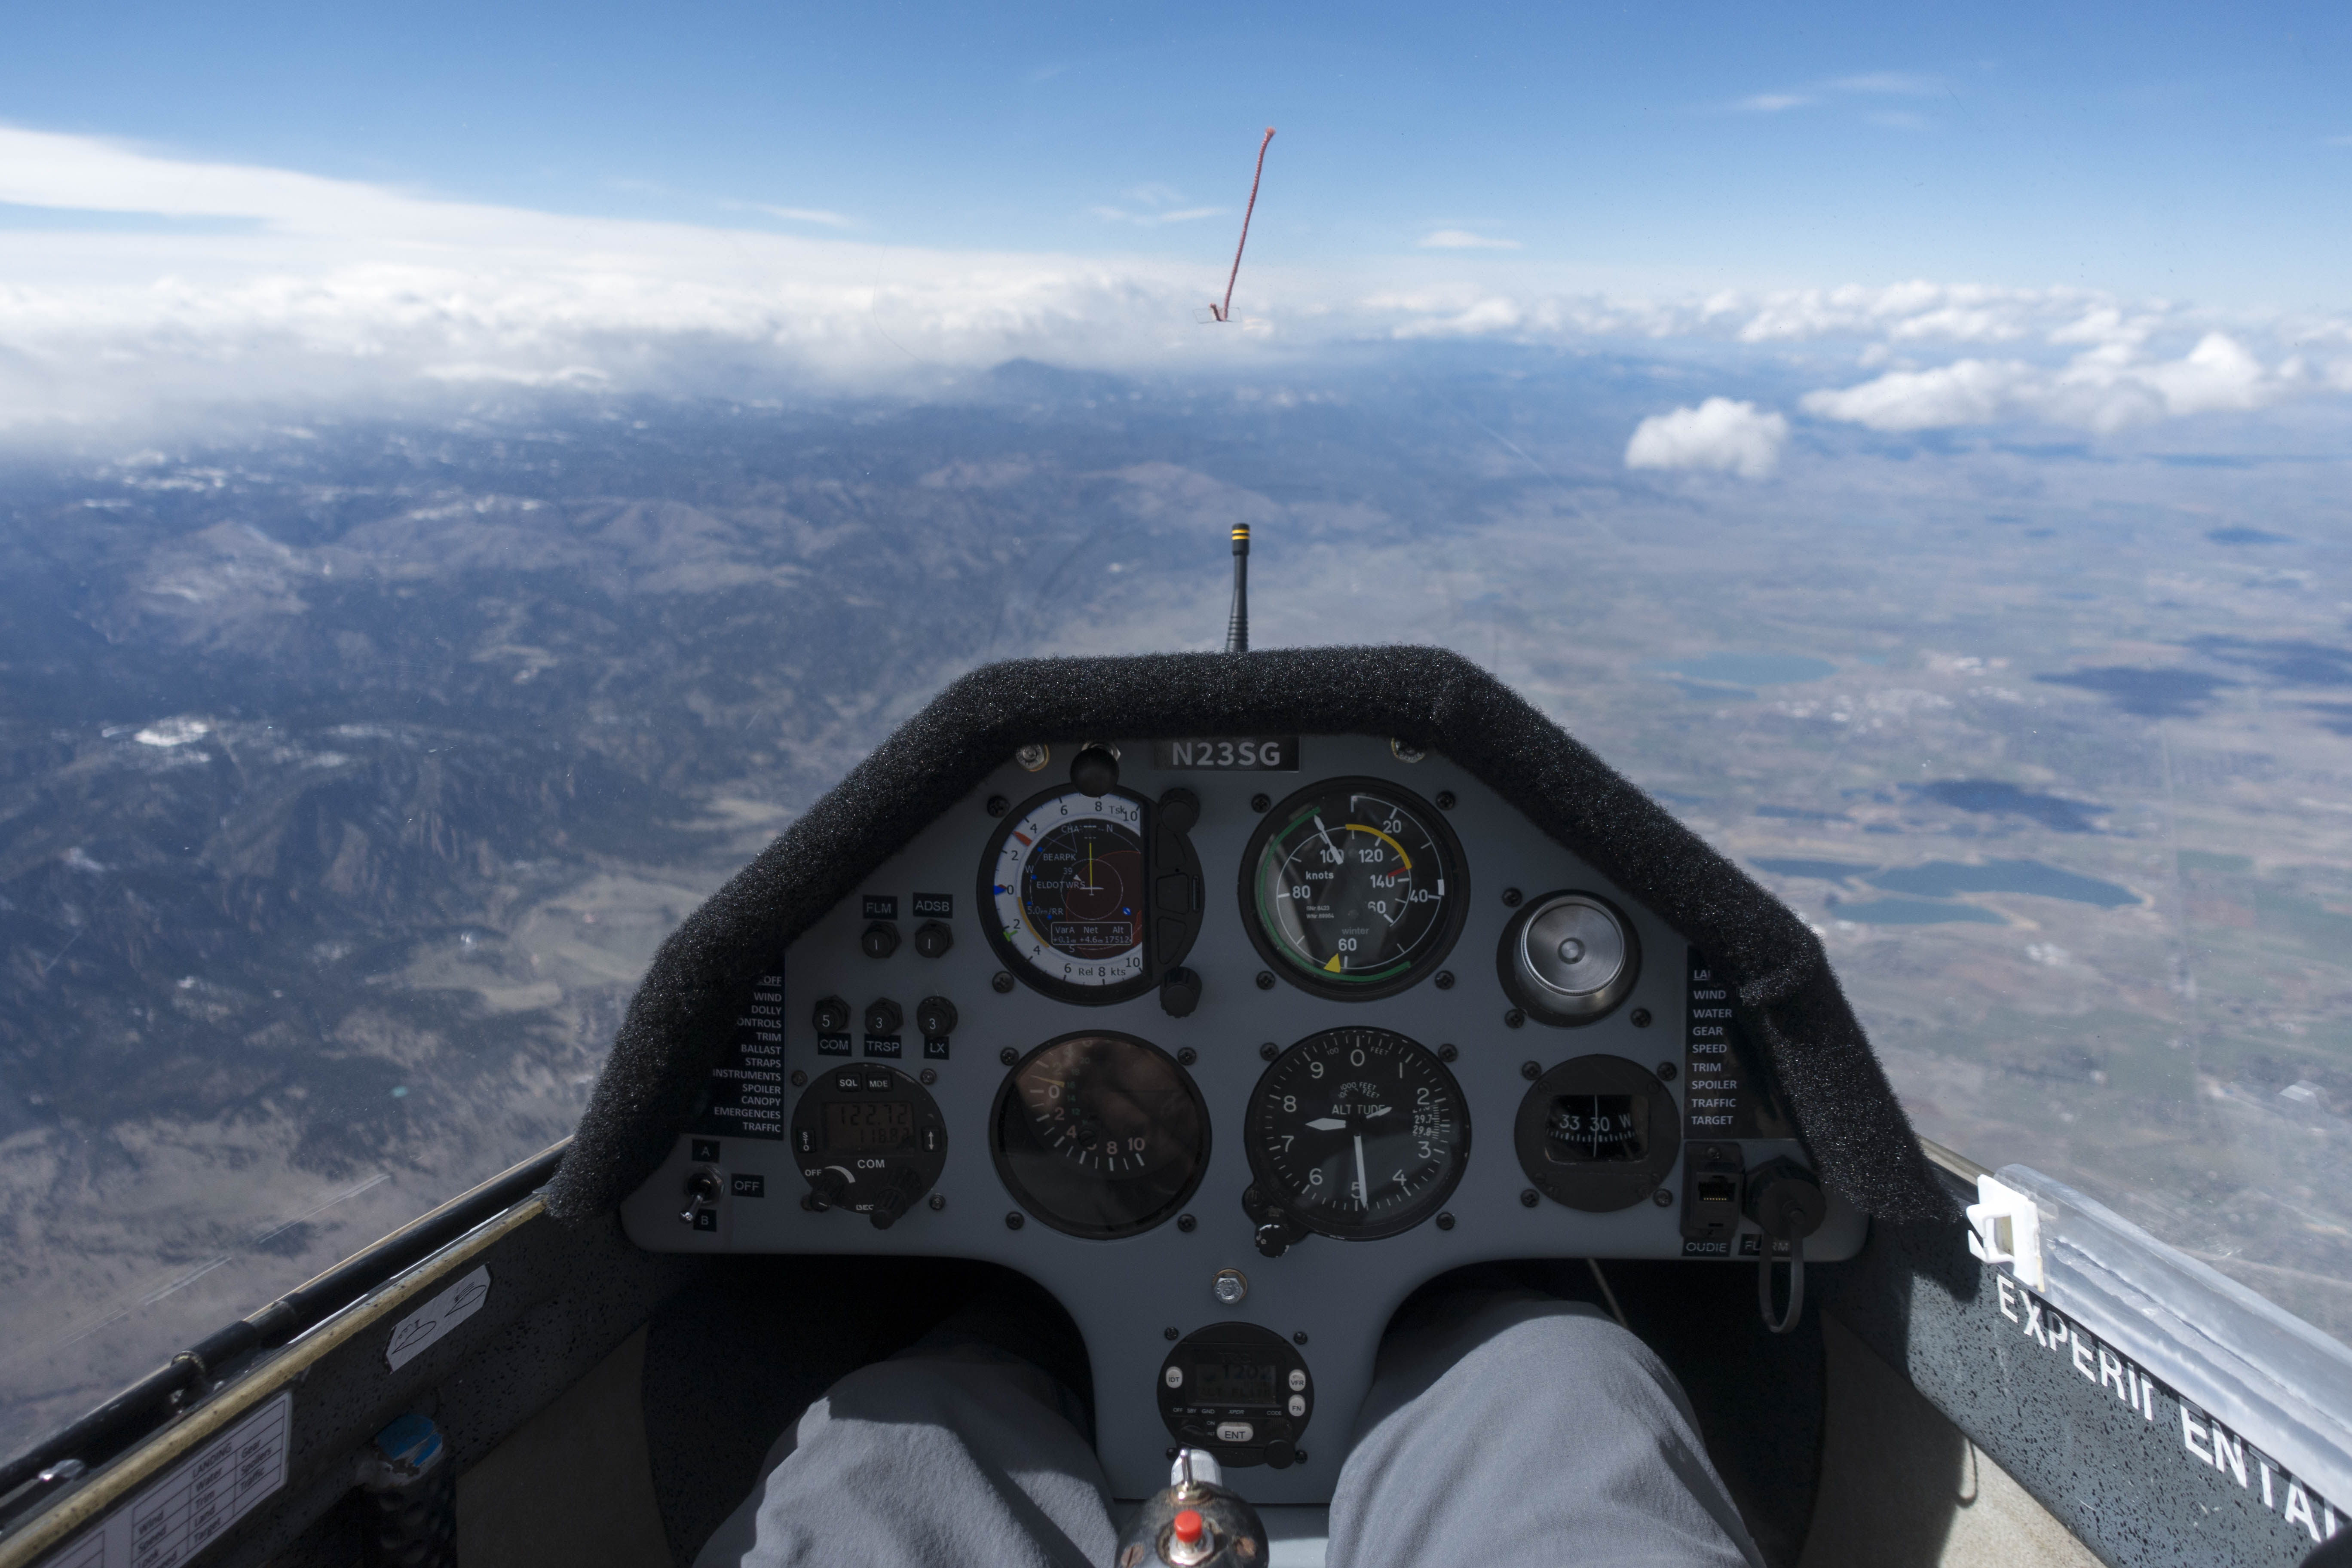
Last picture before putting the camera away and getting ready to descend. The panel shows the typical cruise mode for the flight. Speed around 100 kts, lift 2-3 kts, altitude 17,500 MSL.
Visibility was absolutely perfect for the entire flight and the excellent wave conditions reached to the horizon to the north and the south as far as the eye could see. I have no doubt that it would have been possible to continue the speed run north to the Wyoming border, and south all the way to Pikes Peak.
Unfortunately I wasn’t very well dressed for this altitude. Once the sun was blocked by a lenticular cloud layer far above it got really cold very fast. That’s when I decided to cut the flight short and come back down to land.
Before leaving the laminar layer on the descent I made sure to secure my camera and any other loose objects in the side pockets and I retightened all my belts. I slowed down to below 80 kts to minimize getting knocked around too badly once I would re-enter the rotor zone, and I kept away from the proximity of rotor clouds where the most severe turbulence is usually found.
I don’t know if it was due to my precautions or if I simply got lucky but ultimately my re-entry into the rotor zone wasn’t nearly as bad as I experienced it before.
AWOS told me the wind on the ground had turned west as well and was blowing at 20 kts gusting to 28. The wind sock suggested a slight northerly cross wind component. I landed on Glider 26, making sure the touchdown was before the line of trees that could add some unpleasant turbulence. The ship rolled nicely all the way to its tie down spot.
Don’t squeeze the cannula! I need to make it a habit to put the cannula on before launching. It’s easy to do in flight, but this will prevent me from closing the canopy and squeezing the cannula tube between the canopy and the fuselage.
Know the VnE at altitude. Our club’s Discus’s VnE at 18,000 MSL is 124 kts. I could have flown a bit faster instead of opening the spoilers. (As long as I’m well clear of any rotor turbulence and there is no rough air).
Dress more warmly for wave. Especially the feet and legs get cold in the shade below the glare shield. And especially when flying fast.
What do Colorado bears have in common with glider pilots? As soon as the spring sun heats the ground, and the ground heats the air, both come out of their dens.
Except that for many of us glider pilots, our den this year was the hangar. And we didn’t get to sleep in. For the past 10 weeks several of us spent a lot of time redoing the panel on our club’s Discus CS under the tireless, thoughtful, and diligent guidance of Jack, our ship manager. Not even a broken leg would deter him…
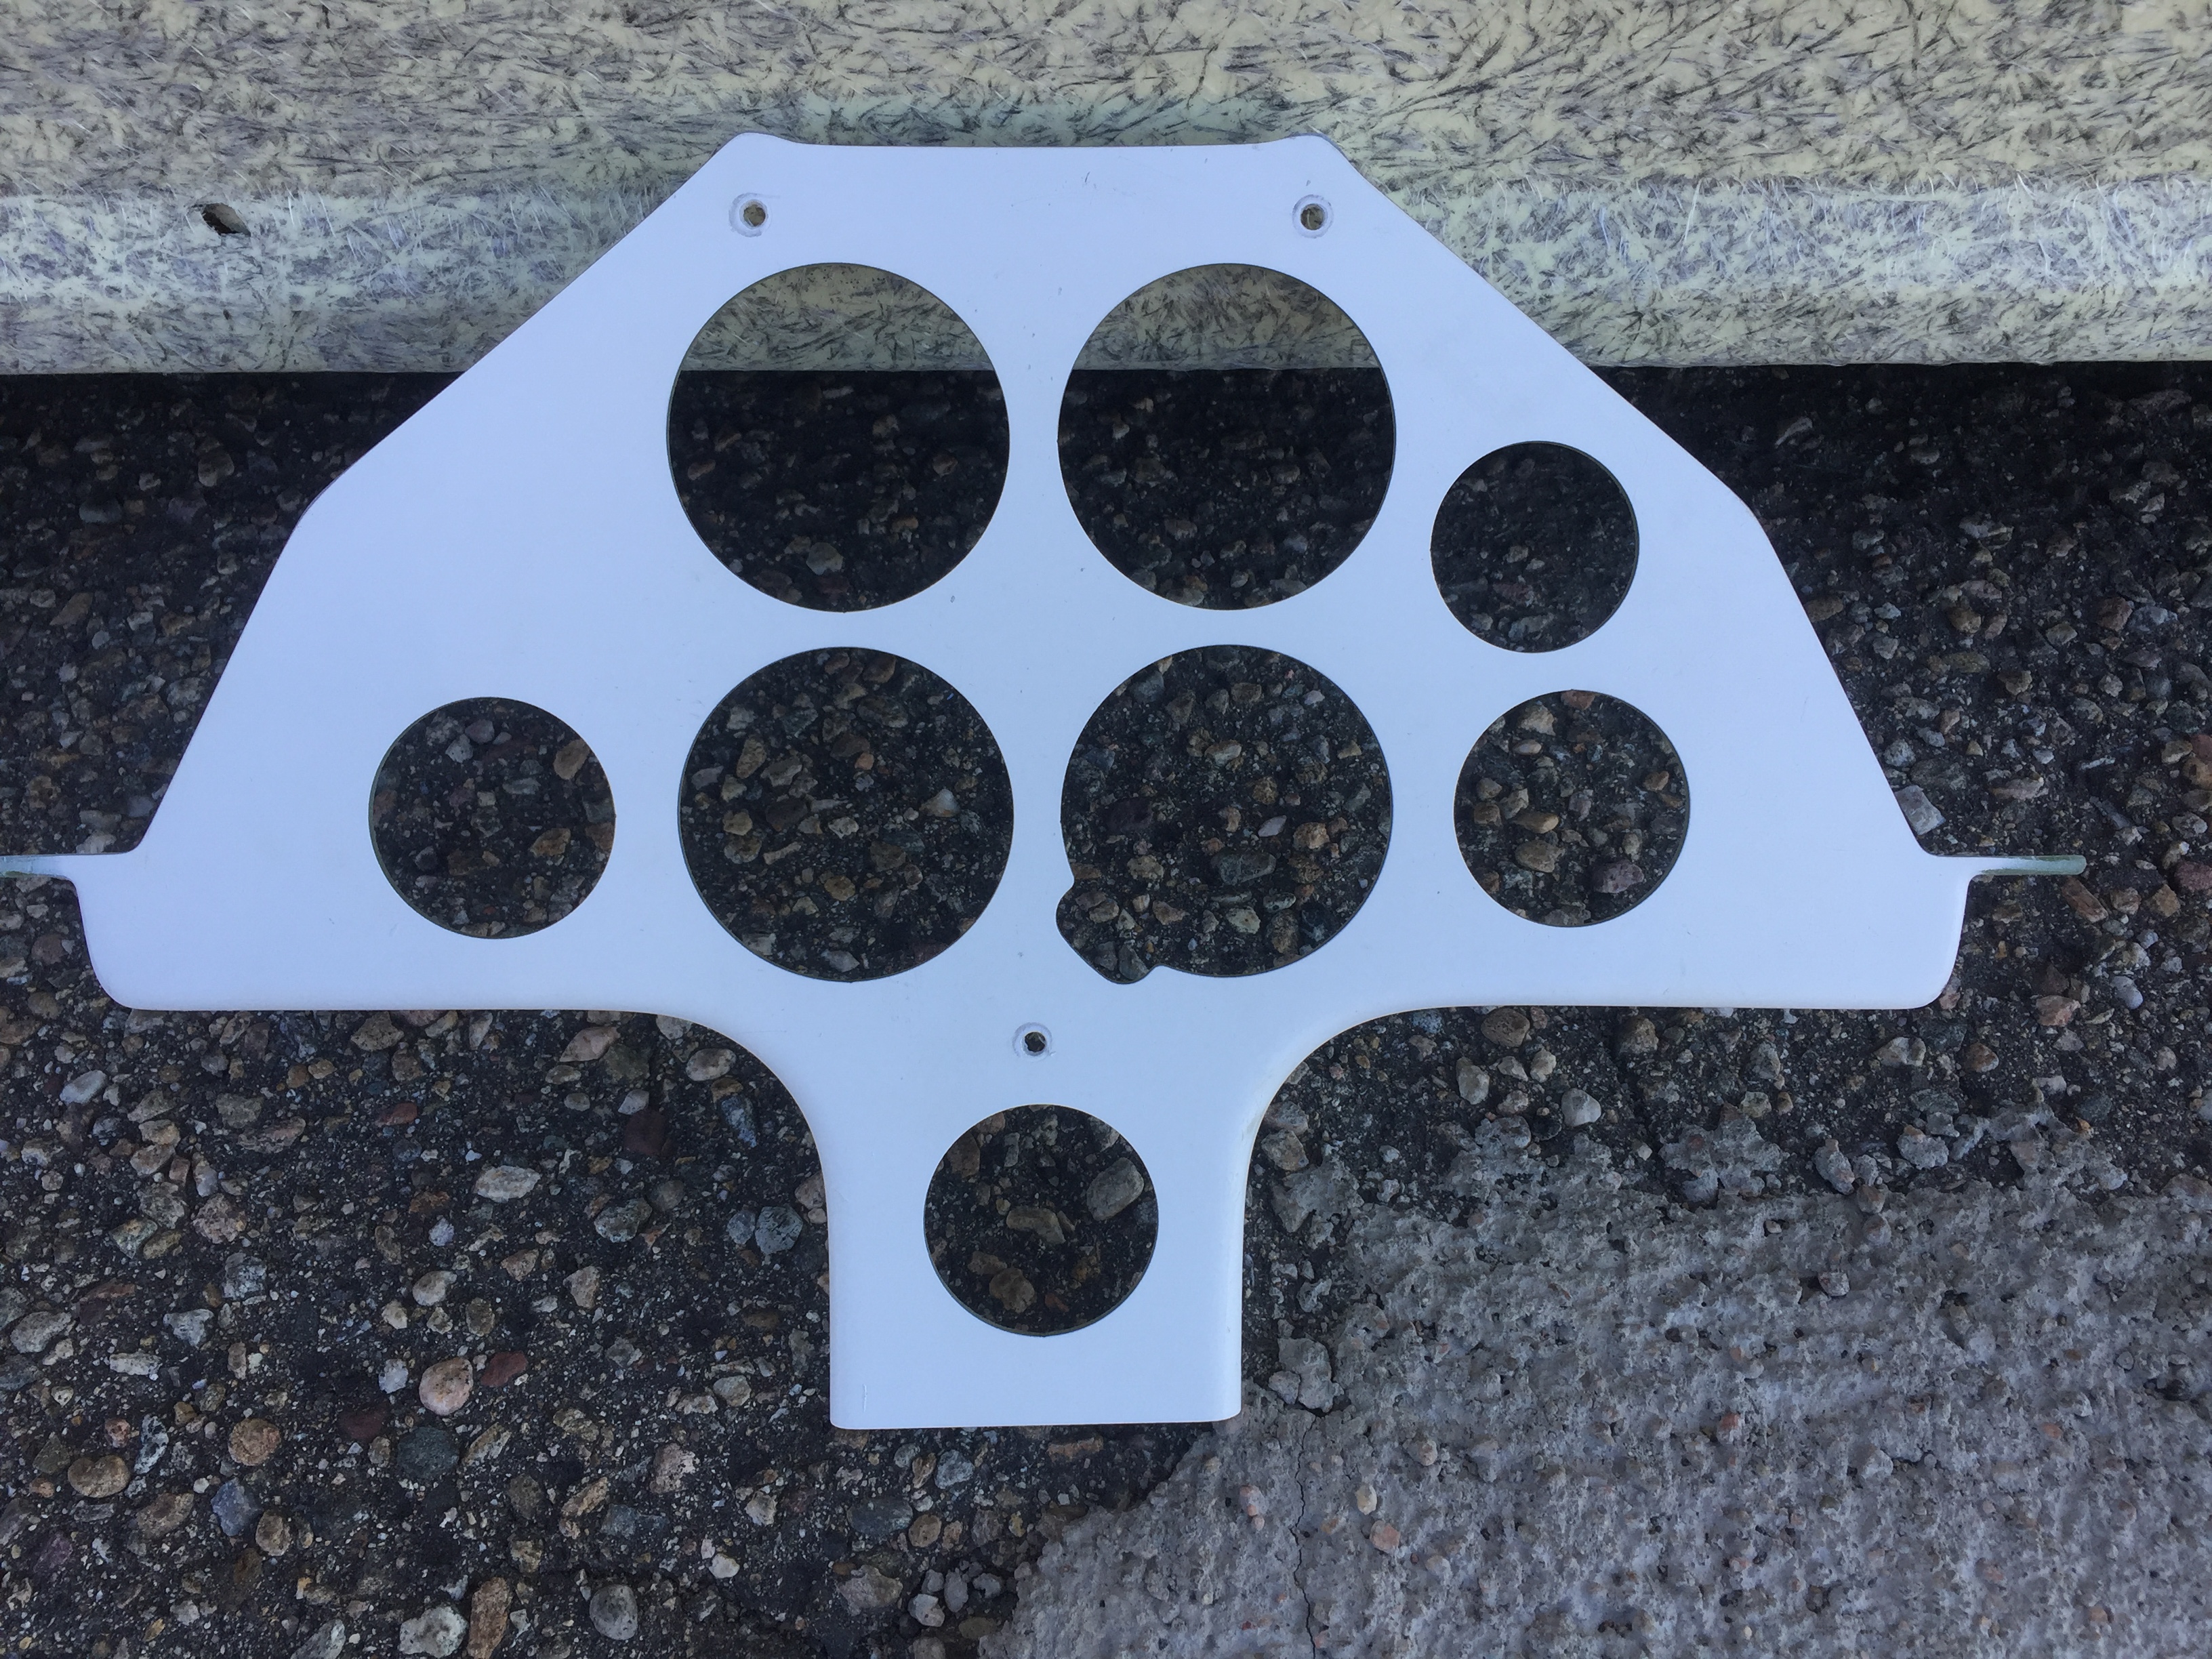
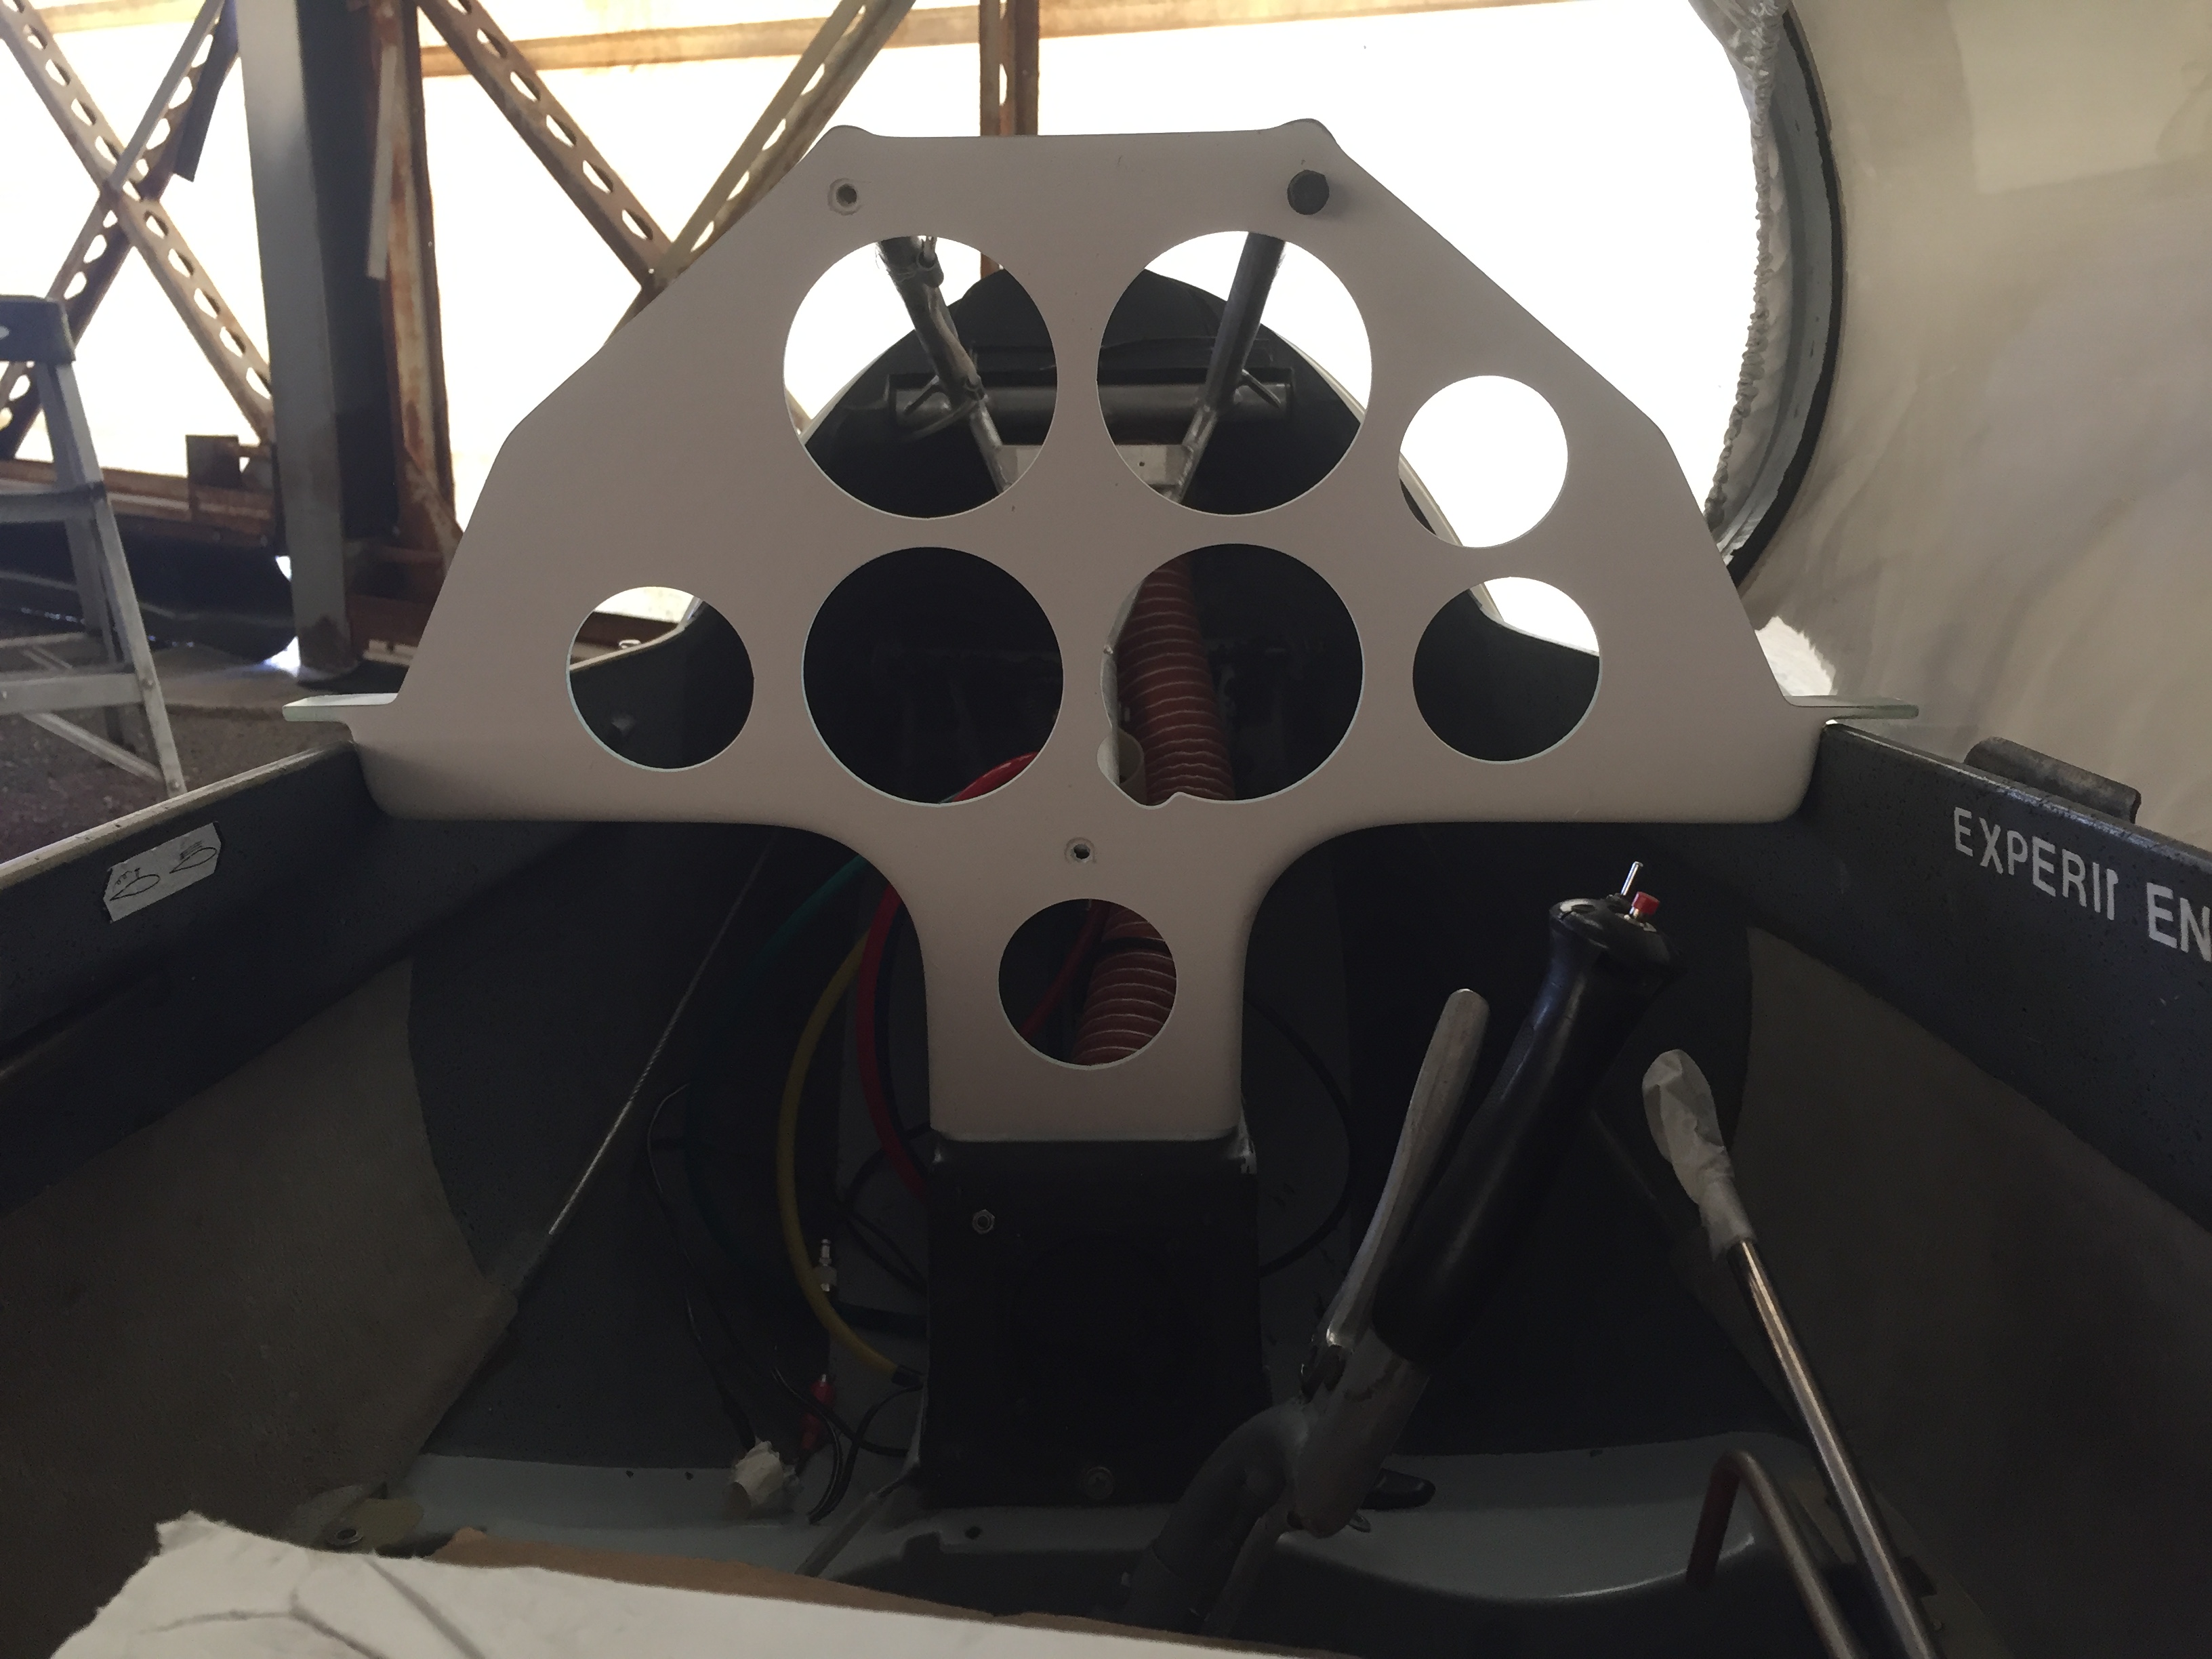
Here’s what we started with: a new fiberglass panel
First, holes needed to be cut with a water jet to place the new instruments.
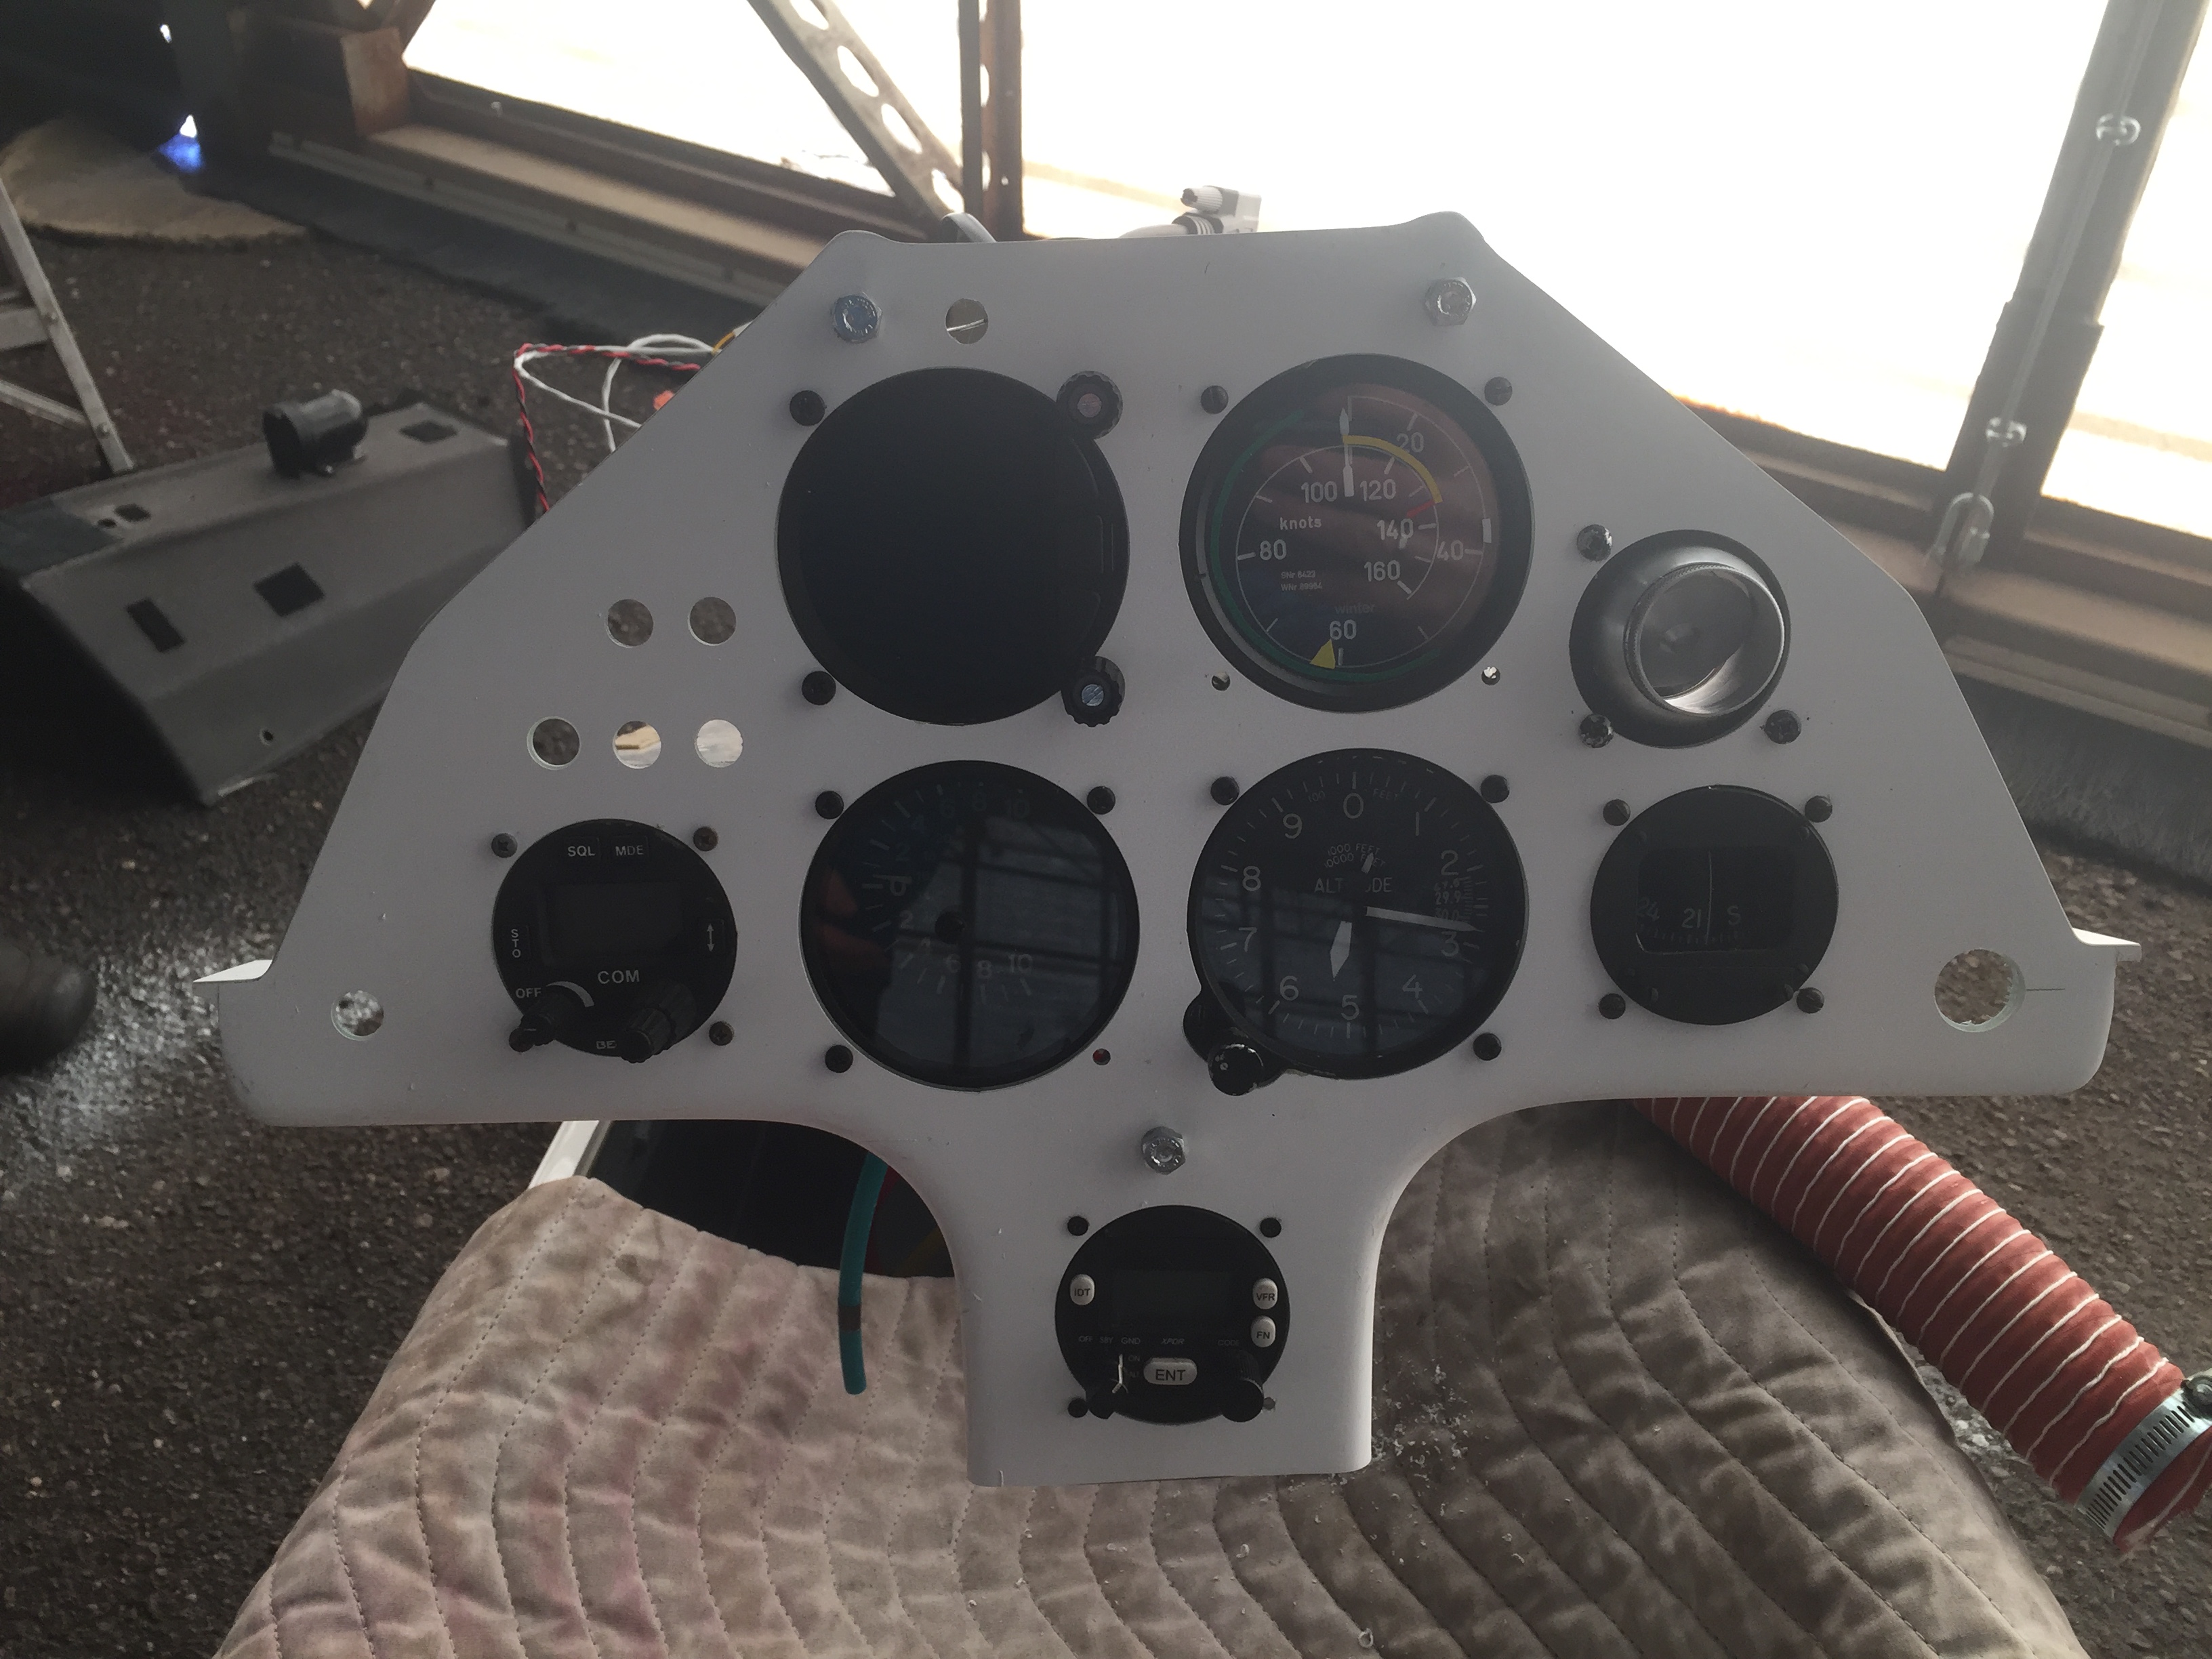
Then it had to be fitted into the ship. Clearly, it’s still too wide…
Mounting holes had to be drilled and the the instruments had to be fitted.
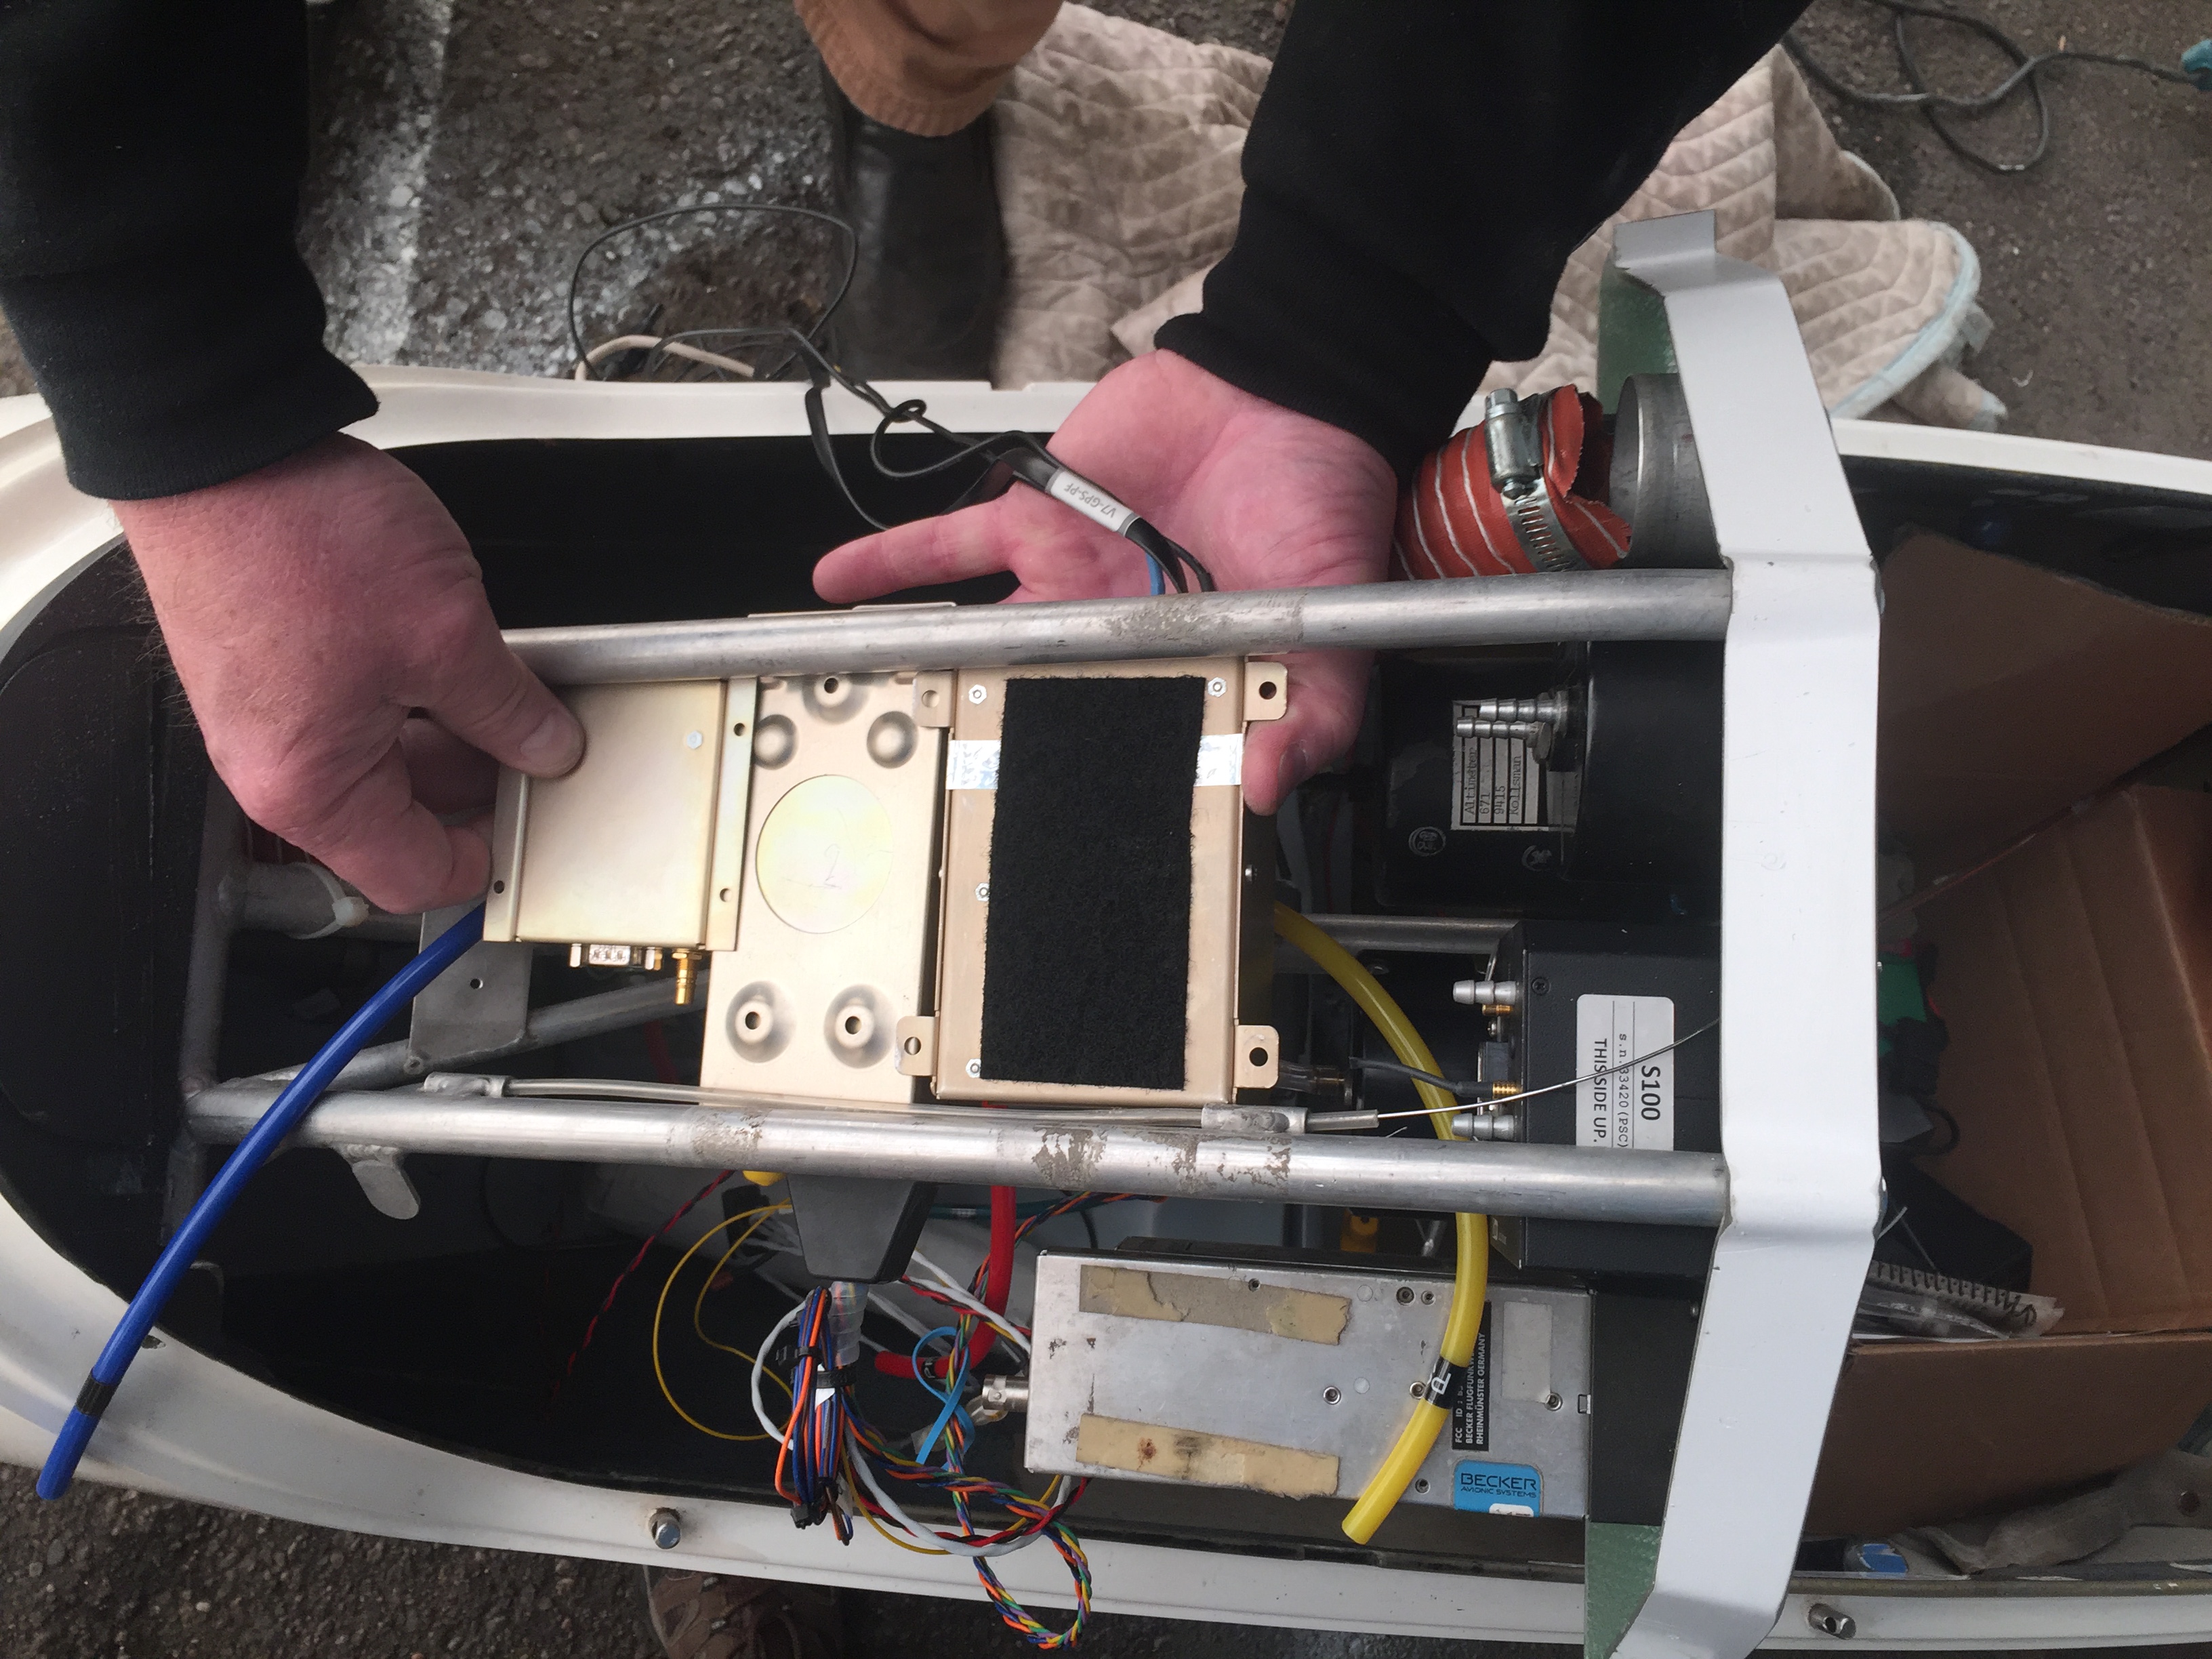
Then the real work began … all the invisible parts had to be mounted somewhere before any of the tubes or wires could be connected.
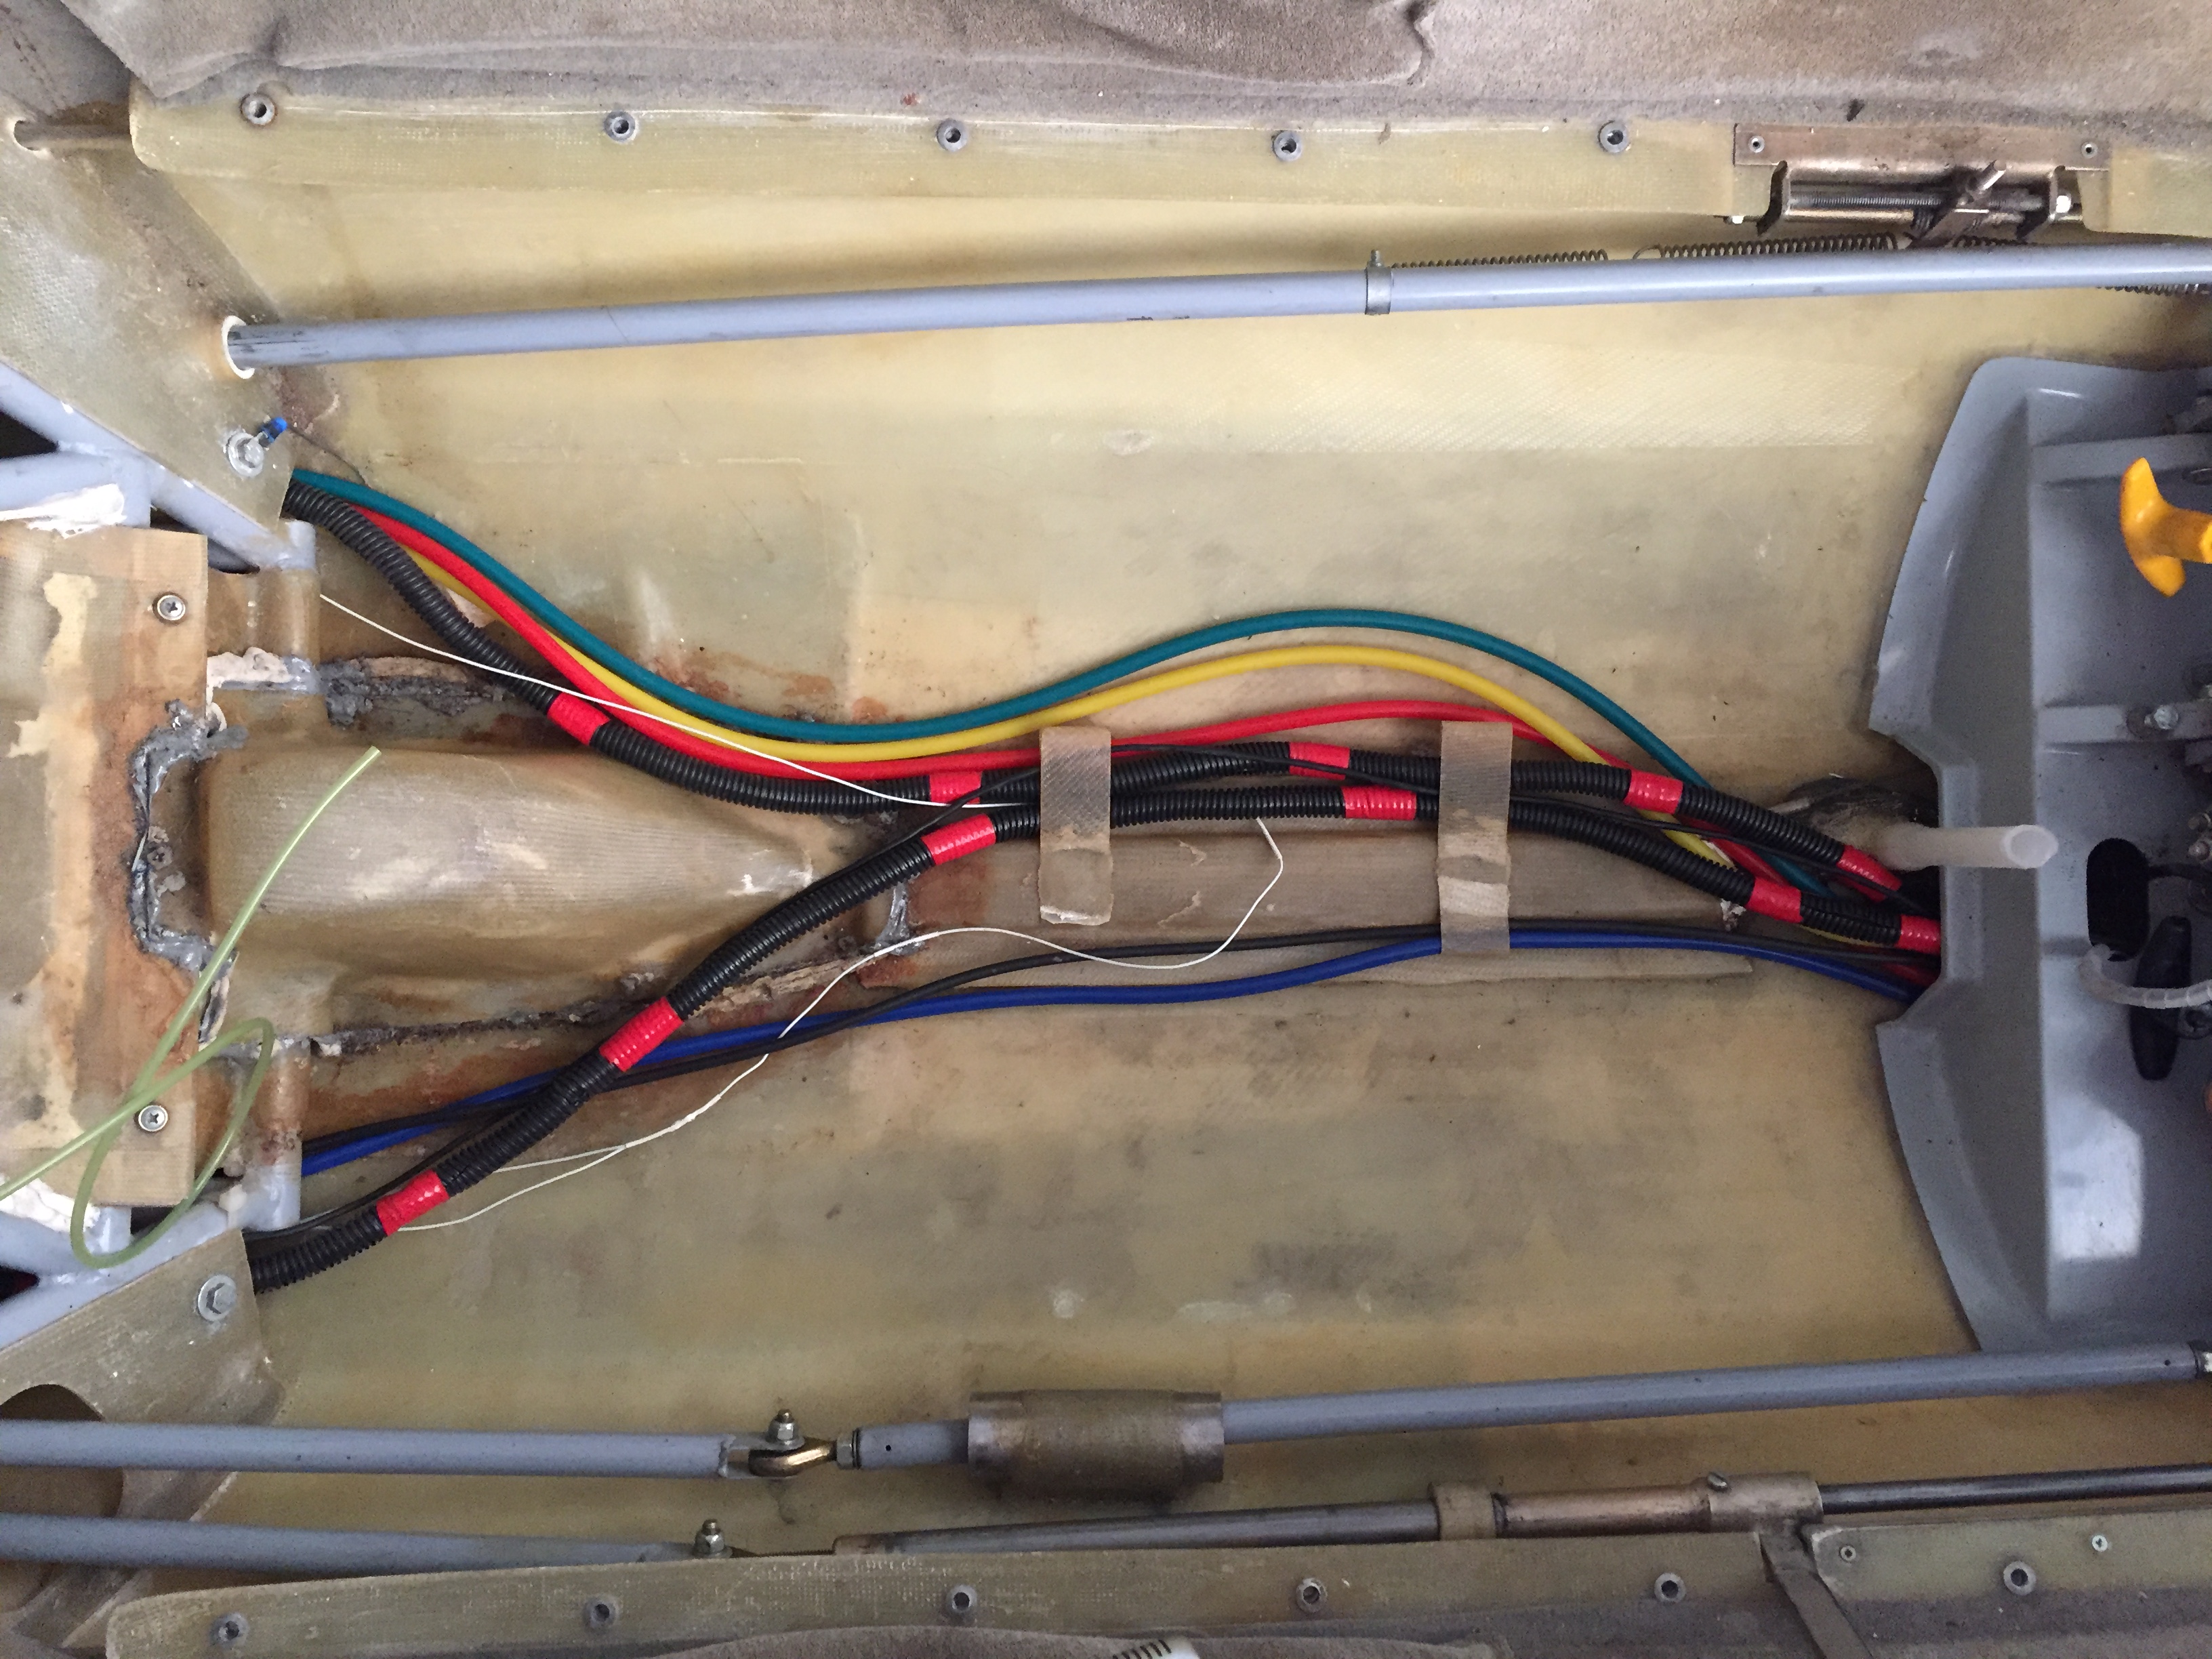
Wires to various sensors and new pneumatic tubing to the ports and probes had to be laid securely below the seat pan
Finally everything had to be mounted, hooked up, and tested. Faulty parts had to be replaced, and everything tested again. (There’s a lot of steps and pics missing in this sequence before we could call it a success…)
It’s been a major team effort – unfortunately some key team members are not in this picture.
After 10 weeks of work, Jack drove the ship back to the airfield while the sky above beckoned.
Then, yesterday, finally, I had the honor of test-flying the ship. And voila, everything worked perfectly. All the little issues that had plagued the ship from time to time in the past such as erratic vario displays due to leaky tubing, power failures due to old batteries, poor radio reception, an unreadable flarm display, stick thermal indications due to faulty compensation settings, etc… all those issues where gone.
The new S100 flight computer, which isn’t just your task planner and speed-to-fly calculator, but which integrates every available information into a central hub is a thing of functional beauty. Other air-traffic, even commercial airliners, showed up on the display, color coded by height. I spotted glider pilots with their call signs on the screen before I could see them for real. The temperature sensor told me when I climbed to freezing altitudes, the gear warning was a friendly voice and not an obnoxious sound the meaning of which has yet to be deciphered. The thermal assistant provided timely and accurate information. The screen is super bright and easy to read at a brief glance even with my polarized sunglasses. Climb and sink indications agreed with the fully-compensated mechanical vario. I could just keep my eyes outside the cockpit, focus on the sky, the wind, and the sun and not worry about any of the little things that can become distractions. That’s soaring as it should be!
As always, the Discus handled perfectly. The coolest thing is that it basically thermals on autopilot. Whenever I put it in a 45 degree bank it just stayed there without further control inputs. You can even take your hand off the stick, adjust your oxygen cannula, take pictures and just make small corrections with the rudder pedals while the ship basically climbs on its own. You can just look outside and watch the world become smaller and smaller.
I want to thank everyone who’s contributed to this major club project. We have a fleet of terrific club ships, which only very few clubs in the United States can offer their members. Come out to the field and enjoy!
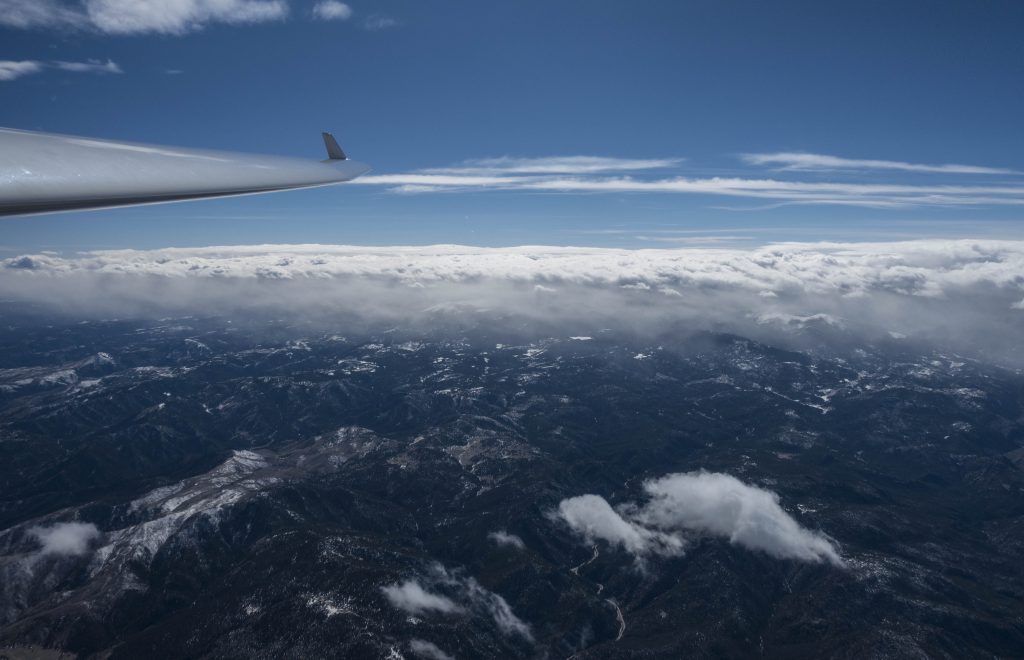
View of the Front Range from the Lower Foothills SE of Estes Park. Soaring was better than the sky suggests.
So here’s a bit about the flight itself: I got a late launch at about 1:35pm when thermal conditions were almost at their peak. As soon as I was satisfied that everything was working and that I wouldn’t need to test the parachute as well ;-), I released at 1,700 AGL and immediately climbed a few thousand feet off tow. The sky was mostly blue with a few clouds near Thorodin Mountain SW of the Flatirons. So that’s where I headed first. But all I could find was sink. I hadn’t even reached Gross Reservoir when I decided to head back to the prairie. The thermals were still there but the wind had started to shift to the west. That meant the climbs were less consistent and more wind blown with a somewhat “rotory” feel.
As a climbed, a line of small rotor clouds developed NW of the field to the west of Left Hand Canyon. I gingerly headed towards that line, pulling a little in every gust and pushing through any sink. I was able to connect with that line and then fly in cruise mode all the way to the ridge line NE of Estes Park. This was a good stretch to spot commercial air traffic inbound into DIA on the Flarm screen of the S100. It was very comforting not solely having to rely on ATC to see me, but to see the airliners myself on the screen before spotting them in the sky.
I found good lift on the ridge near Storm Mountain where I climbed above 14,500. The sky to the north from there looked pretty bleak, so I decided to retrace my track while another rotor line formed further east. I connected with that line between Carter Lake and Berthoud, climbed back up to over 14,000 and then imagined a straight line south from there with relatively good air. Although there were no clouds the line worked in reducing my sink rate and supporting my glide. I headed past Boulder and the Flatirons towards some rotor clouds north of Golden. These did not work at all, however.
I turned towards the Flatirons, intent on soaring along the top of the ridge where I expected significant ridge lift since the wind speed had picked up considerably and was now 20-30 kts from the west. Unfortunately the push through the lee and into the wind cost just a bit too much altitude and I was not comfortable with my height as I got toward the Flatirons. I remember thinking, “if this were Condor, I would just go for it, and I’m sure it would work”. But this wasn’t Condor, and in the real world I only have one life to live, so it was an easy decision to turn away.
I pushed through the heavy lee sink at about 100 kts and arrived at the field at a comfortable height of just under 2000 AGL. The wind was blowing straight from the west at 20 kts gusting to 25. A sporty pattern flown at about 80 knots brought me to a smooth landing after a flight of 2 hours and 15 minutes. At 168km it wasn’t particularly long, and at 78 kph it wasn’t particularly fast, but I’m satisfied that it was about what was reasonably possible for me with such a late launch and the onset of strong west wind conditions.
Finally, here’s a look at the new panel in flight as I’m cruising in good lift along the rotor line heading north. The small clouds in the distance (right in front of the nose) were my northerly turnpoint near Storm Mountain.
The new Discus Panel. Everything worked perfectly!
Lessons Learned
It’s great to be in a club. I have learned so much from all the talented fellow club members during this project. Taking care of a glider felt intimidating to me and for many things I would not have even known where to start. Compared to my club mates I still know very little but at least I have a basic understanding how everything works and I have a reasonable idea as to what I can do myself and where I still need help. The whole thing is no longer a total mystery. And that’s huge progress for me.
The flight controls of a glider are mechanical and quite simple; but the entire pneumatic, electric, and electronic systems are another matter. While only very little of it is needed to fly safely, it does make flying easier and more enjoyable because – when everything works – you can focus on what’s outside the cockpit and not worry about glide calculations or the accuracy of any of the instruments.
The flight itself held some new lessons, too. I experienced the transition from thermal to rotor conditions and the effect this had on the thermals in the prairie. When I noticed what went on, I adjusted appropriately to the new situation and switched to “rotor flying”.
Intent on circling as little as possible, I consciously practiced “feeling the air” as I was cruising along the rotor line. Whenever I felt some lift I would gently pull up into the rising air, and whenever I felt some sink I would try to gently push away from it with careful and limited control inputs. It’s hard to know if I did it right – that would have required another glider to my side flying straight at a constant airspeed – but my subjective feeling is that it worked quite well.
When approaching the Flatirons with questionable altitude to get above the ridge I am glad I immediately made the right call without hesitation. I always worry a little that flying on Condor might teach me to take undue risks (I actually always tell myself on Condor that I would not do XYZ in real life whenever I approach a risky transition) and I’m glad the same thought came to me in this real life situation with the very clear opposite outcome that favors safety above everything else. I’m committed to keeping it that way.