So you want to earn your soaring badges?
But you don’t know where to start? The process, rules and regulations can be a bit confusing but it is easier than you might think. In this article, I will try to make the entire process as simple as possible. I will help you:
- Understand the requirements for each of the badges;
- Examine what you should do to prepare for badge flying;
- Navigate and complete the necessary paperwork;
- Figure out how to plan specific distance tasks that are particularly suitable for the typical summer soaring conditions in Boulder; and,
- Understand what it takes to successfully complete the altitude requirements for each of the badges.
What Are Soaring Badges?
In the 1930s the FAI (Federation Aeronautique International) established levels of progressive achievement levels for soaring: the Silver Badge, Gold Badge, and Diamond Badge. (Additional, more difficult, achievement levels were later added including distance diplomas but we will concentrate on these three core badges.)
The Silver Badge requires the pilot to complete the following:
- Silver Duration: a minimum flight time of 5 hours after release
- Silver Altitude: a 1,000 m (3,281 ft) altitude gain above an in-flight low point
- Silver Distance: a straight distance flight of at least 50 km
The Gold Badge requires:
- Duration: same as for the Silver Badge (if you already have the Silver Badge you don’t have to do this again)
- Gold Altitude: a 3,000 m (9,843 ft) altitude gain above an in-flight low point
- Gold Distance: a pre-declared 300km (186.42 miles) cross-country flight with no more than three turn-points in addition to start and finish. Note: if you make this a triangle or an Out and Return (O&R) course, it also qualifies for the Diamond Goal requirement (see below).
The Diamond Badge also has 3 requirements:
- Diamond Altitude: a 5,000m (16,404 ft) altitude gain above an in-flight low point
- Diamond Goal: a pre-declared 300km cross-country flight, which has to be either a Triangle or an Out and Return (O&R) course.
- Diamond Distance: a pre-declared 500km cross-country flight with no more than three turn-points in addition to start and finish.
Note: it is possible to earn multiple requirements in one flight. At least in theory you can earn all requirements for the Diamond Badge in one single flight: you would have to fly a 500 km triangle or O&R course, spend at least five hours doing so (you’re unlikely to be much faster anyway), and also manage to get the 5,000 m altitude gain in the same flight (this is really hard because the conditions that will allow you to achieve the distance components are usually quite different from the conditions needed for the altitude gain component). If you manage to accomplish such a feat, you would not be the first person in the world to do so, but you might be the first one who does so flying from Boulder.
If you recently earned your glider certificate and are just starting out to do some longer flights, some of these requirements might sound really difficult. However, it is not as hard as you might think:
- First, consider the equipment that was available in the 1930s when the badges were established. The best gliders at the time, such as the Schleicher Rhönadler, had a glide ratio of 20:1 and were extremely light (i.e. you had to fly very slowly). GPS flight computers didn’t exist, and the weather forecasts were rudimentary at best. Our club Disci have a glide ratio of 42:1, are equipped with the latest gadgets, and you can fly more than twice as fast as the pilots of the 1930s. Badge flying has definitely gotten much easier!
- Second, Boulder is an exceptionally good location for getting your badges: the typical high cloud base means that all requirements for the Gold Badge (and possibly even for the Diamond Badge) can be achieved entirely within glide range of Boulder. All altitude requirements can be earned from Boulder as well. Diamond altitude requires the use of the wave window, while Gold altitude can be achieved on most good summer soaring days.
Preparation and Pre-Requisites
The most essential skill you will need before you can tackle any of the badges is the ability to stay up. I.e., you should be confident that you can find thermals, center them, and not lose them. It therefore makes sense that you start with the 5-hour duration requirement, which you need for any of the badges. If you can stay up for five hours locally, chances are pretty good that you will be able to stay up anywhere else as well. Make sure that you don’t just stay in the “glider box” and always use the same two or three thermals. Instead, move around over the hills while staying within safe glide range of Boulder. Another good way to practice is to stay up until the thermals die at the end of the day. It’s a huge confidence boost if you can still fly when most others are already on the ground.
Once you’re confident that you can stay up as long as the thermals allow, you should get checked out in the DG505 and the Disci. While you can certainly achieve Silver (and even Gold) Distance in the ASK 21, the better performance of the Disci will make it much easier (and safer) to fly any distance leg. (Also, remember that the club doesn’t have a trailer for EF, i.e. you must stay within glide range when you fly the ASK 21). Another advantage of flying a Discus is that you can book one for long flights even on weekends. This means it’s also a great choice for your 5-hour duration requirement, especially if you have more time to fly on weekends.
Five hours is a long time in the air. That means you need to carry water and food and you should also make sure to set up a pilot relief system. The DG505 and both Disci have the necessary plumbing that allows you to insert a relief tube. There are also solutions for women.
Before you start any kind of distance flying you should also get proficient in reading soaring weather forecasts so you won’t get surprised by thunderstorms, an approaching cold front, or ferocious westerly winds. (My personal favorite is Skysight.) You should also be familiar with the frequent convergence line that tends to set up over the foothills. Knowing how it works will not only prevent you from falling out of sky without knowing why, it can also be a huge help in covering a lot of distance very quickly.
Before you undertake any flight that might take you outside of glide distance from Boulder, you should talk with your instructor about a cross-country checkout and prepare for the possibility of off-field landings. You must also get a rigging check out so you know how to take the glider apart if you have to land in a field and call someone to get you with the trailer. For any flight that takes you further afield, and especially for flights beyond glide distance, you should also carry a land-out kit and emergency equipment.
You also need to learn to use a flight computer to set up tasks and document your flight (see below).
Documentation and Paperwork
Badges are official proof that you have successfully completed specific requirements. Therefore you must document them correctly, otherwise the SSA won’t issue your badge. Links to all official documents from the SSA start from this page. There are a lot of documents, and the first time you look at them they can seem overwhelming. Don’t let that discourage you. I will try to make this as simple as possible and leave out the intricacies, exceptions, and exceptions from exceptions… If you follow the simplistic approach that I recommend below you should be fine. Note: if you’re unsure or you just want to understand every nuance about this process in detail, please do read the official documents…
To document your flight you will need 1) a Flight Recorder to record your flight in the form of an .igc file, and 2) an Official Observer (see below) who confirms your flight. You will also need to fill out the badge application form and the badge and record worksheet and make sure these are signed by you and your Official Observer. You must then save these forms (with signatures) in .pdf format and email them along with the .igc file from the flight recorder to the following email address: badgeandrecords@ssa.org.
Flight Recorder (FR): you will need an “IGC approved” flight recorder (some lower spec FRs are also permissible for Silver and Gold Badges). Fortunately, you already have an IGC approved FR: both Disci and the DG505 are equipped with LXNAV S100 flight computers that are IGC approved and automatically record every flight. You also need to learn to program a task before your flight (for pre-declared distance tasks). The manual for the S100 can be confusing. Paul Remde from Cumulus Soaring offers a training video that you can purchase or rent, which can save you time and makes the whole thing a lot easier to understand. (In addition to the S100, I recommend you also mount a bigger moving map in the cockpit as this makes navigation easier. But it is not required.) After the flight, you just need to download the .igc file of your flight from the flight recorder to your computer so you can attach it to the email with the badge application. (Tip: make sure you use the version of the .igc file that you downloaded directly to your computer and do not use a copy that you downloaded from OLC – the version downloaded from OLC would get rejected.) When you send in your application you must also attach a copy of the flight recorder calibration data. See example below. (Note: if you use multiple flight recorders and are applying for a Diamond Goal or Diamond Distance Flight, you are supposed to submit .igc flies from ALL flight recorders used. Make sure they have the same task declaration and your name is correct in all of them.)
Official Observer (OO): the Official Observer must be an SSA member (you must provide his or her SSA Member # on the badge application). Also, to be considered qualified, the Official Observer must hold at least an SSA “B” Badge (this is a basic training level badge) or any higher level badge. Practically speaking, ask another club member at the field if they are willing to act as Official Observer and if so, if they have a badge themselves (or know that they are qualified to act as OO.)
Filling Out the Badge Application and Worksheet: the Application is only signed by the pilot but it must include the name and SSA Member# of the Official Observer. The Badge and Records Worksheet must be be signed by both the pilot and the Official Observer. Important: the date and time on the worksheet must show that the Official Observer signed the worksheet before you took off on your flight!
Submission Deadline: Badge Applications must be submitted within six months of the flight. (Note: much shorter timelines apply for record flights!)
Practical Recommendation: Make the process as easy as possible for the Official Observer by doing all the paperwork so he or she just needs to sign off. However, absolutely make sure that your Official Observer knows the details of your planned flight before your flight. It is best to have the actual version of the Badge and Records Worksheet prepared in advance. (However, sometimes you may want to change your task on the day of the flight at the field. In this case make sure that you send your OO a sheet a text or an email with the final task details before you take off. (This way you will have a time stamp from the text/email and can prove that you set declared the task before your flight. This means that he or she can sign the final version of your Badge and Record Worksheet with a good conscience with a date and time that predates your takeoff.)
Example: As an example for a badge application, here you can see my application for Diamond Distance. (I just removed personally identifiable information). You can see I combined the application, the worksheet, and the flight recorder calibration data into a single .pdf file.
Check for the Latest Version of Documents/Process: the process described above is current as of February 2020. You may want to check on the SSA website that you are using the current version of the forms and that the process has not changed since the date that I wrote this.
Good Badge Tasks
Now comes the fun part. What tasks should you fly for your badges? It took me a while to figure this out for myself when I decided that I wanted to do my badge flights. I want to give you some samples as a starting point and my reasons for why I think these are good options. However, part of the fun is to come up with your own tasks, so look at this simply as a recipe that you can adjust based on your own experience and the specific weather forecast for the day. (For defining your own tasks, you can use the GPS coordinates of any point on the map as a start-, finish-, or turn point, as long as you set it up as a turnpoint in the flight recorder.)
Silver Distance
Silver Distance requires a straight flight of 50km from the point of release. Plus, the point must also be at least 50km away from the take-off airport.
E.g., you could fly 87km to Owl Canyon and land there. But why would you want to do that when the soaring conditions are normally much better over the hills? Also, you will then need to figure out how to get a tow at Owl Canyon.
My thinking is, if you can fly 50km in one direction, you can also fly the other way and come back. So why not fly 100km in total and come back to Boulder instead of landing someplace else?
I am proposing you pick a target destination to the north. Why to the north? Well, you can’t go east because the Denver Class B airspace is in the way. You don’t want to go west because your flight would take you across the Continental Divide – not a great idea for your first badge flight. I also suggest that you don’t go south because there are only very poor options to land if anything were to go wrong. Hence, you should go north. Should you have trouble coming back, there are several landing options: Longmont airport, Lazy W (southeast of Carter Lake – not great but doable – drive there and examine it on the ground), and Christman (a private paved airstrip near Horsetooth Reservoir). However, I recommend that your goal should be to stay high enough so that you always are within safe glide range of Boulder. On a day with high cloud bases, this is definitely doable, especially with a Discus or the DG 505.
You can pick any point by looking at a map and and measure the distance from the Boulder airport – you can do this in Naviter’s SeeYou or you can just use Google Maps. Make sure your target is at least 50km away from Boulder. Once you have picked a location you should set it up as finish point in the flight computer.
However, the easiest solution is to pick a point that already exists in your flight computer. The S100 in the club ship should be pre-loaded with the B250 waypoint file, which contains over 1000 points within a 250 nautical mile radius of Boulder.
(Note: if you have the SeeYou software for your PC (Mac owners need to set up Windows under Bootcamp to run it or use the cloud version) you can preview the waypoints on your computer: to do that you can download the Boulder 250 file from the “Worldwide TurnPoint Exchange“: go to this page, which provides download links for the Boulder 250 file in many different file formats, and scroll down until you see “SeeYou”. Then click the down arrow to download the file to your computer. Double-click on the file and voila, you can see it in SeeYou.)
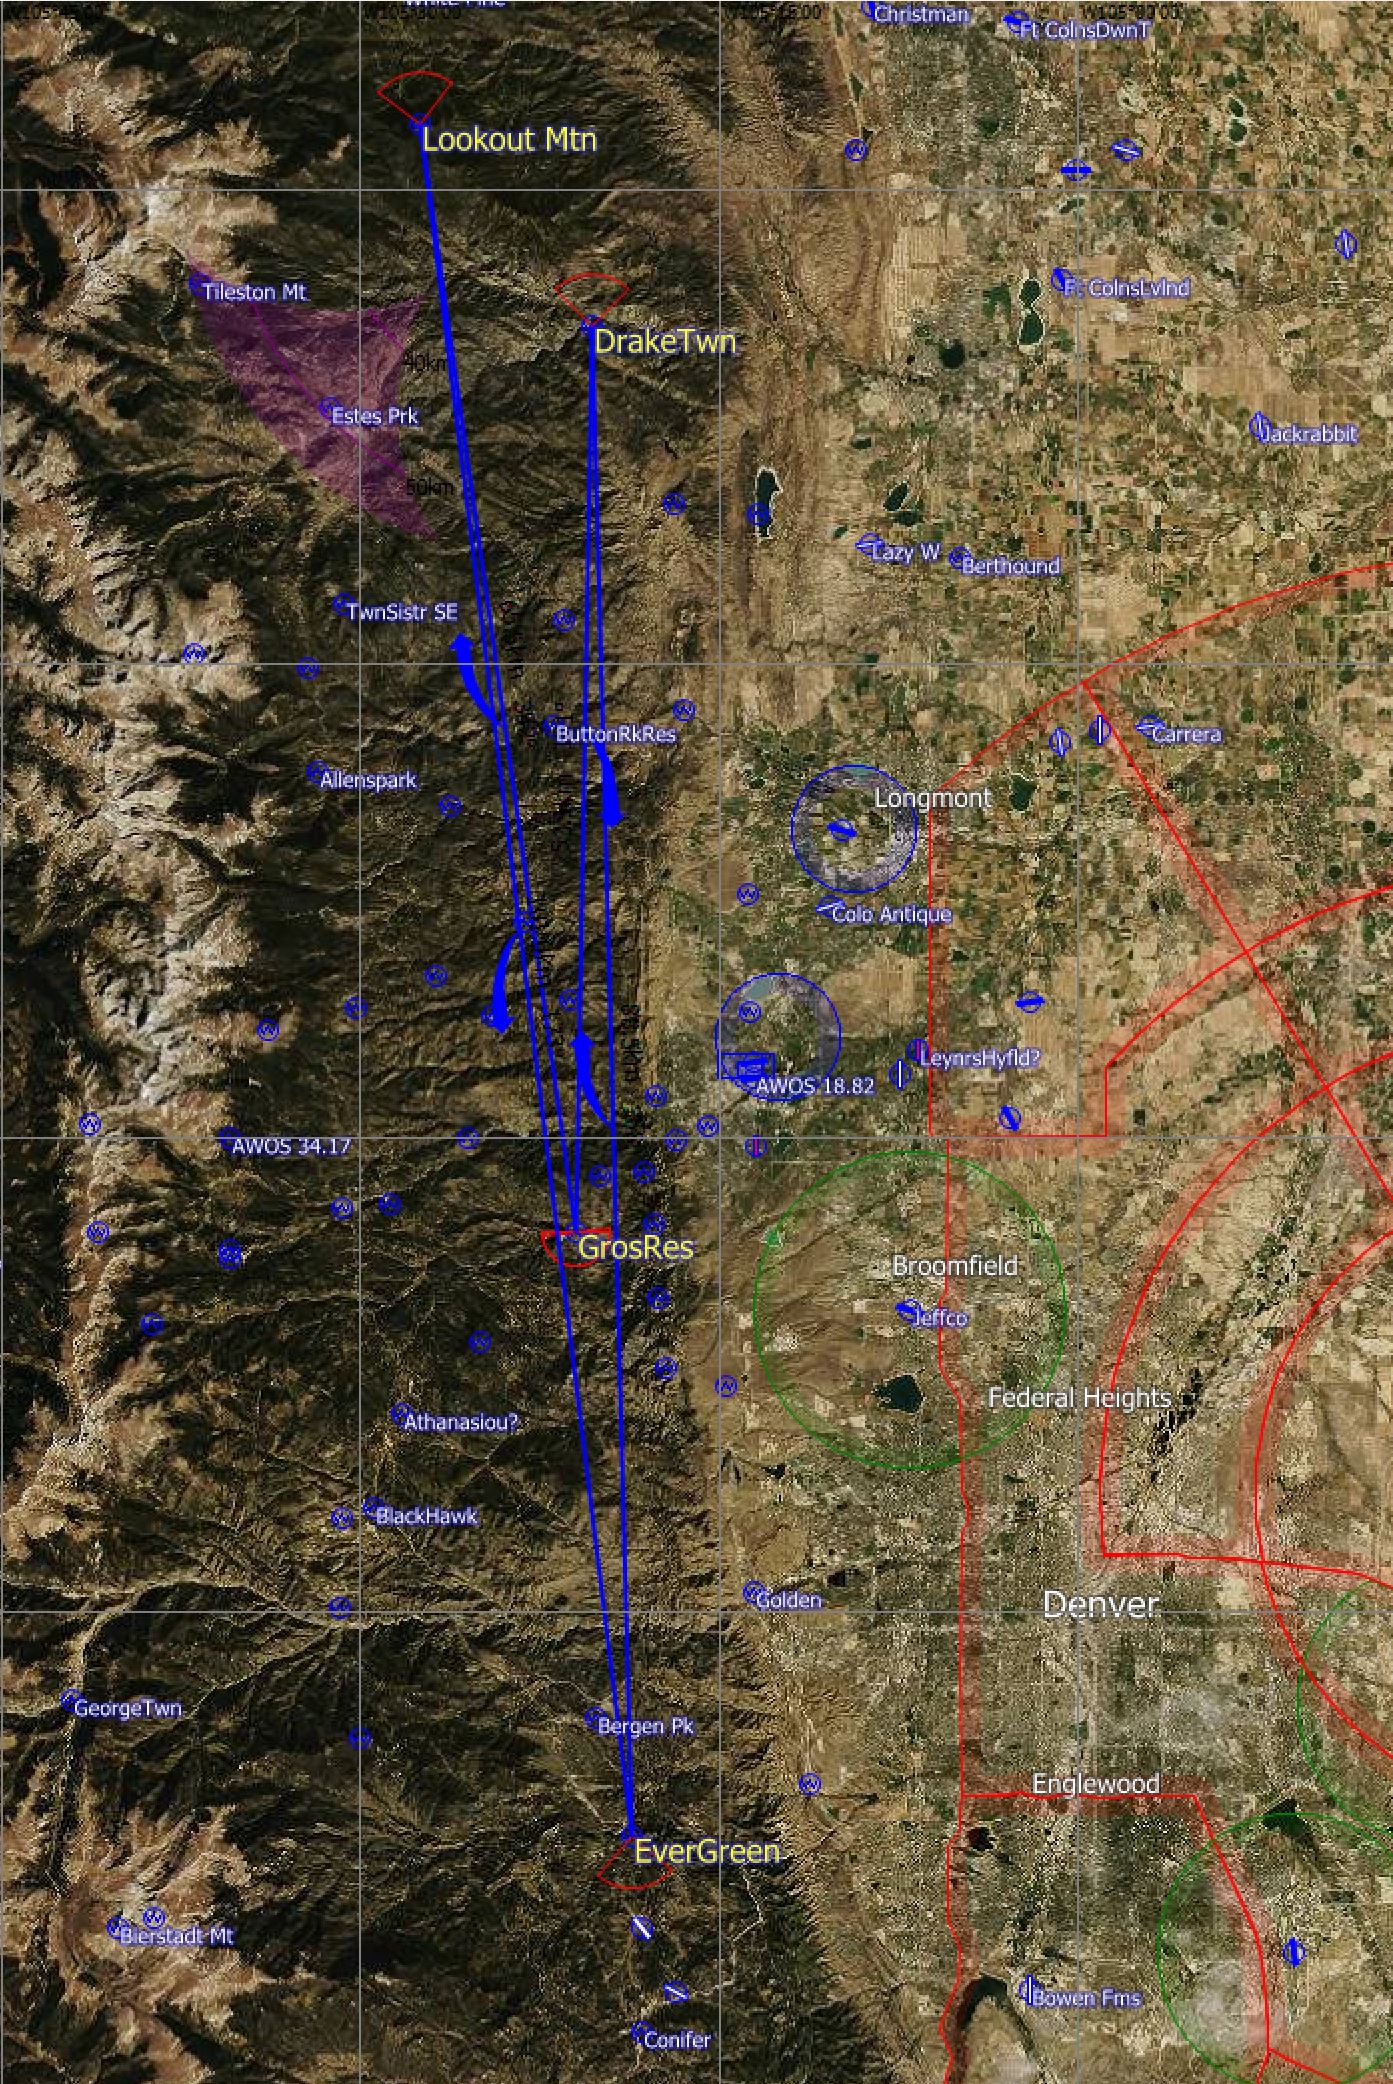
Among the pre-existing points in this database I recommend you use a point called “Lookout Mtn” as your finish point for your Silver Distance task. Lookout Mountain is located on the ridge north of Estes Park and is 58.5 km away from Boulder. It is only suitable on days with a high cloud base but that is the kind of day you want anyway for your first badge flight.
Now, you will also want to make sure that your release point is at least 50 km away from Lookout Mountain. You have to be careful there because the usual northwest tow from Boulder often takes you too far north, i.e. your release might be less than 50km away from Lookout Mountain.
The easiest way to ensure that this won’t be a problem, is to take a south tow where you release somewhere in the vicinity of the Flatirons, Gross Reservoir, Sugarloaf, or Thorodin Mountain. That will add quite some extra distance to your flight but you will be absolutely certain that it qualifies :-).
If you decide to take a north tow, be sure to check exactly where you have to release to be at least 50km away from Lookout Mountain. An easy way to do this is to use SeeYou to draw a 50km circle around Lookout Mountain. If you do this, you will see that Lee Hill, Gold Hill, and Ward are all ok: they are more than 50 km away. However, much of Nugget Ridge is too far north and even Gold Lake is still just a little too far north (the distance between Gold Lake and Lookout Mountain is 49.9 km!) Once you know where you want to release, be sure to brief the tow pilot before your flight so he can take you there.
I also recommend that you set a specific start point for your task that is also at least 50 km away. Among the points in the turnpoint database, the town of Gold Hill (labelled as “GoldHil”), the top of Lee Hill (labelled as “LeeHil”), and the town of Ward (labelled as “WardTown”) are suitable options.
Hence, this is my task recommendation:
- Start: Gold Hill (“GoldHil”)
- Finish: Lookout Mountain (“Lookout Mtn”)
- From there you return to Boulder
Official task distance from Gold Hill to Lookout Mountain: 52.4 km
Total Task Distance (including the return leg to Boulder): 110.8 km

So, in the S100 flight computer, set up a task with Start: “GoldHil”, and Finish: “Lookout Mtn”. Set the Observation Zone for the Start and Finish as a line. (Don’t use circles for start and finish (or for turn points) because this effectively shortens the distance between points and therefore your flight may end up being too short.) Also, make the Start Line and the Finish Line no longer than 1 km in total (i.e. use a “radius” of 0.5 km). (Note: the map charts used in this post show a longer start/finish line so you can better see them in these images. In your flight computer, make the line no longer than 1 km! This isn’t necessary for the Silver Badge but once you get to Diamond Goal your flight will not qualify if you don’t pick a 1km start line.) You should also enter your name as the pilot and make sure that you use correct settings for everything else such as pilot weight, ballast, bugs, etc. While this isn’t critical for getting your badge, the computer will give you wrong finish altitude and speed to fly information if you set these things wrong (remember for all electronic gadgets: garbage in – garbage out).
Note: you will also want to set a safe arrival altitude in Boulder of at least 1,500 feet AGL, and you should use a MacCready setting of no less than 4 or 5 for the computer’s final glide calculation (do not use MC=0 – zero may be the default setting, but it is very risky to set MC=0 because it requires you to always fly at best L/D speed to achieve the indicated glide distance. The higher your MC setting, the more safety margin your final glide has built-in. If you don’t understand why that is the case, read this article by John Cochrane.)
When you plan your first XC flights, it is a good idea – even with a high performance glider such as a Discus or DG505, to assume a glide ratio of no more than 20:1 when you figure out how high you want to be in order to comfortably stay within safe glide distance of Boulder. Since your turnpoint is 58.5 km away from Boulder, you will want to be quite high when you round it. How high? Do the math: to glide 60 km at a glide ratio of 20:1 you want to be 60/20 = 3 km = 3,000 m = 10,000 ft high. Add 5,288 ft on the ground + 1,500 ft arrival altitude and you get 16,800 feet. Now you know why I said pick a day with high cloud bases!
It is likely that you may not be quite as high when you round Lookout Mtn and that is ok – as long as you have a backup plan! Therefore, figure out in your flight preparations how high you need to be to safely reach Christman, Lazy W, and Longmont so you have a Plan B and a Plan C if Plan A does not work out. Having a backup plan means you won’t panic if you made it to Lookout Mtn and are “only” at 15,000 feet. If that happens you can calmly pursue Plan A knowing that Plan B is a safe backup option. (In all likelihood Plan A will work out. Firstly, because you will most likely achieve a glide ratio of much better than 20:1 (with a Discus, 27:1 works most of the time, even if you fly less than optimal). And secondly, on your way back you are very likely to find additional thermals (just as you found them on your outbound leg), and you can climb back to a more comfortable altitude. But remember, always have a Plan B in mind: the #1 rule for XC soaring is to always maintain a safe landing area in easy glide!
Here are some additional tips for this route:
- A good general rule for your first XC flights is to “get high and stay high”. The entire flight can be done within glide range of Boulder and my recommendation is that you aim to do so. It won’t take you all day to cover 110 km so you should not be in a hurry. Try to climb to 13,000 ft or more before you even head out on task. Thermal soaring conditions tend to be best around mid afternoon and this often is a good time to fly the task.
- Avoid getting low over Estes Park. Look at a map and note that Estes Park lies in a bowl with high ground to cross to the east. Try to stay somewhat east of Estes Park or make sure that you are really high when you cross. If you get below 14,000 ft to the west of Estes Park it can get scary.
- Make sure you really understand the weather conditions. Pick a day with high cloud bases, good lift, no thunderstorms, and not a lot of wind. If a cold front is in the forecast make sure that you make it back well before the front arrives.
- Pay close attention to the wind at different altitudes and understand how it interacts with the terrain. Remember that strong (westerly) winds will cause rotor turbulence and strong sink in the lee of mountains. Be particularly careful in the lee of Longs Peak where the rotors can be downright violent. You may also encounter some rotor turbulence near Lookout Mountain. Also remember that your glide performance will suffer whenever you have to push into a headwind.
- There are some nice thermal hotspots along your route. E.g., there is often good lift above the hills surrounding Button Rock Reservoir, north of Pine Wood Springs, and above Drake Mountain. Try to get as high as (legally) possible before you glide toward Lookout Mountain. Strong lift and strong sink are fairly common along the ridge north of Estes Park. Be prepared and make sure you fly appropriately fast when you hit sink.
- If you hit a lot of sink and drop below 15,000 ft a few miles before you reach Lookout Mountain, it may be best to turn around immediately, find another climb, and make another attempt, possibly via a different approach route, trying to avoid flying through the same sink again. You’re not in a hurry and you want to be safe!
- Days with a strong convergence line can be boon or a bane. “Our” convergence line sets up when there are westerly winds aloft and easterly winds from the prairie (i.e., very often). These winds meet, i.e. “converge” somewhere over the foothills, more or less parallel to the Continental Divide. Conditions are often very challenging on the east side of the convergence (poor climb rates, thermals top out close to the ground), and excellent on the west side (strong climbs to high altitudes). On some days it is possible to fly along the line on its west side and climb in straight flight. The line could be as far east as Boulder, or it could be as far west as the Continental Divide itself. If you are very lucky, the line might just align with your task and you might be able to complete the entire flight with minimal circling. The further east the line is, the easier it is to get to. On some days it can be very challenging to reach the line safely. Those are not good days for a first badge flight… If there are clouds, the line is often characterized by a step in the cloud base with lower cloud bases on the east side and much higher cloud bases on the west side. Skysight has a forecast specifically for convergence (the location of which can be a few miles off – convergence is very difficult to forecast correctly) and you can also see it in other forecasts by looking at vertical velocity. The sooner you learn about the convergence line along the Front Range, the better all your XC flying will be.
After you have completed this task you will invariably notice that you did not only achieve Silver Distance but also Silver Altitude (a 3,281 ft climb from an in-flight low point)! Make sure you also tick the box for that specific claim when you file your application! (And if you were able to release early and climb out from a pattern tow, you might even have accomplished Gold Altitude on your flight! Remember that Gold Altitude requires a 9,843 ft climb from release. I.e., if you release at 7,500 ft and manage to climb to 17,500 ft you have not only completed Silver Altitude but Gold as well!)
Gold Distance
Gold Distance requires a 300 km flight from a start point to a finish point with no more than 3 turn points in-between. There are obviously a lot of options to design your own route and to tailor it to the weather forecast.
If you want to make it as safe and simple as possible, here is a recommendation that you can work from as you do your own planning.
Note: all the recommendations and tips that I mentioned for the recommended Silver Distance task are applicable here as well. I suggest you read them first!
Here’s my suggested task:
- Start: Gross Reservoir Dam (“GrosRes”) – set the “observation zone” in the S100 as a 1 km “line” (0.5 km “radius”) (never use a circle!)
- TP1: Lookout Mountain (“Lookout Mtn”) – set the “observation zone” in the S100 as a 45 degree sector (do this for all turnpoints)
- TP2: Evergreen (“EverGreen”)
- TP3: Drake (“DrakeTwn”)
- Finish: Gross Reservoir Dam (“GrosRes”) – set the observation zone in the S100 as a 1 km “line” (0.5 km “radius”) (never use a circle!)
Total task distance: 308.2 km
Here are the benefits of this particular task:
- You will remain on the east side of the Continental Divide.
- The entire task can be flown without ever leaving a safe glide distance to Boulder.
- The task takes advantage of the direction of the frequent energy lines running parallel to the Continental Divide.
- If you have done the suggested Silver Distance task, you’re already familiar with Lookout Mountain as a TP. Lookout Mountain will be the furthest you will be away from Boulder.
- The start point, Gross Reservoir Dam, is deliberately chosen to be south of Boulder. This means that the first part of your first leg will be within easy glide of Boulder even if you are still relatively low. I.e., you can cross the start line and get going on task without having to climb up high before you start.
- Because you can cross the start line relatively low (let’s say at around 11,000-12,000 feet MSL), you are less at risk of exceeding the 1,000 m “Loss of Height Limit”: according to the rules, your finish altitude must not be more than 1,000 m (3,281 ft) below your start altitude, otherwise you will get a significant amount of distance deducted from your flight!
- Evergreen, the only turnpoint south of Boulder can easily be kept within glide range. This is important, because there are no good landing options between Boulder and Evergreen.
- The task finishes back at Gross Reservoir. There’s something satisfying about flying a “Closed Task” but there is also another benefit: finishing at Gross Reservoir will force you to finish relatively high, which once again assures that you won’t accidentally violate the “Loss of Height Limit”. (E.g., instead of Gross Reservoir, you could set your Finish Point at Colorado University. Your flight distance would still be 302.5km. However, if you started at Gross Reservoir at 12,000 feet and finished over the university at 8,000 feet, you would be 719 feet below the 1,000 m Loss of Height Limit. You would get a penalty of 100 times 719 ft! That means 100 x 719 = 71,900 ft = 21.9 km would be deducted from your flight distance and you would miss Gold Distance by a wide margin! Therefore: be careful to never violate the Loss of Height Limit!)
Here are some additional tips for this task:
- To start at Gross Reservoir, it might be best to take a south tow. Be careful not to get low behind the Flatirons where there are no good places to land! Always stay high enough that you can easily glide out.
- Note that the actual point for “GrosRes” in the turn point file is actually not directly over the dam but 1/3 of a mile further east. (This surprised me the first time I used “GrosRes” but there is a good reason for it: the location of the turnpoint is within the 15 km start ring for OLC speed league flights – the reservoir itself would be too far away from Boulder to qualify as an OLC start point. For your badge flight this does not need to concern you – what matters is that you cross the start line as it is set in the flight recorder, not that you are actually above the dam.)
- If there is a strong convergence line, both Ever Green and Drake could be located a few miles too far to the east. Look at the weather forecast. You may be better off to define your own turn points in the flight computer and put them such that they better align with the convergence. (If there are clouds with a step-up cloud base, you may otherwise be forced to descend just to make the turn point. Plus you would have to fly into worse air while you are farthest away from Boulder. You obviously want to avoid that.)
- If you fly past Thorodin Mountain towards Idaho Springs (further west than the route I suggested) be mindful of the terrain. Similar to the bowl at Estes Park, the area south west of Thorodin Mountain can also become an unlandable trap if you get low.
- If there are strong westerly winds, the lee of Mount Evans can be a scary place with violent rotors and heavy sink (just like the lee of Longs Peak).
- Figure out the minimum altitude you want to have for rounding Evergreen to stay within glide range, considering that there are no good landing options south of Boulder. Evergreen is 46 km (29 miles) away from KBDU.
Note: the task that I suggested is good for Gold Distance but it does not qualify for Diamond Goal. Diamond Goal is also a 300 km flight but it has more stringent requirements. Every Diamond Goal flight automatically qualifies for Gold Distance as well, but not every Gold Distance Flight will qualify for Diamond Goal! – see right below.
Diamond Goal
Diamond Goal is similar to Gold Distance in that it requires a pre-declared 300 km flight. However, to qualify for Diamond Goal, the flight can only be a straight distance flight, an Out and Return, or a Triangle. These requirements make the task more challenging because they force you to get significantly further away from Boulder. You might still be able to (just) remain within glide distance to Boulder but do not count on it. Most likely you will get out of glide range at some point and you must therefore carefully plan your land-out options, and always maintain a safe escape route if you hit unexpected sink.
Note: all the tips and recommendation provided for Silver Distance and Gold Distance remain valid here as well. Please read those also.
If you want to tackle Diamond Goal, you should already be very comfortable doing your own task planning. However, I will once again suggest a task to get you thinking. It is the same one that I personally used for my own Diamond Goal flight.
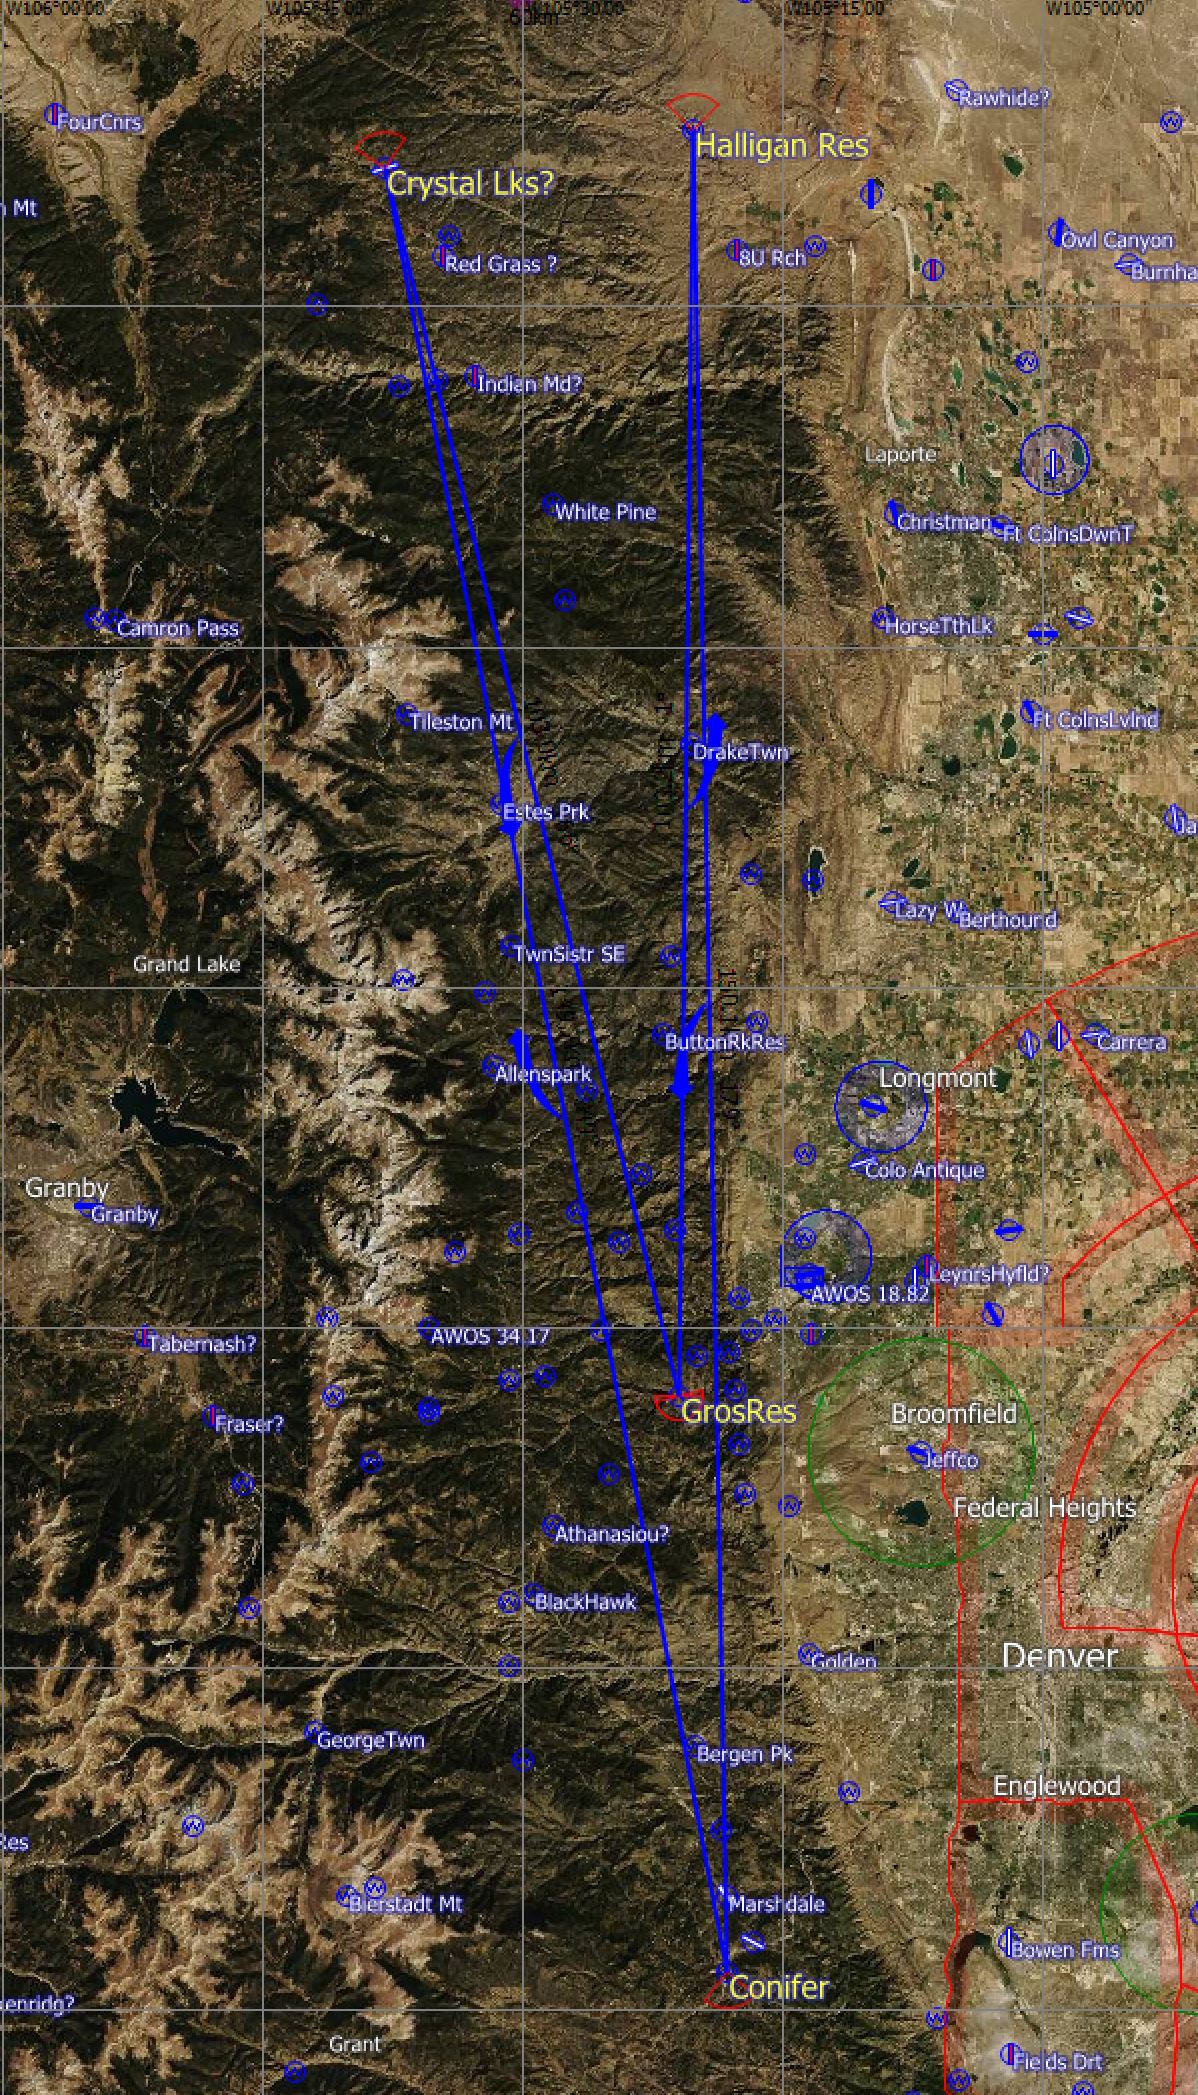
- Start: Gross Reservoir Dam (“GrosRes”)
- TP1: Halligan Reservoir (“Halligan Res”)
- TP2: Town of Conifer (“Conifer”)
- Finish: Gross Reservoir Dam (“GrosRes”)
Total Task Distance: 302.1 km

The task takes advantage of the rule that the course can be a triangle, even if it is really a flight up and down the Continental Divide. The rules do not specify a specific shape for the triangle, e.g., it does not have to qualify as an “FAI triangle.” Any triangle works.
The rationale for my suggestion is similar to the rationale for the tasks that I recommended for Silver and Gold Distance:
- The entire flight is on the east side of the Continental Divide.
- The route is aligned with typical energy lines that run parallel to the Divide.
- The longer leg is to the north because of the better landing options.
- The northern turn point, Halligan Reservoir, is 94 km (58 miles) away from Boulder. You may not be able to always stay within glide range to Boulder and it is therefore essential to also consider other landing options along the route. (Note: with some luck Boulder might still be reachable from Halligan Reservoir with a Discus in straight glide when flying near best L/D, but never count on luck!). Acceptable landing options along the way are Longmont, Lazy W, Ft. Collins/Loveland, and Christman. I also had scouted some additional fields along the way just to be safe (see under tips below).
- The southern turn point, Conifer, is 58 km away from Boulder. This is no further away from Boulder than Lookout Mountain (which I recommended above for Silver and Gold Distance) – i.e., on good days with high cloud bases it is possible to stay high enough to comfortably remain within safe glide distance to Boulder. This was important to me due to the lack of good landing options south of Boulder.
Here are some additional tips for this task:
- Ensure that the task is aligned with the projected energy lines. Halligan and Conifer may be too far east if the convergence line runs further west. If that is the case, you’re better off to define your own turn points that better align with the forecast.
- If you have to move the route further west, be mindful that you also get further away from landable areas. This means you will need to maintain more altitude to ensure a safe glide out to the east. Notice how wide the foothills get north of Fort Collins – depending on where you fly the airports to the east can be far away! Stay high!
- If you fly an even more westerly route, be particularly mindful not to get trapped between the Mummy Mountains and the Never Summer Mountains. If you fly in this area you must stay above 15,000 ft at all times to be able to reach a landable airport (and even 15,000 can be scary low!). Depending on where you are the airports at Walden and Granby may become your best options.
- If you use the Boulder 250 Waypoint file from the Worldwide Turnpoint Exchange (this file will be pre-loaded on the S100), note that it contains a few airstrips and landout fields over the hills in the Poudre area that I personally do not consider landable. (E.g.: the airstrip “Crystal Lks” is very narrow – probably ok for a bush plane but not for a Discus with long and low wings; “Red Grass” and “Indian MD” are at best emergency fields – you will damage the plane if you land there; “8U Rch” is also not an airstrip, however, the surrounding hay fields may be landable depending on vegetation.) My advice: do not rely on any of these fields! It is always best to personally visit fields on the ground and determine for yourself that you have the necessary skills to safely land your particular glider there. I have personally visited a number of fields on the ground along the Front Range and I would encourage everyone to do the same. You can find more information about this here.
- When you look at the weather forecast, specifically examine the area north of Route 14 (north-west of Fort Collins) when you look at the forecast winds. The wind speed tends to increase as you get closer towards Laramie. Strong winds can mess up the thermals.
- For Diamond Goal it is absolutely essential that your start and finish is at the same location and that you declare a start line and a finish line (not a circle, sector, or anything else) and that the line is set up with a “radius” of 0.5 km such that it is no longer than 1 km. Otherwise your flight will not count for Diamond Goal!
Diamond Distance
The requirements for Diamond Distance are basically the same as for Gold Distance, except that you now need to fly 500 km instead of 300 km. If you want, you can continue to stay on the east side of the Continental Divide and fly up and down the Front Range, taking advantage of the usual energy lines. And if you fly a club Discus or the DG505 you still don’t have to go much beyond the glide range of Boulder.
Here’s an example of an “easy” Diamond Distance task:
- Start: Gross Reservoir Dam (“GrosRes”)
- TP1: Halligan Reservoir (“Halligan Res”)
- TP2: Town of Conifer (“Conifer”)
- TP3: Crystal Lakes (“Crystal Lks?”)
- Finish: Gross Reservoir Dam (“GrosRes”)
Total Task Distance: 505.9 km
By now you’re already very familiar with this area, making this task quite doable:
- The northern turn points can easily be kept within glide of airports along the base of the foothills.
- The southern turn point can be kept within glide range of Boulder.
- You have already learned on your prior flights how to read the soaring weather along the Front Range, and, especially, how to follow the typical energy lines.
The only thing that’s really different about this flight is its length. 500 km is a longer distance and if you fly an unballasted Discus, it might take you anywhere from 5-7 hours. This means that:
- You have to get good at forecasting the evolution of the soaring weather over an entire soaring day. You need to have good conditions that last for much longer.
- You may have to start your flight before the soaring conditions are optimal, so your first leg may be slower and the cloud bases may be lower.
- You have to pay more attention to flying at the optimal speeds so you won’t run out of time on your second trip north. Your chances of having to land out go up considerably if it gets late in the day.
These differences are subtle but they are real. I have made five failed attempts before I was able to complete my Diamond Distance flight. I have had many free distance flights (where I just followed cloud streets and other obvious energy lines) that were considerably longer than 500 km. These free flights are much easier because you don’t have to round particular turn points. (There’s a reason they don’t count for badges.)
My five failed attempts were due to one of these reasons: a) the soaring day was about to end before I could reach the last turnpoint; b) I misjudged the forecast conditions for a particular turnpoint, i.e. the turnpoint ended up in an area that made if difficult to reach; or c) poor weather moved in (e.g. O/D, thunderstorms, etc.) and I felt that the completion of the flight was no longer safe.
I would also say that by the time I felt ready to go for Diamond Distance I was no longer interested in just flying up and down the Front Range, and I picked more interesting (and more challenging) tasks instead. Planning one of these flights is definitely part of the fun. Be mindful, however, that every new area you fly in poses additional challenges and requires more effort in terms of flight preparation. Here is the write-up of my own Diamond distance flight for additional inspiration. As I mentioned, I had a few failed attempts before so don’t give up if at first you don’t succeed. Here’s an example of a failed attempt.
Altitude Requirements
Remember that each of the Badges (Silver, Gold, and Diamond) has an altitude component that you have to complete as well. (This could be during one of your distance flights or as a separate flight.) At many soaring locations, even Silver Altitude (a 1,000 m = 3,281 ft altitude gain after release) can be a real challenge. In Boulder, not so much! In fact, it is a rare summer soaring day in Boulder when you will not climb at least as high. On most soaring days it just happens and you don’t even think about it.
Gold Altitude (a 3,000 m = 9,843 ft altitude gain after release) takes a bit more planning but it is doable on probably at least 50-100 days of the year without having to open the wave window. Because you can legally only fly up to 17,999 feet (unless you are cleared by ATC to fly in the wave window), you have to make sure to get off tow below 8,000 feet (I would recommend you release below 7,500 ft to you give yourself a bit of room and don’t accidentally miss your goal by a few feet). There are many days when it is possible to climb out from a pattern tow – you might even be able to release around 6,500 ft, which means you don’t have to climb quite as high. In the summer it is usually best to wait until 2-3 pm before you take off because by then the thermals tend to work much better in the plains. Also, the thermal tops and cloud bases will have risen higher than earlier in the day. In any event, examine the weather forecast and make sure you pick a day when climbs close to 18,000 feet are possible. Another alternative is to earn Gold Altitude in wave conditions. There are many wave days when you can release in rotor lift at 6,500 – 7,000 feet and climb up into wave. Wave season tends to be approx. from mid October to mid-April. Make sure you talk to an instructor about wave flying and know what you’re doing! On some days the wave is gentle, on others the rotors can be violent and dangerous. Lift and sink rates of 20-30 kts are not uncommon!
Diamond Altitude (a 5,000 m = 16,404 ft climb after release) is a lot more involved because you have to climb well above 18,000 feet and therefore you have do it in the wave window. The Arapaho Soaring Area wave window is currently in the process of being re-defined and it is probably best to wait for that process to complete (hopefully soon). Another obstacle is that none of SSB’s club gliders are currently equipped and approved for flights in the wave window. Mile High Gliding has some gliders that may be suitable but you have to check if one of them has already been outfitted with the appropriate equipment (pressure oxygen system and transponder). While you and I wait for these issues to get resolved (I still have to complete my Altitude Diamond myself), it is a good idea to learn everything you can about high altitude wave flying. In particular, you should also attend a hypoxia training program and simulation so you learn to recognize your individual hypoxia symptoms.
Some Final Tips
Whatever your objective, make sure that you wait for soaring conditions that support your task. Especially, do not take any chances in potentially hazardous conditions and always keep a suitable airport or land-able field in safe glide range! Safety must always come first!
Avoid the following mistakes that could make your attempt invalid:
- Make sure you have an Official Observer who is qualified (they must have a B-badge or any higher-level badge). The rules also require your Official Observer to be present.
- You can fly a two-place ship but only you can be on board (no other pilots, no passengers!)
- Use a valid flight recorder that is approved for your task. (The LXNav S100 is approved for all types of badges and records.) Your FR should also have a current calibration (i.e. the last calibration must not be older than five years; or you can have the FT re-calibrated within 2 months after your flight). Gold and Silver Badges do not require a current calibration. If you’re in doubt, check here.
- If you use multiple Flight Recorders, make sure to declare the same task in each FR! The SSA may require you to submit traces from all flight recorders used and your attempt will be invalid if your FRs don’t agree with one another. Also, make sure that the pilot’s name is set and correct in each one of them!
- Always declare tasks in your FR(s). (Paper declarations are permissible for some types of tasks but why make things complicated. Always declare the tasks in your FR(s) and you’ll be fine.)
- If you want to use the same turn point twice during your task, it must also be in the declaration two times.
- Do not violate any airspace regulations (obviously!)
- Be careful to stay within permissible Loss of Height Limits (1000 m between start and finish max 1% for Silver Distance, i.e. 500 m)
- Set the Observation Zones correctly! Use a start line and a finish line with a length of 1 kilometer and 45 degree sectors for all turn points.
- You must fly across the start line and the finish line in the correct direction! I.e., if you fly around the line on its side and then backtrack to cross it from the backside, this does not count as a valid crossing!
- Do not use more turn points than allowed for your specific task.
- Make sure the time and date on the Badge and Record Worksheet shows that it was signed before your flight!
I hope this article has been helpful and encourages you to work on your badge flights. We are lucky that we have outstanding soaring conditions in Boulder and excellent club equipment making all of this very doable. You won’t find many places in the world where you can get your soaring badges without really ever having to leave the glide range to your home airport.
Maybe 2020 is the season when you start to see your name pop up in the badge achievement columns of Soaring Magazine and on the SSA Website!
- Good luck and let me know how it goes!